Fast, reproducible, and portable software development environments
Copyright (C) 2021 Bernd Doser, [email protected]
All rights reserved.
BrainTwister docker-devel-env is free software made available under the MIT License. For details see the license file.
- Fast build and execution compared to virtual machines
- Portability: Same environment on different machines, platforms, and operating systems
- Reproducible behaviors
- Economical consumption of resources
- Identical environment for development IDE and continuous integration
- Easy provisioning of images
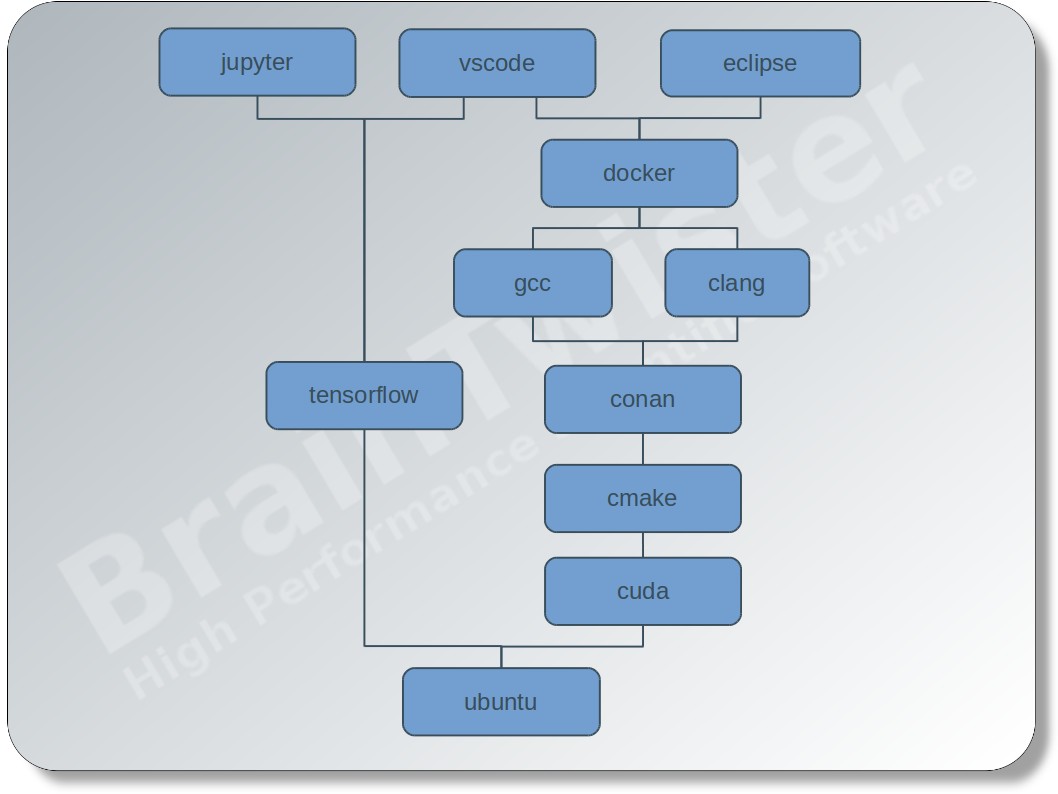
Each directory correspond to an environment module. They can stick together as a chain:
module1 - module2 - module3 - ...
The image module1-module2-module3 is using the image module1-module2 as
base, which will be set using the build-time variable BASE_IMAGE. For
example the image ubuntu-20.04-clang-12 will be build with
cd clang-12
docker build -t braintwister/ubuntu-20.04-clang-12 --build-arg BASE_IMAGE=braintwister/ubuntu-20.04 .
Please find a list of available images at images.yml. The images in the list will be build automatically with Jenkins and pushed to DockerHub.
The docker images can be pulled with
docker pull braintwister/<image-name>A ready-for-action eclipse IDE with
- clang
- CMake
- conan.io
installed can be started by
docker run -d -v /tmp/.X11-unix:/tmp/.X11-unix:ro -e DISPLAY --privileged \
  braintwister/ubuntu-20.04-clang-12-eclipse-cpp-2021.09
or using docker-compose by
version: "3"
services:

  eclipse:
    image: braintwister/ubuntu-20.04-clang-12-eclipse-cpp-2021.09
    volumes:
      - /tmp/.X11-unix:/tmp/.X11-unix:ro
    environment:
      - DISPLAY
    privileged: true
The mount of the X11 socket file (/tmp/.X11-unix) and the definition of the
environment variable DISPLAY induce the application within the container to
send the rendering instructions to the host X server. To allow the container to
use the host display, the command xhost +local: must be executed on the host
before starting the container. The privileged mode is needed for debugging with
gdb.
First of all nvidia-docker version 2
must be installed and the runtime attribute must be set to nvidia, that the
container get access to the host GPU card. The nvidia runtime attribute is
currently only available at docker-compose version 2.3.
For CUDA development the NVIDIA IDE nsight is highly recommended, because it provides special support for code editing, debugging, and profiling. The version of nsight is not adjustable, as it depends to the version of the cuda module.
version: "2.3"
services:

  eclipse:
    image: braintwister/cuda-devel-11.4.2-clang-12-nsight
    runtime: nvidia
    volumes:
      - /tmp/.X11-unix:/tmp/.X11-unix:ro
    environment:
      - DISPLAY
privileged: trueFor embedded programming you have to bind the host serial port (here: /dev/ttyACM0) to get a connection to the embedded platform (Arduino, ESP32, ...).
version: "3"
services:

  eclipse:
    image: braintwister/ubuntu-20.04-clang-12-eclipse-cpp-2021.09
    volumes:
      - /tmp/.X11-unix:/tmp/.X11-unix:ro
      - /dev/ttyACM0:/dev/ttyACM0
    environment:
      - DISPLAY
privileged: trueThe Visual Studio Code IDE can be started by using
docker run -d -v /tmp/.X11-unix:/tmp/.X11-unix:ro -e DISPLAY --privileged \
braintwister/ubuntu-20.04-clang-12-vscode-1.62.3The data in the container can be made persistent by using a docker
volume home for the home directory
/home/user.
version: "3"
services:

  eclipse:
    image: braintwister/ubuntu-20.04-clang-12-eclipse-cpp-2021.09
    volumes:
      - /tmp/.X11-unix:/tmp/.X11-unix:ro
      - home:/home/user
    environment:
      - DISPLAY
    privileged: true

volumes:
home:The docker development environment can be directly stored within the source
code repository and is able to bind the working directory of the source code
into the development container. Therefore, the user in the container must be
the owner of the source code working directory on the host. The user in the
container can be set with the environment variables USER_ID, GROUP_ID,
USER_NAME, and GROUP_NAME. In the following example the docker-compose file
is stored in the root directory of a git repository. Starting docker-compose up -d in the root directory the current directory . will be bound to
/home/${USER_NAME}/git/${PROJECT}. It is recommended to set the variables in
an extra file .env, which is not controlled by the source control management,
so that the docker-compose file must not be changed.
version: "3"
services:

  vscode:
    image: braintwister/ubuntu-20.04-clang-12-vscode-1.62.3
    volumes:
      - /tmp/.X11-unix:/tmp/.X11-unix:ro
      - home:/home/${USER_NAME}
      - .:/home/${USER_NAME}/git/${PROJECT}
    environment:
      - DISPLAY
      - USER_ID=${USER_ID}
      - GROUP_ID=${GROUP_ID}
      - USER_NAME=${USER_NAME}
      - GROUP_NAME=${GROUP_NAME}
    privileged: true

volumes:
  home:
The .env-file can be generated by
cat << EOT > .env
PROJECT=`basename "$PWD"`
USER_ID=`id -u $USER`
GROUP_ID=`id -g $USER`
USER_NAME=`id -un $USER`
GROUP_NAME=`id -gn $USER`
EOTA declarative Jenkinsfile can look like
pipeline {

  agent {
    docker {
      image 'braintwister/ubuntu-20.04-clang-12'
    }
  }

  stages {
    stage('Conan') {
      steps {
        sh 'conan install .'
      }
    }
    stage('CMake') {
      steps {
        sh 'cmake .'
      }
    }
    stage('Build') {
      steps {
        sh 'make all'
      }
    }
    stage('Test') {
      steps {
        sh 'make test'
      }
    }
  }
}For machine learning development we provide with an installation of the open-source framework TensorFlow using the latest cuda development drivers.
Although the usage of GPUs is highly recommended
braintwister/cuda-devel-11.4.2-tensorflow-gpu-2.0, a CPU version is
also available braintwister/ubuntu-20.04-tensorflow-2.0.
Start a plain container with
docker run -it --runtime=nvidia braintwister/cuda-devel-11.4.2-tensorflow-gpu-2.0TensorBoard
is available at localhost:6006, if -p 6006:6006 was added to the docker run command and tensorboard was launched within the container.
To allow the container to use the host display, the command xhost +local:
must be executed on the host before starting the container.
docker run -d --runtime=nvidia -e DISPLAY \
braintwister/cuda-devel-11.4.2-tensorflow-gpu-2.0-vscode-1.62.3Start the container with
docker run --runtime=nvidia -p 8888:8888 \
  braintwister/cuda-devel-11.4.2-tensorflow-gpu-2.0-jupyter-1.0
and open localhost:8888 on your host browser.
