A local applet is one that is stored on your own computer system. When your Web page must find a local applet, it doesn't need to retrieve information from the Internet-in fact, your browser doesn't even need to be connected to the Internet at that time. As you can see in Listing 3.1, a local applet is specified by a path name and a file name.
Example:
<applet

    codebase="myjava/tictactoe"

    code="TicTacToe.class"

    width=120

    height=120>

</applet>
Remote Applets
A remote applet is one that is located on another computer system (Figure 3.2). This computer system may be located in the building next door or it may be on the other side of the world-it makes no difference to your Java-compatible browser. No matter where the remote applet is located, it's downloaded onto your computer via the Internet. Your browser must, of course, be connected to the Internet at the time it needs to display the remote applet.
To reference a remote applet in your Web page, you must know the applet's URL (where it's located on the Web) and any attributes and parameters that you need to supply in order to display the applet correctly. If you didn't write the applet, you'll need to find the document that describes the applet's attributes and parameters. This document is usually written by the applet's author. Listing 3.2 shows how to compose an HTML <applet> tag that accesses a remote applet.
<applet

    codebase="http://www.myconnect.com/applets/"

    code="TicTacToe.class"

    width=120

    height=120>

</applet>java.awt.Canvas class Canvas control represents a rectangular area where application can draw something or can receive inputs created by user.
public class Canvas
   extends Component
implements AccessibleCanvas()
Canvas(GraphicsConfiguration config)
- AccessibleContext getAccessibleContext()
- void paint(Graphics g)
- void update(Graphics g)
- getBufferStrategy()
- createBufferStrategy()
import java.awt.*;
public class CanvasExample
{
  public CanvasExample()
  {
    Frame f= new Frame("Canvas Example");
    f.add(new MyCanvas());
    f.setLayout(null);
    f.setSize(400, 400);
    f.setVisible(true);
  }
  public static void main(String args[])
  {
    new CanvasExample();
  }
}
class MyCanvas extends Canvas
{
  public MyCanvas() {
    setBackground (Color.GRAY);
    setSize(300, 200);
  }
  public void paint(Graphics g)
  {
    g.setColor(Color.red);
    g.fillOval(75, 75, 150, 75);
  }
}The LayoutManagers are used to arrange components in a particular manner. LayoutManager is an interface that is implemented by all the classes of layout managers. There are following classes that represents the layout managers:
- java.awt.BorderLayout
- java.awt.FlowLayout
- java.awt.GridLayout
- java.awt.CardLayout
The BorderLayout is used to arrange the components in five regions: north, south, east, west and center. Each region (area) may contain one component only. It is the default layout of frame or window. The BorderLayout provides five constants for each region:
- public static final int NORTH
- public static final int SOUTH
- public static final int EAST
- public static final int WEST
- public static final int CENTER
import java.awt.*;
import javax.swing.*;

public class Border {
JFrame f;
Border(){
    f=new JFrame();

    JButton b1=new JButton("NORTH");;
    JButton b2=new JButton("SOUTH");;
    JButton b3=new JButton("EAST");;
    JButton b4=new JButton("WEST");;
    JButton b5=new JButton("CENTER");;

    f.add(b1,BorderLayout.NORTH);
    f.add(b2,BorderLayout.SOUTH);
    f.add(b3,BorderLayout.EAST);
    f.add(b4,BorderLayout.WEST);
    f.add(b5,BorderLayout.CENTER);

    f.setSize(300,300);
    f.setVisible(true);
}
public static void main(String[] args) {
    new Border();
}
} The GridLayout is used to arrange the components in rectangular grid. One component is displayed in each rectangle.
- GridLayout(): creates a grid layout with one column per component in a row.
- GridLayout(int rows, int columns): creates a grid layout with the given rows and columns but no gaps between the components.
- GridLayout(int rows, int columns, int hgap, int vgap): creates a grid layout with the given rows and columns alongwith given horizontal and vertical gaps.
import java.awt.*;
import javax.swing.*;

public class MyGridLayout{
JFrame f;
MyGridLayout(){
    f=new JFrame();
    JButton b1=new JButton("1");
    JButton b2=new JButton("2");
    JButton b3=new JButton("3");
    JButton b4=new JButton("4");
    JButton b5=new JButton("5");
    JButton b6=new JButton("6");
    JButton b7=new JButton("7");
    JButton b8=new JButton("8");
    JButton b9=new JButton("9");

    f.add(b1);f.add(b2);f.add(b3);f.add(b4);f.add(b5);
    f.add(b6);f.add(b7);f.add(b8);f.add(b9);

    f.setLayout(new GridLayout(3,3));
    //setting grid layout of 3 rows and 3 columns

    f.setSize(300,300);
    f.setVisible(true);
}
public static void main(String[] args) {
    new MyGridLayout();
}
} The FlowLayout is used to arrange the components in a line, one after another (in a flow). It is the default layout of applet or panel.
- public static final int LEFT
- public static final int RIGHT
- public static final int CENTER
- public static final int LEADING
- public static final int TRAILING
- FlowLayout(): creates a flow layout with centered alignment and a default 5 unit horizontal and vertical gap.
- FlowLayout(int align): creates a flow layout with the given alignment and a default 5 unit horizontal and vertical gap.
- FlowLayout(int align, int hgap, int vgap): creates a flow layout with the given alignment and the given horizontal and vertical gap.
import java.awt.*;
import javax.swing.*;

public class MyFlowLayout{
JFrame f;
MyFlowLayout(){
    f=new JFrame();

    JButton b1=new JButton("1");
    JButton b2=new JButton("2");
    JButton b3=new JButton("3");
    JButton b4=new JButton("4");
    JButton b5=new JButton("5");

    f.add(b1);f.add(b2);f.add(b3);f.add(b4);f.add(b5);

    f.setLayout(new FlowLayout(FlowLayout.RIGHT));
    //setting flow layout of right alignment

    f.setSize(300,300);
    f.setVisible(true);
}
public static void main(String[] args) {
    new MyFlowLayout();
}
}The CardLayout class manages the components in such a manner that only one component is visible at a time. It treats each component as a card that is why it is known as CardLayout.
- CardLayout(): creates a card layout with zero horizontal and vertical gap.
- CardLayout(int hgap, int vgap): creates a card layout with the given horizontal and vertical gap.
import java.awt.*;
import java.awt.event.*;

import javax.swing.*;

public class CardLayoutExample extends JFrame implements ActionListener{
CardLayout card;
JButton b1,b2,b3;
Container c;
    CardLayoutExample(){

        c=getContentPane();
        card=new CardLayout(40,30);
//create CardLayout object with 40 hor space and 30 ver space
        c.setLayout(card);

        b1=new JButton("Apple");
        b2=new JButton("Boy");
        b3=new JButton("Cat");
        b1.addActionListener(this);
        b2.addActionListener(this);
        b3.addActionListener(this);

        c.add("a",b1);c.add("b",b2);c.add("c",b3);

    }
    public void actionPerformed(ActionEvent e) {
    card.next(c);
    }

    public static void main(String[] args) {
        CardLayoutExample cl=new CardLayoutExample();
        cl.setSize(400,400);
        cl.setVisible(true);
        cl.setDefaultCloseOperation(EXIT_ON_CLOSE);
    }
} - Type 1: JDBC-ODBC Bridge Driver
- Type 2: JDBC-Native API
- Type 3: JDBC-Net pure Java includes middleware
- Type 4: 100% Pure Java
Java Swing tutorial is a part of Java Foundation Classes (JFC) that is used to create window-based applications. It is built on the top of AWT (Abstract Windowing Toolkit) API and entirely written in java.
Unlike AWT, Java Swing provides platform-independent and lightweight components.
The javax.swing package provides classes for java swing API such as JButton, JTextField, JTextArea, JRadioButton, JCheckbox, JMenu, JColorChooser etc.
- AWT components are platform-dependent. Java swing components are platform-independent.
- AWT components are heavyweight. Swing components are lightweight.
- AWT doesn't support pluggable look and feel. Swing supports pluggable look and feel.
- AWT provides less components than Swing. Swing provides more powerful components such as tables, lists, scrollpanes, colorchooser, tabbedpane etc.
- AWT doesn't follows MVC(Model View Controller) where model represents data, view represents presentation and controller acts as an interface between model and view. Swing follows MVC.
Sometimes it is more convenient to use a PreparedStatement object for sending SQL statements to the database. This special type of statement is derived from the more general class, Statement, that you already know.
If you want to execute a Statement object many times, it usually reduces execution time to use a PreparedStatement object instead.
The main feature of a PreparedStatement object is that, unlike a Statement object, it is given a SQL statement when it is created. The advantage to this is that in most cases, this SQL statement is sent to the DBMS right away, where it is compiled. As a result, the PreparedStatement object contains not just a SQL statement, but a SQL statement that has been precompiled. This means that when the PreparedStatement is executed, the DBMS can just run the PreparedStatement SQL statement without having to compile it first.
Although PreparedStatement objects can be used for SQL statements with no parameters, you probably use them most often for SQL statements that take parameters. The advantage of using SQL statements that take parameters is that you can use the same statement and supply it with different values each time you execute it. Examples of this are in the following sections.
PreparedStatement statement=con.prepareStatement("update emp set name=? where id=?");
statement.setString(1,"smit");//1 specifies the first parameter in the query i.e. name
statement.setInt(2,101);

int i=statement.executeUpdate();
System.out.println(i+" records updated"); - public void init(): is used to initialized the Applet. It is invoked only once.
- public void start(): is invoked after the init() method or browser is maximized. It is used to start the Applet.
- public void paint()
- public void update()
- public void stop(): is used to stop the Applet. It is invoked when Applet is stop or browser is minimized.
- public void destroy(): is used to destroy the Applet. It is invoked only once.
import java.applet.Applet;
import java.awt.Graphics;
<!--
<applet code="UseParam.class" width="300" height="300">
<param name="msg" value="Welcome to applet">
</applet>
-->
public class UseParam extends Applet {
public void paint(Graphics g) {
String str=getParameter("msg");
g.drawString(str,50, 50);
}
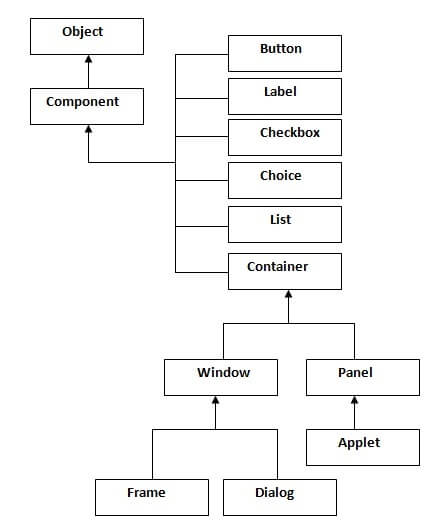
}Java AWT Tutorial
Java AWT (Abstract Window Toolkit) is an API to develop GUI or window-based applications in java.
Java AWT components are platform-dependent i.e. components are displayed according to the view of operating system. AWT is heavyweight i.e. its components are using the resources of OS.
The java.awt package provides classes for AWT api such as TextField, Label, TextArea, RadioButton, CheckBox, Choice, List etc.
- Can read any database if proper drivers are installed.
- Creates XML structure of data from database automatically
- No content conversion required
- Query and Stored procedure supported.
- Can be used for both Synchronus and Asynchronous processing.
- Supports modules
- Correct drivers need to be deployed for each type of database
- Cannot update or insert multiple tables with sequence.
- If we are running an applet from a provider who is not trustworthy than security is important.
- Applet itself cannot run or modify any application on the local system.
- Applets has no access to client-side resources such as files , OS etc.
- Applets can have special privileges. They have to be tagged as trusted applets and they must be registered to APS (Applet Security Manager).
- Applet has little restriction when it comes to communication. It can communicate only with the machine from which it was loaded.
- Applet cannot work with native methods.
- Applet can only extract information about client-machine is its name, java version, OS, version etc ... .
- Applets tend to be slow on execution because all the classes and resources which it needs have to be transported over the network.
- As applet is a small java program, so it is platform independent code which is capable to run on any browser.
- Applets can perform various small tasks on client-side machines. They can play sounds, show images, get user inputs, get mouse clicks and even get user keystrokes, etc ...
- Applets creates and edit graphics on client-side which are different and independent of client-side platform.
- As compared to stand-alone application applets are small in size, the advantage of transferring it over network makes it more usable.
- Applets run on client browser so they provide functionality to import resources such as images, audio clips based on Url's.
- Applets are quite secure because of their access to resources.
- Applets are secure and safe to use because they cannot perform any modifications over local system.
- Various small tasks such as performing login, inventory checking, task scheduling can be done by applets running over Intranets.
// JDBC DEMO
import java.sql.*;

class JDBCDemo {
    public static void main(String args[]) {
        try {
            Class.forName("com.mysql.jdbc.Driver");
            System.out.println("Driver Loaded");
            Connection conn = DriverManager.getConnection("jdbc:mysql://localhost:3306/test", "root", "");
            // create table if not exists
            PreparedStatement statement = conn.prepareStatement("create table if not exists user(id int primary key auto_increment, name varchar(50), email varchar(100))");
            statement.execute();
            // insert
            statement = conn.prepareStatement("insert into user  (name, email) values (?,?)");
            statement.setString(1, "smit");
            statement.setString(2, "[email protected]");
            statement.executeUpdate();
            System.out.println("Connected");
            // select
            statement = conn.prepareStatement("select * from user");
            ResultSet result = statement.executeQuery();
            while(result.next()) {
                System.out.println(result.getString("name"));
            }
        }
        catch(Exception e) {
            System.out.println(e.toString());
        }

    }
}import java.awt.*;
import java.awt.event.*;
import java.applet.*;
/*
<applet code="MouseListenerDemo" width=300 height=500></applet>
*/
public class MouseListenerDemo extends Applet implements MouseListener, ActionListener, TextListener, MouseMotionListener {
Button myBtn;
Label myLabel;
TextArea myTextField;
int x = 0, y = 0;
public void init() {
// setLayout(new GridLayout(3,3));
// setLayout(new BorderLayout());
setLayout(new FlowLayout(FlowLayout.LEFT));
myBtn = new Button();
myLabel = new Label();
myTextField = new TextArea("Input Something");
myTextField.addTextListener(this);
myLabel.setText("Hello");
addMouseListener(this);
myBtn.addActionListener(this);
add(myTextField);
add(myBtn);
add(myLabel);
addMouseMotionListener(this);
}
public void textValueChanged(TextEvent e) {
System.out.println(e.toString());
myLabel.setText(myTextField.getText());
}
public void actionPerformed(ActionEvent e) {
myBtn.setLabel("Fuck");
}
public void mouseClicked(MouseEvent e) {
setBackground(Color.blue);
}
public void mouseEntered(MouseEvent e) {
setBackground(Color.yellow);
}
public void mouseExited(MouseEvent e) {
setBackground(Color.green);
}
public void mousePressed(MouseEvent e) {
setBackground(Color.pink);
}
public void mouseReleased(MouseEvent e) {
System.out.println("mouse mouseReleased");
setBackground(Color.red);
}
public void mouseMoved(MouseEvent e) {
}
public void paint(Graphics g) {
g.drawOval(x, y, 200, 200);
}
public void mouseDragged(MouseEvent e) {
System.out.println(e.toString());
x = e.getX();
y = e.getY();
repaint();
}
}