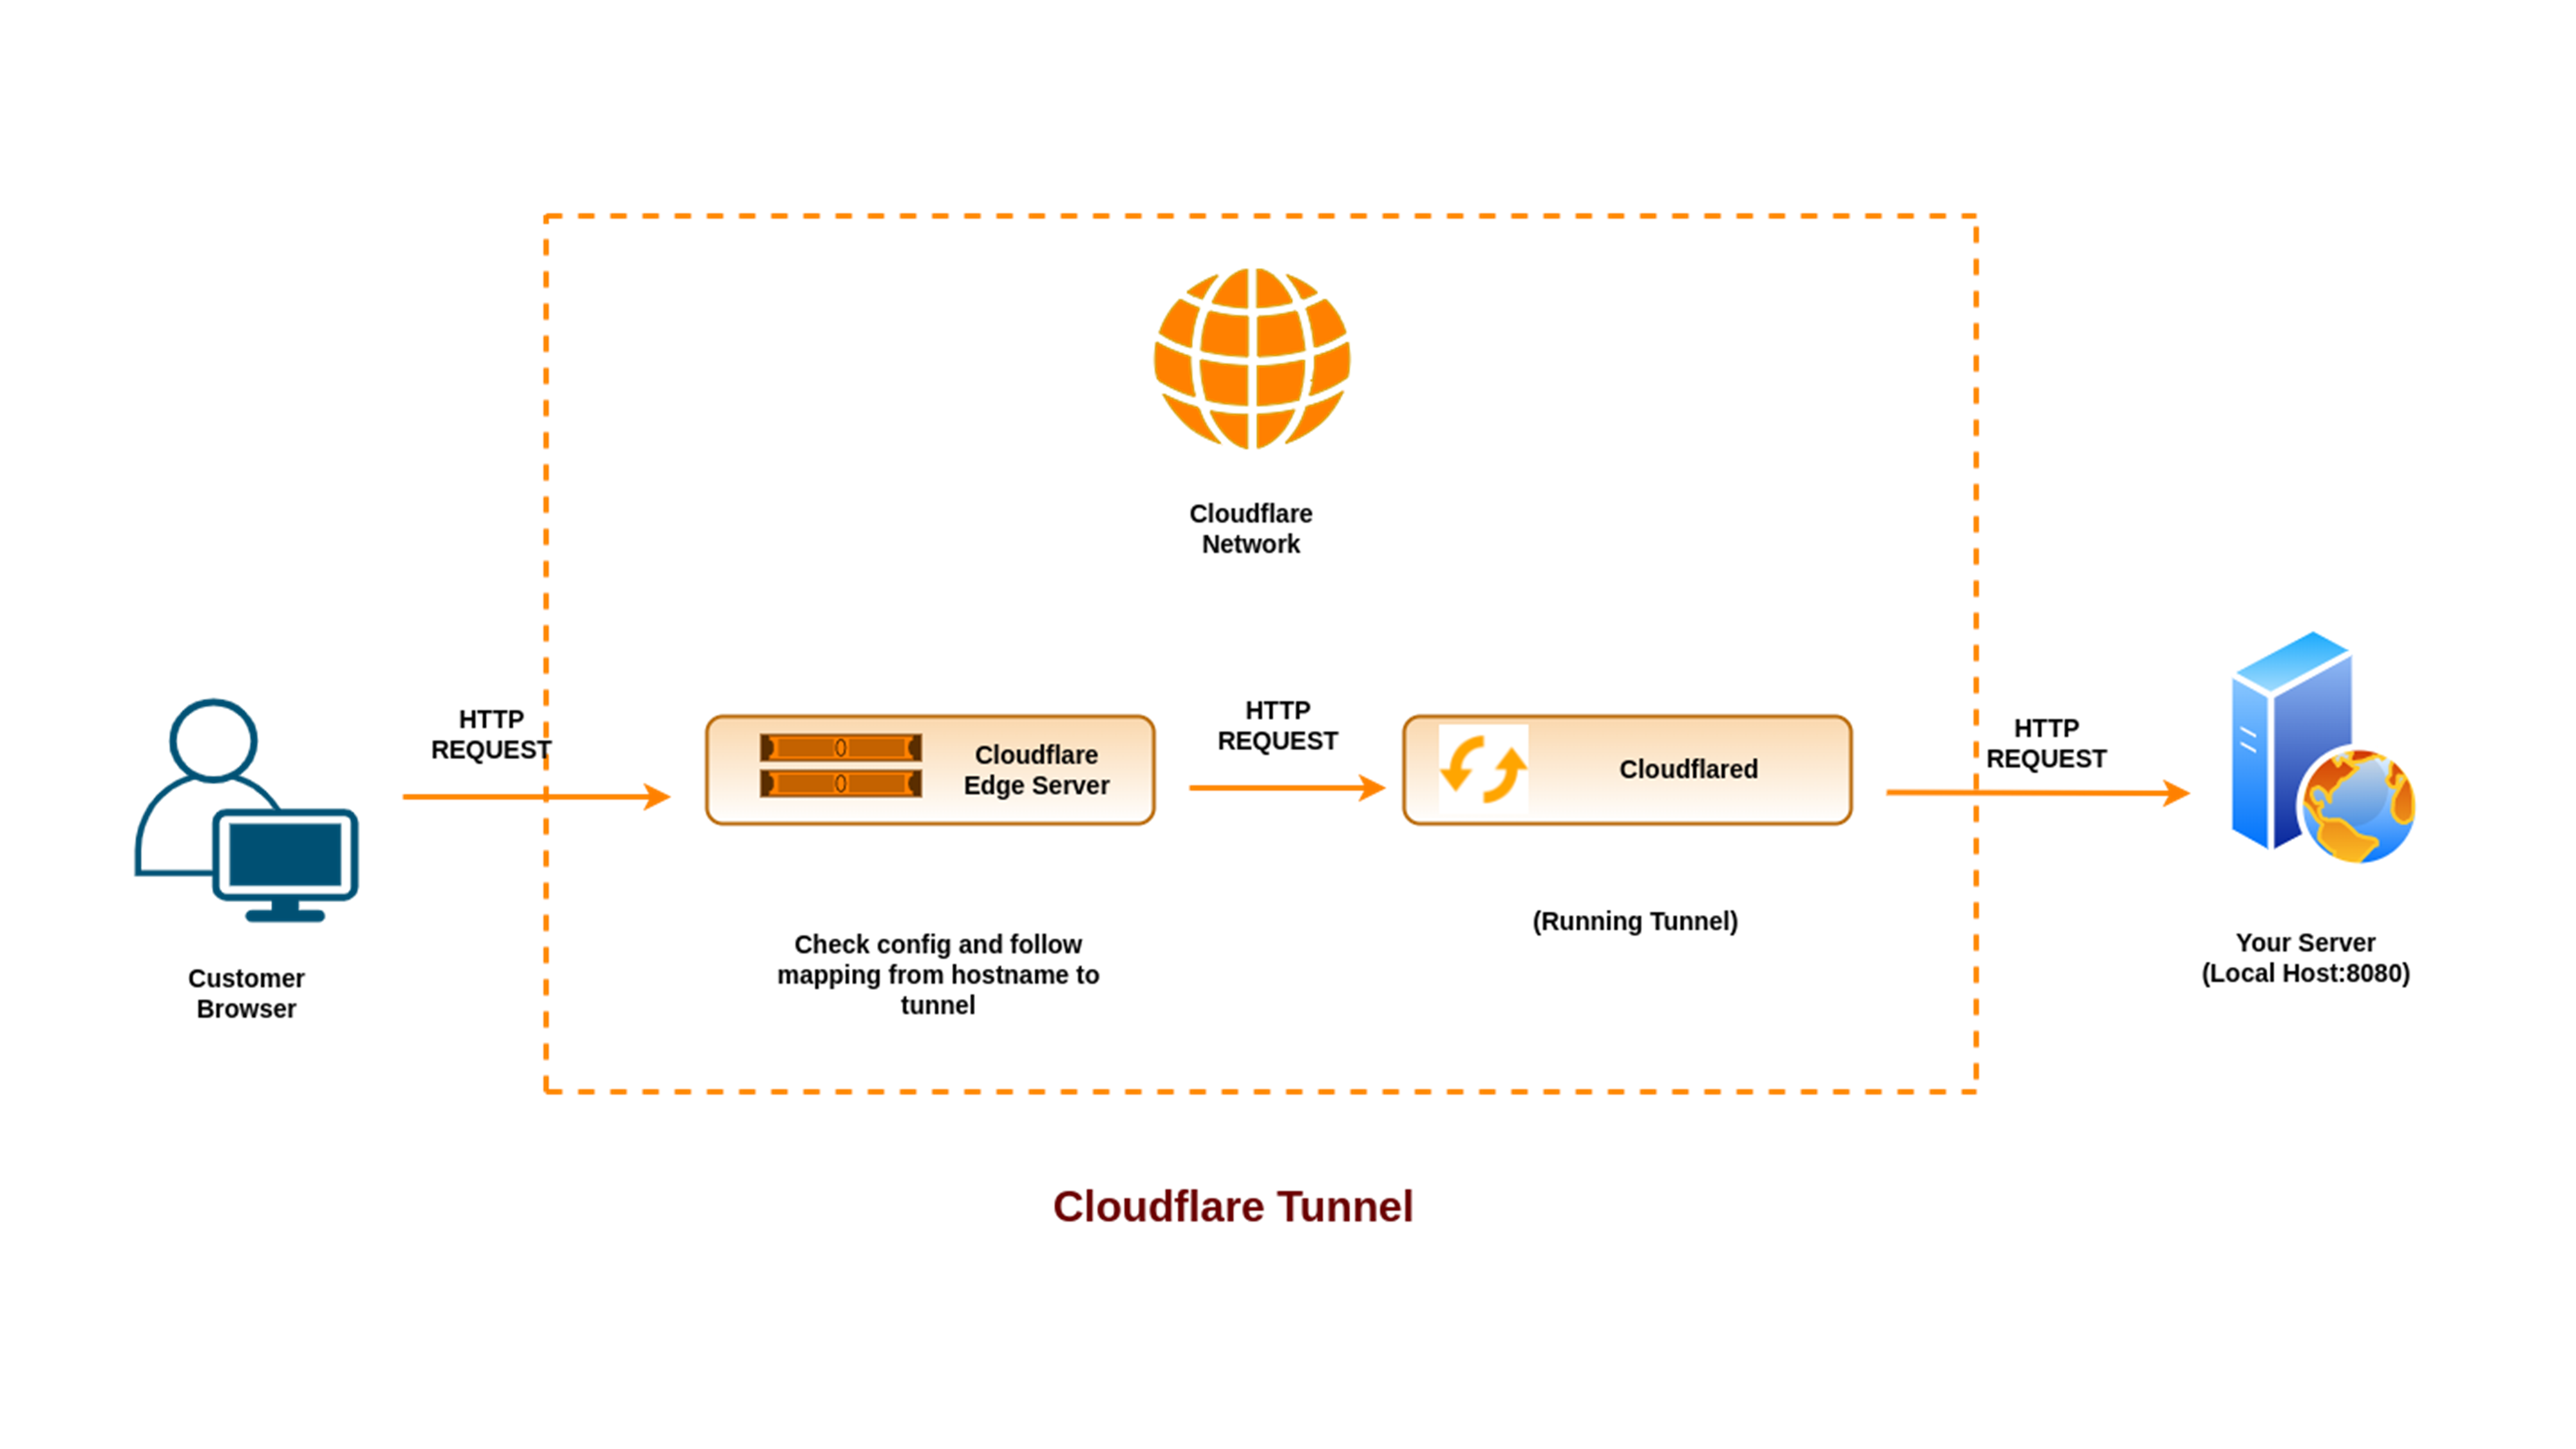
By using Cloudflare, your localhost project made with native PHP or Laravel can be accessed on the internet. In short, you can access your localhost on the internet by using your preferred domain!
- Imagine a user or tester accessing your capstone project website on the "project.com" domain. The HTTP request is processed through the Cloudflare network, where configurations and tunnels are checked until it reaches your localhost server on your laptop!
- By setting up this configuration, you can access your capstone project on the internet, even if it's running on your local laptop or desktop localhost. However, you'll need to purchase a .online domain on Hostinger, which will cost you at least 70 pesos.
- Domain Name
- A laptop with at least 4GB of RAM.
- Internet connection.
- XAMPP
- Your website will be down if the server (which is your laptop) is off.
- Slow website performance if your laptop has slow performance.
- Less expense.
- Easy to modify your code, even when already accessible on the internet.
- BUY DOMAIN HERE: https://www.hostinger.ph/domain-checker
- CLOUDFLARE DASHBOARD: https://dash.cloudflare.com/
- DOWNLOAD cloudflared.exe: https://developers.cloudflare.com/cloudflare-one/connections/connect-networks/downloads/
- Move your downloaded Cloudflare executable file to a separate folder, then rename it to
cloudflared.exe - Go to the search bar of the file explorer where the
cloudflared.exeis located, then typecmd - Now, the command prompt is open. Type the following commands:
.\cloudflared.exe --version
cloudflared tunnel login
- Now, click the provided link in the command prompt to open it in your active browser, where your Cloudflare dashboard account is logged in. Next, click on your domain and then authorize it.
cloudflared tunnel create mywebsite
Note: "mywebsite" is the name of your website. Please watch my YouTube Tutorial for the installation guide.
-
After the successful execution of the tunnel create command, it will generate a
.json filein the default Cloudflare directory, which is located atC:/Users/currentUser/.cloudflared, then create aconfig.ymlfile. -
Pre-made content for the config.yml file. you can download it here.
url: http://ipv4EthernetIPHere:port
tunnel: <Tunnel ID from .json file>
credentials-file: C:/Users/<currentUser>/.cloudflared/<Tunnel ID from .json file>.json- Please watch my YouTube Tutorial for the installation guide.
cloudflared tunnel route dns mywebsite yourdomain.com
Note: mywebsite is the name of your website, then yourdomain.com is your domain.
cloudflared tunnel run mywebsite
Note: "mywebsite" is the name of your website. Please watch my YouTube Tutorial for the installation guide.
Take note: if cloudflared is not working, try the .\cloudflared then the following commands
-
Go to the search bar of the file explorer where the
cloudflared.exeis located, then typecloudflared tunnel run mywebsite -
However, you can run the
cloudflared tunnel run mywebsiteautomatically, by using my premade.bat file(download it here). Just move the.bat fileto the folder wherecloudflared.exeis located, then right-click, and select "Run as administrator." -
You can edit the
.bat fileby opening it in text editors such as VS Code or Notepad++.
- Download the
index.phpfile here, then place this file in the XAMPP htdocs folder, and replace the current index.php. - Update the
header('Location: '.$uri.'/myproject/login.php');in index.php according to your project's file destination path.
Do I need port forwarding for this Cloudflare method?
No, port forwarding is not required.
Will this method work on native PHP websites and Laravel?
Yes, the tutorial is based on native PHP. For Laravel, you just need to change the APP_URL in the .env file to your purchased domain. When using php artisan serve, declare the Ethernet IPv4 IP and port. You can download the .bat file here for running php artisan serve automatically.
What if the "cloudflared tunnel run mywebsite" command prompt is not running?
If the command prompt for "cloudflared tunnel run mywebsite" is not running, the website running through Cloudflare cannot be accessed. In this case, you need to run the provided .bat file or execute the command "cloudflared tunnel run mywebsite".
Is an "HTTP" address required in the Config?
Yes, only HTTP is required, not HTTPS, since the client/user will access the local server located and running on your XAMPP server.
Why does the link I entered go to /dashboard of XAMPP?
Please refer to the provided process for resolving this issue.
Do I need to have a phpMyAdmin password?
If you are applying this to a native PHP website, yes, you will need a password for phpMyAdmin. However, if you are applying this method to Laravel, there is no need to input a password for phpMyAdmin since it will not go to your default Laravel path.
Where can I download the cloudflared.exe file?
You can download it here.
What if Cloudflare makes my website slow?
Allocate more RAM on XAMPP, then run Cloudflare by executing this command: cloudflared tunnel --protocol http2 run mywebsite.
Where is the default Cloudflared directory?
The Cloudflare directory is located at C:/Users/currentUser/.cloudflared. Read more about it here.
|
Visit My Portfolio
Check out my portfolio to learn more about me! 
|
Please consider visiting my portfolio at https://emmanpbarrameda.github.io. It provides a comprehensive view of my abilities and achievements. Thank you! |
Copyright © 2024 emmanpbarrameda.
All rights reserved.


