📝 14 May 2021
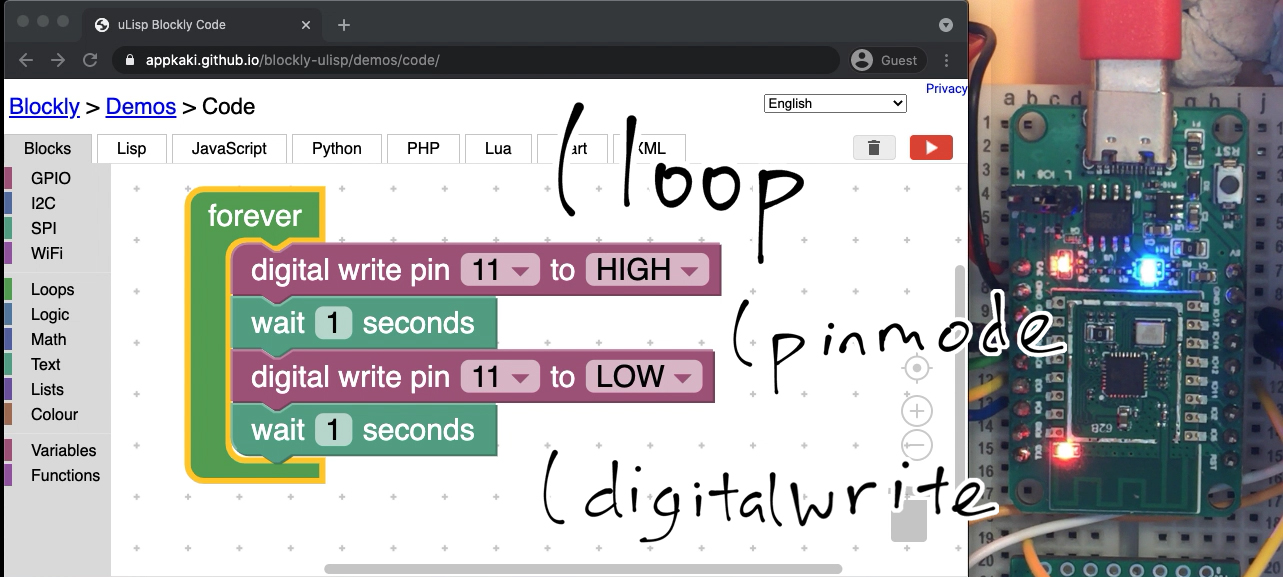
What if we could run Lisp programs on the PineCone BL602 RISC-V Board?
( loop
  ( pinmode 11 :output )
  ( digitalwrite 11 :high )
  ( delay 1000 )
  ( pinmode 11 :output )
  ( digitalwrite 11 :low )
  ( delay 1000 )
)
And create the programs with a drag-and-drop Web Editor... Without typing a single Lisp parenthesis / bracket?
Today we shall explore uLisp and Blockly as an interesting new way to create embedded programs for the BL602 RISC-V + WiFi SoC.
(And someday this could become really helpful for IoT Education)
The uLisp Firmware in this article will run on PineCone, Pinenut and Any BL602 Board.
uLisp and Blockly on PineCone BL602 RISC-V Board
What is uLisp?
From the uLisp Website...
uLisp® is a version of the Lisp programming language specifically designed to run on microcontrollers with a limited amount of RAM, from the Arduino Uno based on the ATmega328 up to the Teensy 4.0/4.1. You can use exactly the same uLisp program, irrespective of the platform.
Because uLisp is an interpreter you can type commands in, and see the effect immediately, without having to compile and upload your program. This makes it an ideal environment for learning to program, or for setting up simple electronic devices.
Why is uLisp special?
Compared with other embedded programming languages, uLisp looks particularly interesting because it has built-in Arduino-like functions for GPIO, I2C, SPI, ADC, DAC, ... Even WiFi!
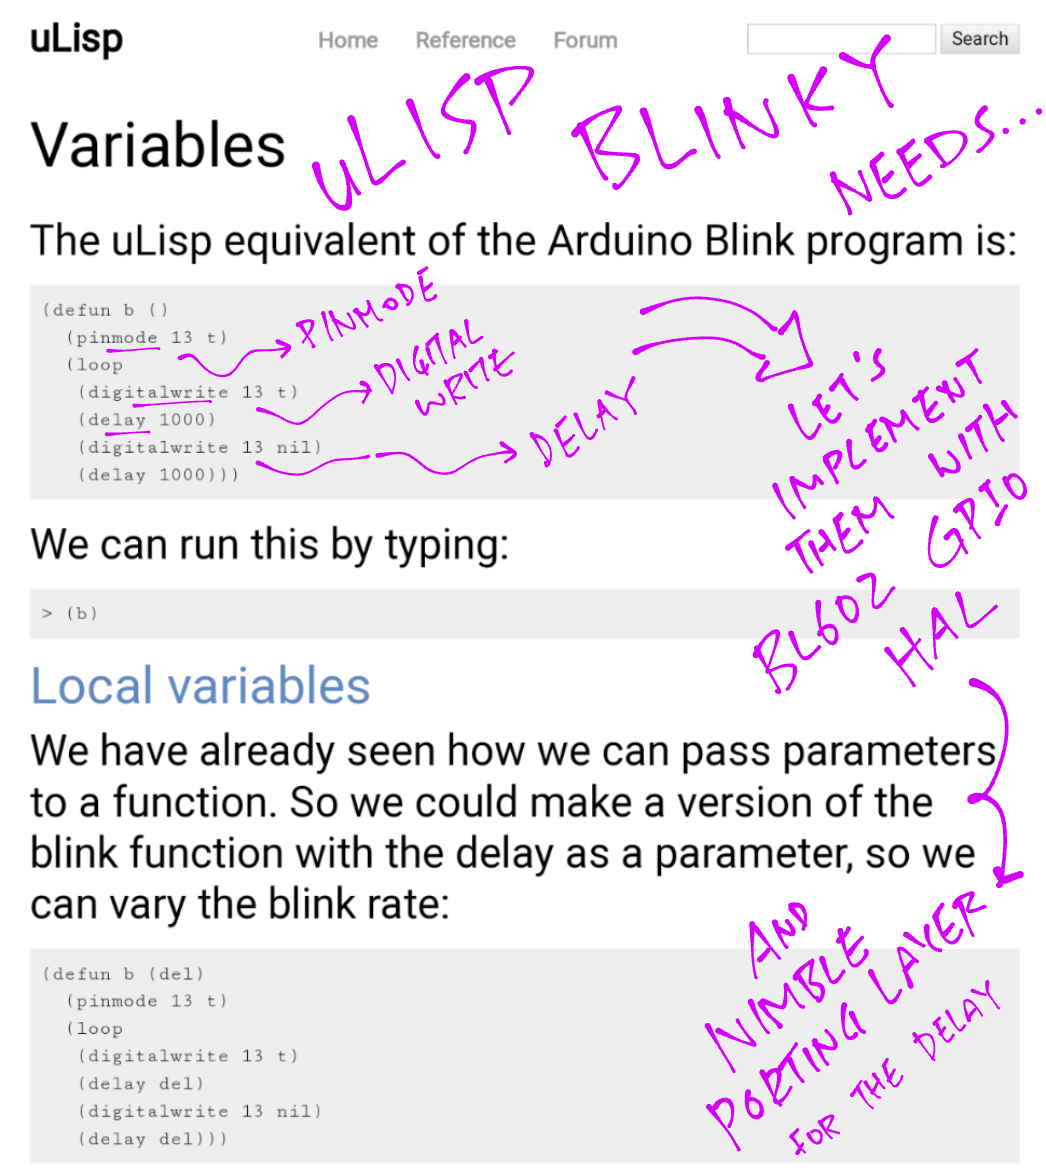
So this Blinky program runs perfectly fine on uLisp...
( loop
  ( pinmode 11 :output )
  ( digitalwrite 11 :high )
  ( delay 1000 )
  ( pinmode 11 :output )
  ( digitalwrite 11 :low )
  ( delay 1000 )
)
Because pinmode (set the GPIO pin mode) and digitalwrite (set the GPIO pin output) are Arduino-like GPIO functions predefined in uLisp.
(delay is another Arduino-like Timer function predefined in uLisp. It waits for the specified number of milliseconds.)
uLisp makes it possible to write high-level scripts with GPIO, I2C, SPI, ADC, DAC and WiFi functions.
And for learners familiar with Arduino, this might be a helpful way to adapt to modern microcontrollers like BL602.
Why port uLisp to BL602?
uLisp is a natural fit for the BL602 RISC-V + WiFi SoC because...
-
BL602 has a Command-Line Interface (and so does uLisp)
Unlike most 32-bit microcontrollers, BL602 was designed to be accessed by embedded developers via a simple Command-Line Interface (over the USB Serial Port).
BL602 doesn't have a fancy shell like
bash. But uLisp on BL602 could offer some helpful scripting capability for GPIO, I2C, SPI, WiFi, ... -
uLisp already works on ESP32 (See this)
Since BL602 is a WiFi + Bluetooth LE SoC like ESP32, it might be easy to port the ESP32 version of uLisp to BL602. Including the WiFi functions.
I'm new to Lisp... Too many brackets, no?
In a while we'll talk about Blockly for uLisp... Drag-and-drop a uLisp program, without typing a single bracket / parenthesis!
(Works just like Scratch, the graphical programming tool)
And we may even upload and run a uLisp program on BL602 through a Web Browser... Thanks to the Web Serial API!
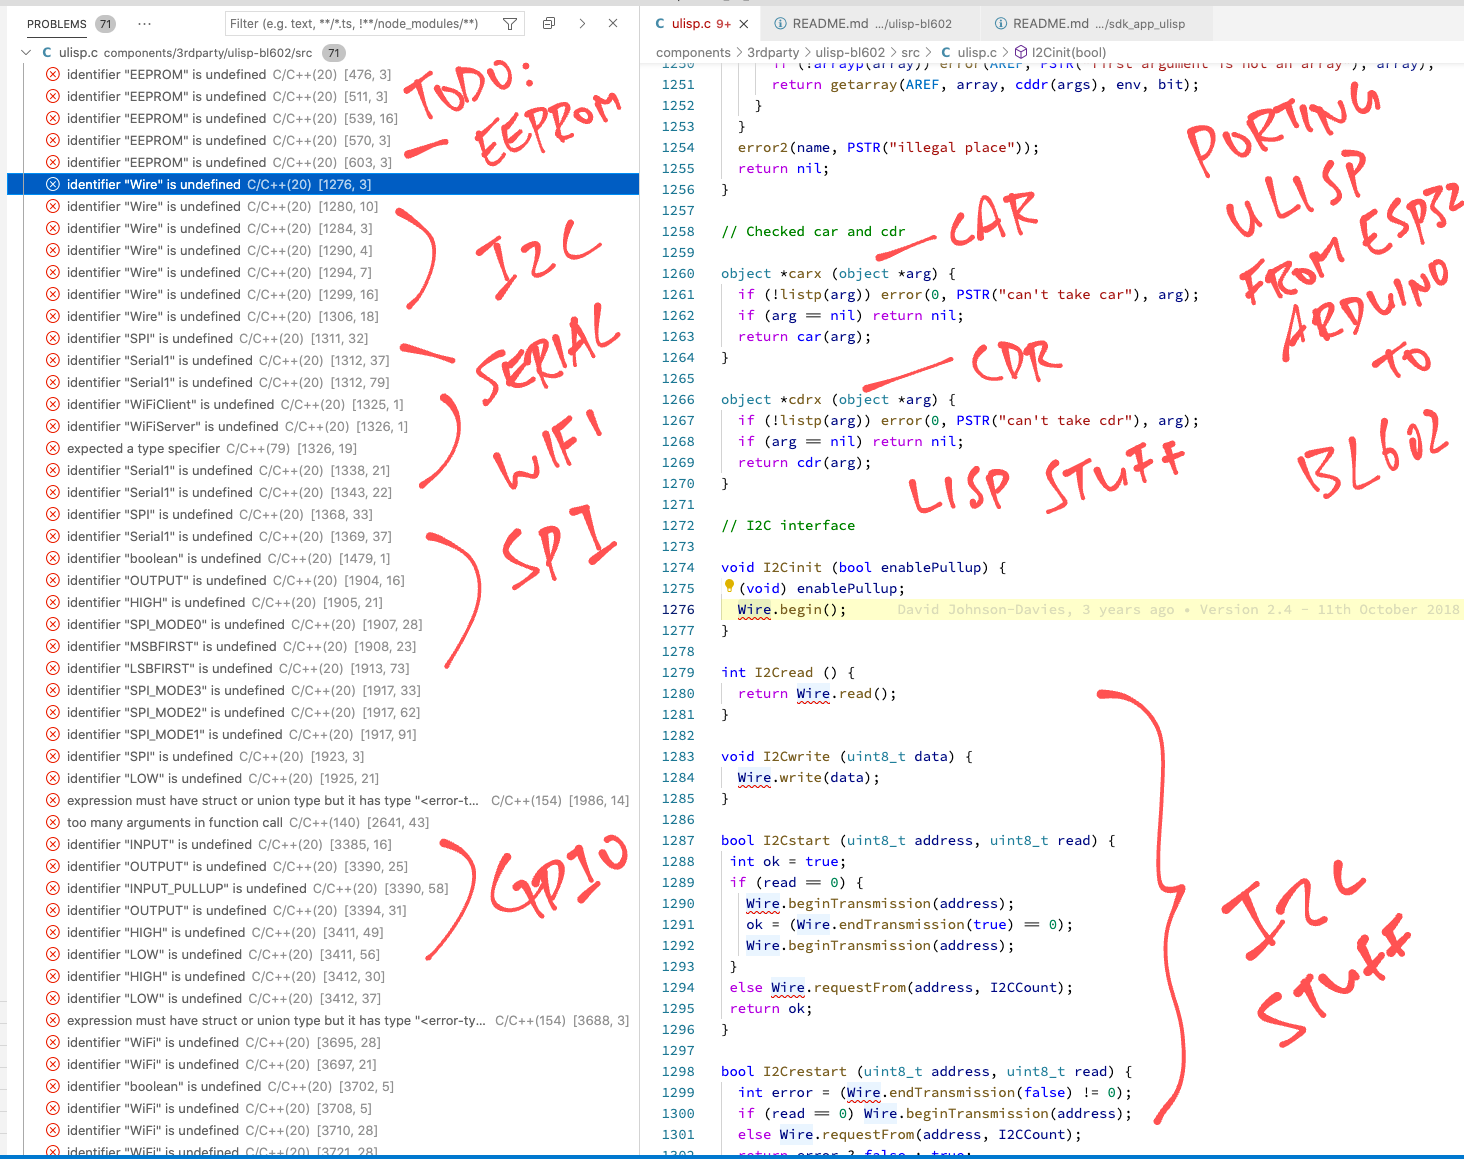
Porting uLisp from ESP32 to BL602 sounds difficult?
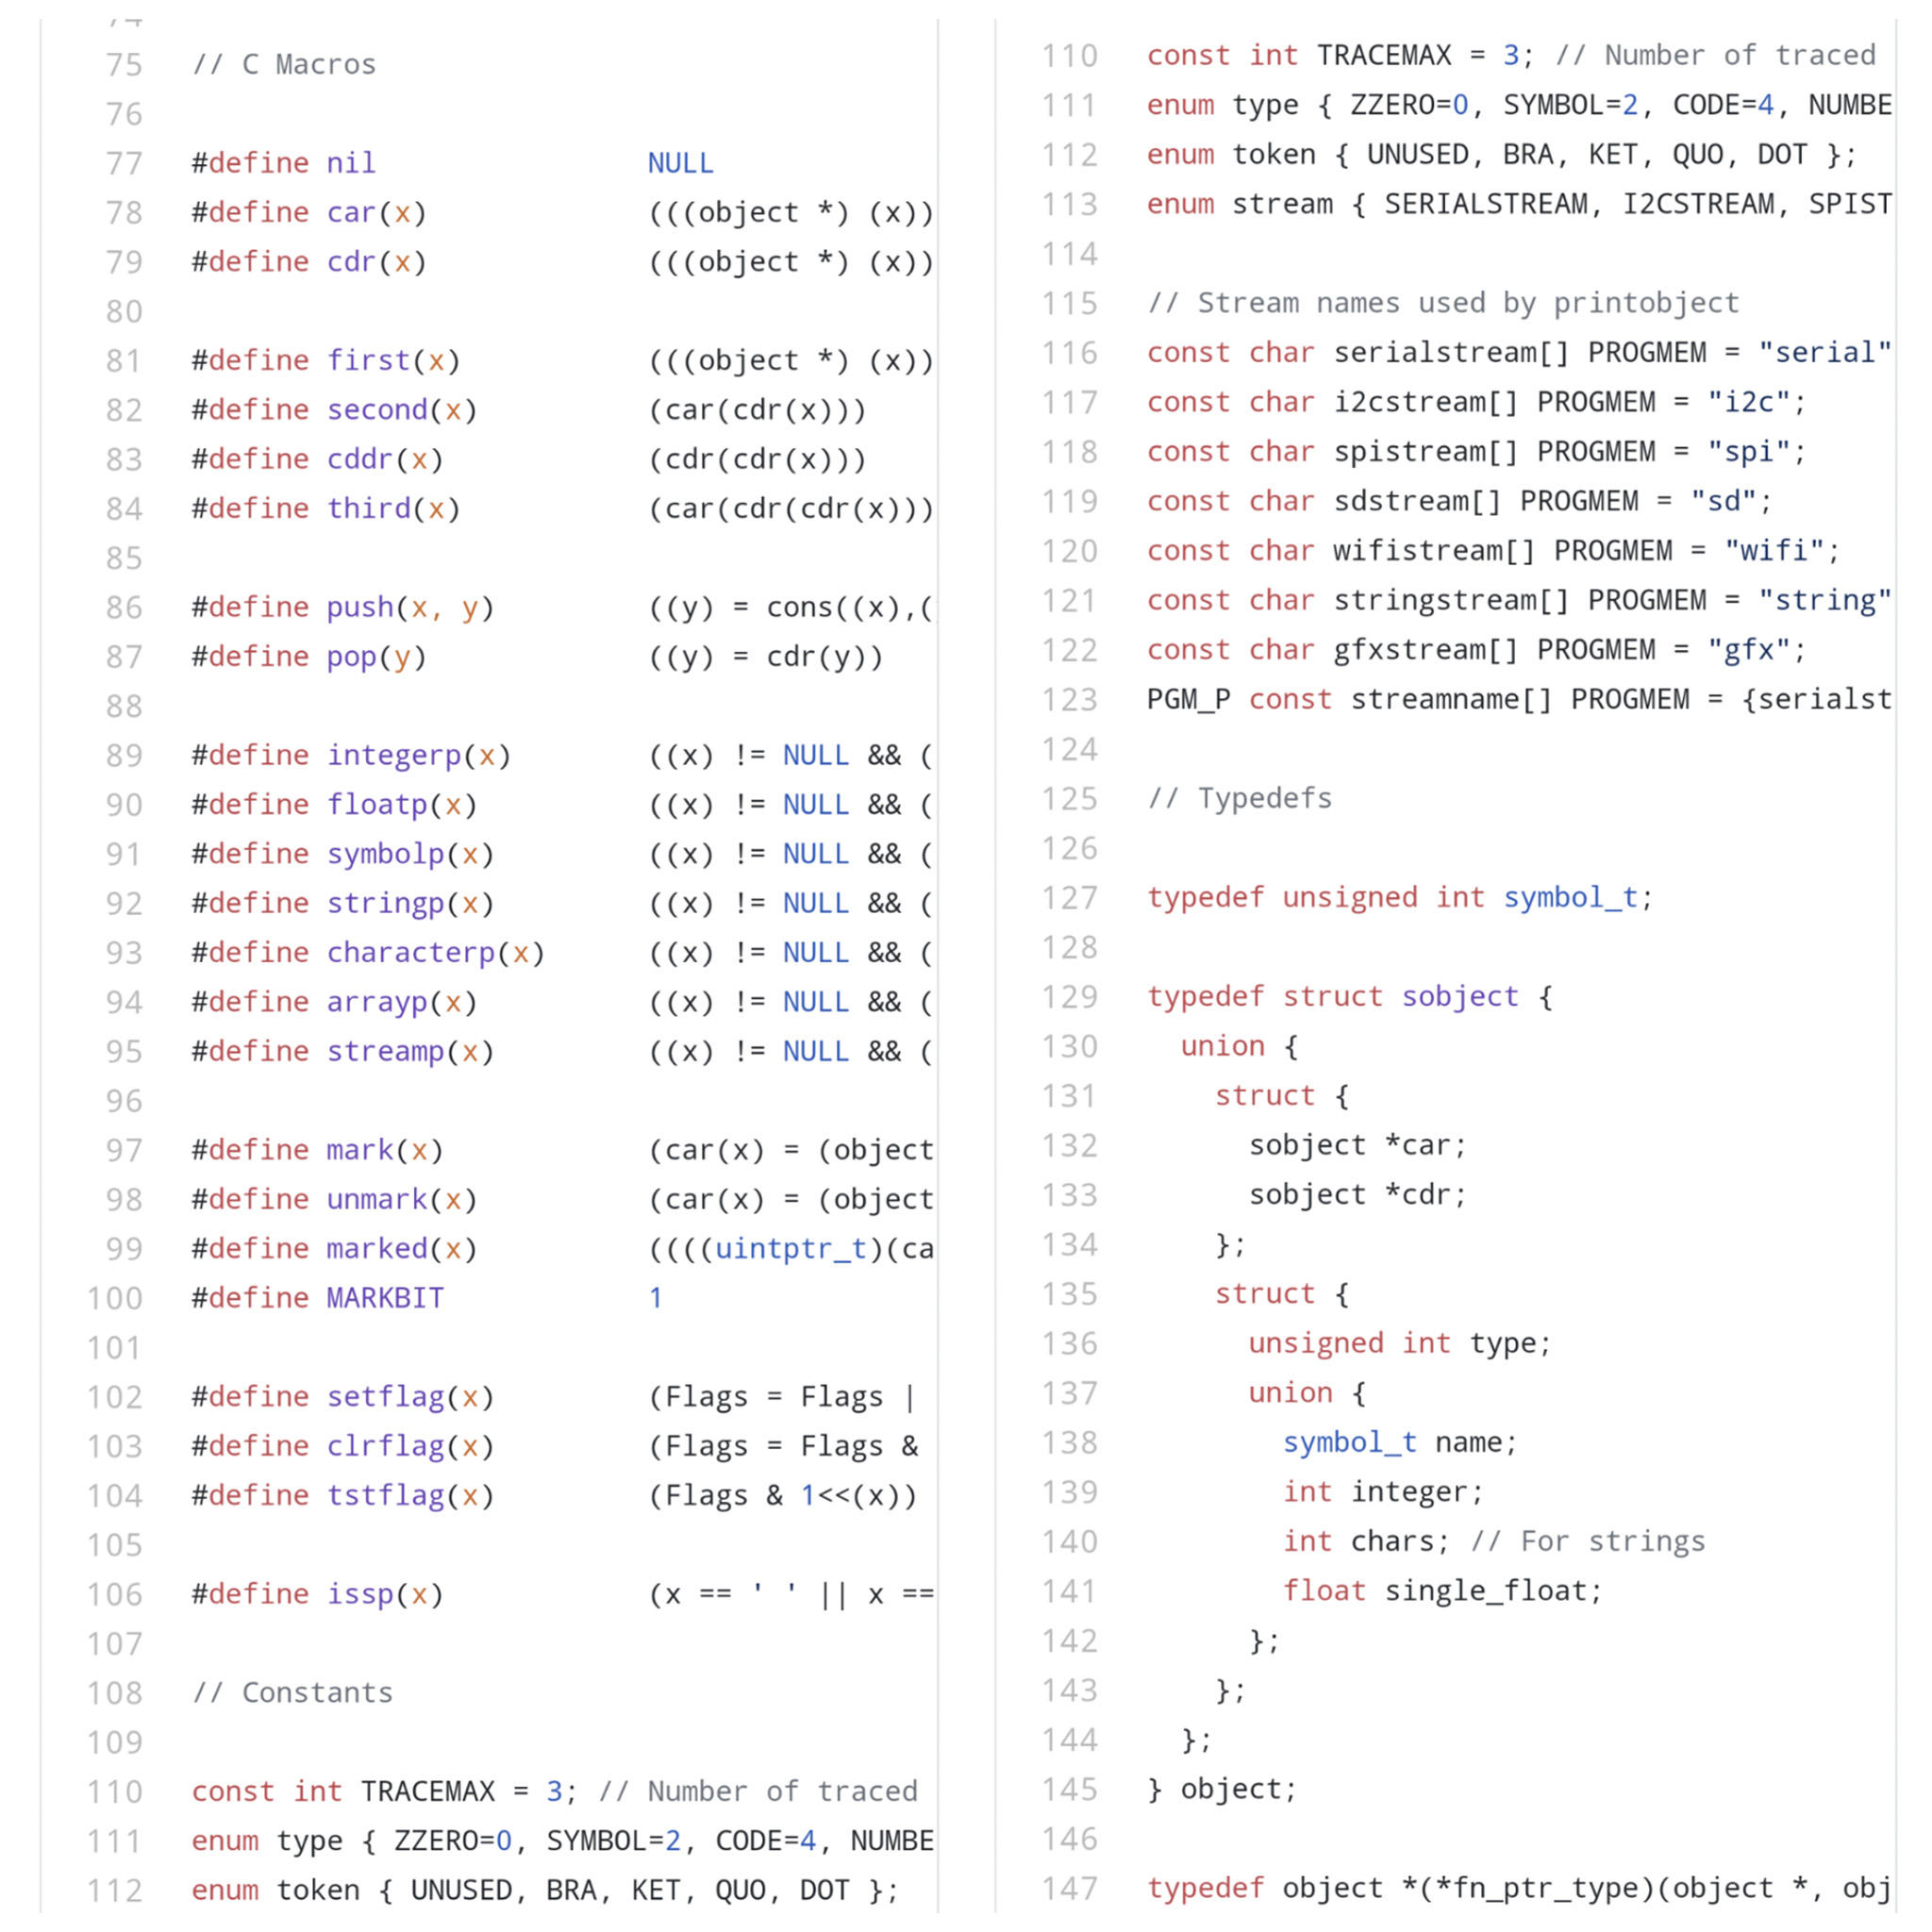
Not at all! uLisp for ESP32 lives in a single C source file: ulisp-esp.ino ...
(With a few Arduino bits in C++)
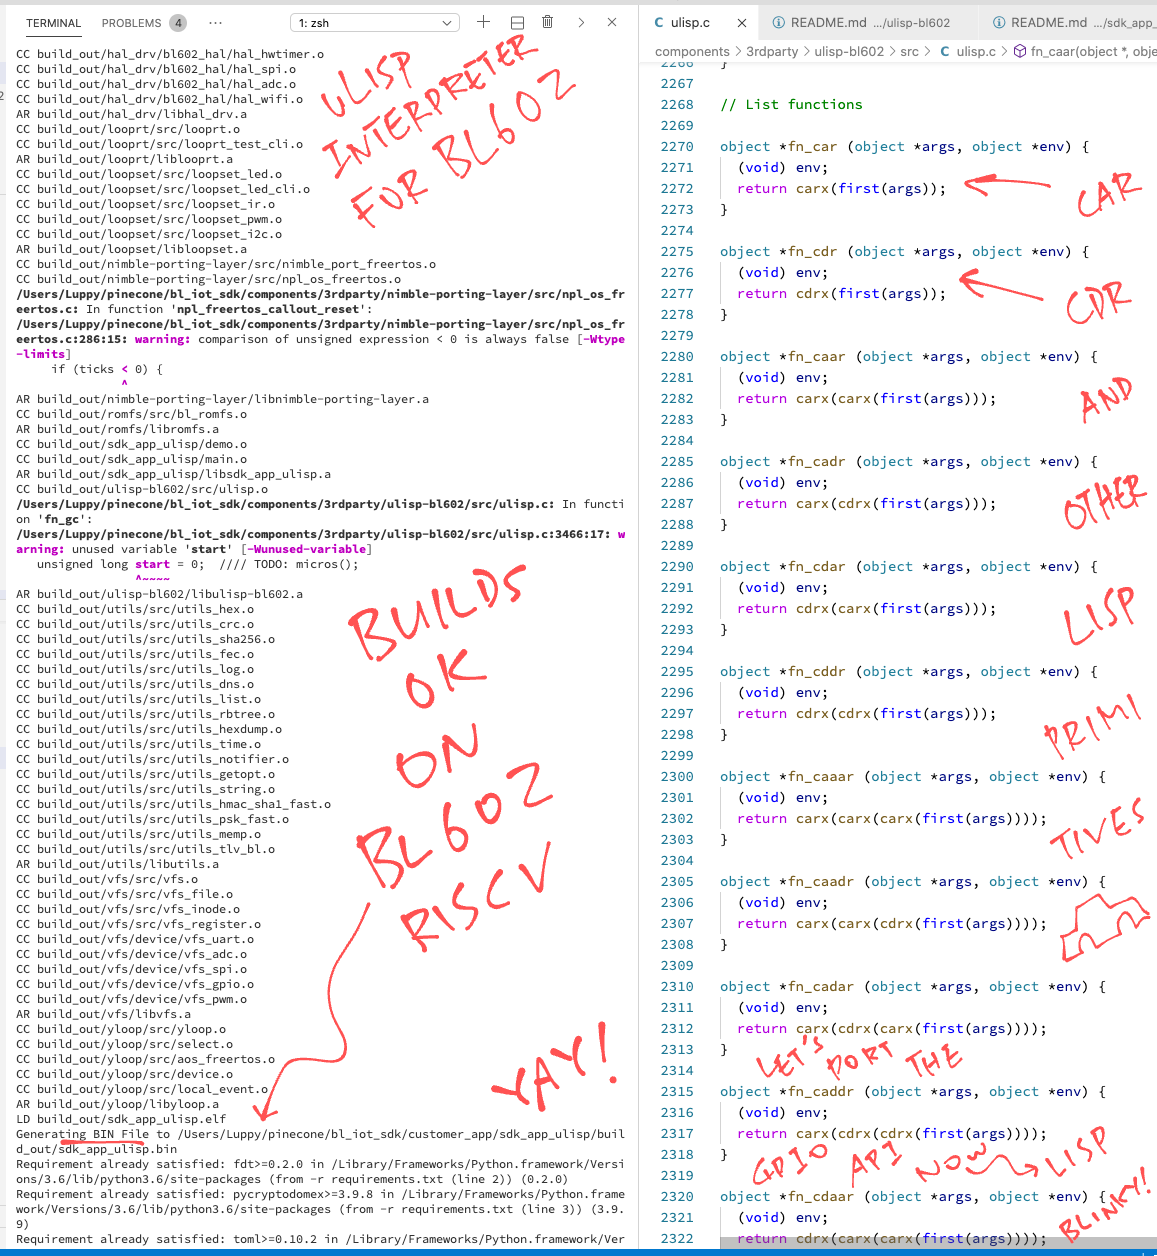
Porting uLisp to BL602 (as a C library ulisp-bl602) was quick and easy.
(More about this in a while.)
What about porting the Arduino functions like pinmode and digitalwrite?
The BL602 IoT SDK doesn't have these GPIO functions.
So in BL602 uLisp we reimplemented these functions with the BL602 Hardware Abstraction Layer for GPIO.
(While exposing the same old names to uLisp programs: pinmode and digitalwrite)
Anything else we should know about uLisp?
uLisp is still actively maintained. It has an active online community.
It's 2021... Why are we still learning Lisp?
Lisp is Not Dead Yet! (Apologies to Monty Python)
We still see bits of Lisp today in WebAssembly... Like the Stack Machine and S-Expressions. (See this)
In fact the uLisp Interpreter looks a little like Wasm3, the WebAssembly Interpreter for Microcontrollers. (See this)
Download and build the uLisp Firmware for BL602...
## Download the master branch of lupyuen's bl_iot_sdk
git clone --recursive --branch master https://github.com/lupyuen/bl_iot_sdk

## TODO: Change this to the full path of bl_iot_sdk
export BL60X_SDK_PATH=$HOME/bl_iot_sdk
export CONFIG_CHIP_NAME=BL602

## Build the sdk_app_ulisp firmware
cd bl_iot_sdk/customer_app/sdk_app_ulisp
make

## For WSL: Copy the firmware to /mnt/c/blflash, which refers to c:\blflash in Windows
mkdir /mnt/c/blflash
cp build_out/sdk_app_ulisp.bin /mnt/c/blflash
More details on building bl_iot_sdk
Follow these steps to install blflash...
We assume that our Firmware Binary File sdk_app_ulisp.bin has been copied to the blflash folder.
Set BL602 to Flashing Mode and restart the board...
For PineCone:
-
Set the PineCone Jumper (IO 8) to the
HPosition (Like this) -
Press the Reset Button
For BL10:
-
Connect BL10 to the USB port
-
Press and hold the D8 Button (GPIO 8)
-
Press and release the EN Button (Reset)
-
Release the D8 Button
For Ai-Thinker Ai-WB2, Pinenut and MagicHome BL602:
-
Disconnect the board from the USB Port
-
Connect GPIO 8 to 3.3V
-
Reconnect the board to the USB port
Enter these commands to flash sdk_app_ulisp.bin to BL602 over UART...
## For Linux:
blflash flash build_out/sdk_app_ulisp.bin \
    --port /dev/ttyUSB0

## For macOS:
blflash flash build_out/sdk_app_ulisp.bin \
    --port /dev/tty.usbserial-1420 \
    --initial-baud-rate 230400 \
    --baud-rate 230400

## For Windows: Change COM5 to the BL602 Serial Port
blflash flash c:\blflash\sdk_app_ulisp.bin --port COM5
(For WSL: Do this under plain old Windows CMD, not WSL, because blflash needs to access the COM port)
More details on flashing firmware
Set BL602 to Normal Mode (Non-Flashing) and restart the board...
For PineCone:
-
Set the PineCone Jumper (IO 8) to the
LPosition (Like this) -
Press the Reset Button
For BL10:
- Press and release the EN Button (Reset)
For Ai-Thinker Ai-WB2, Pinenut and MagicHome BL602:
-
Disconnect the board from the USB Port
-
Connect GPIO 8 to GND
-
Reconnect the board to the USB port
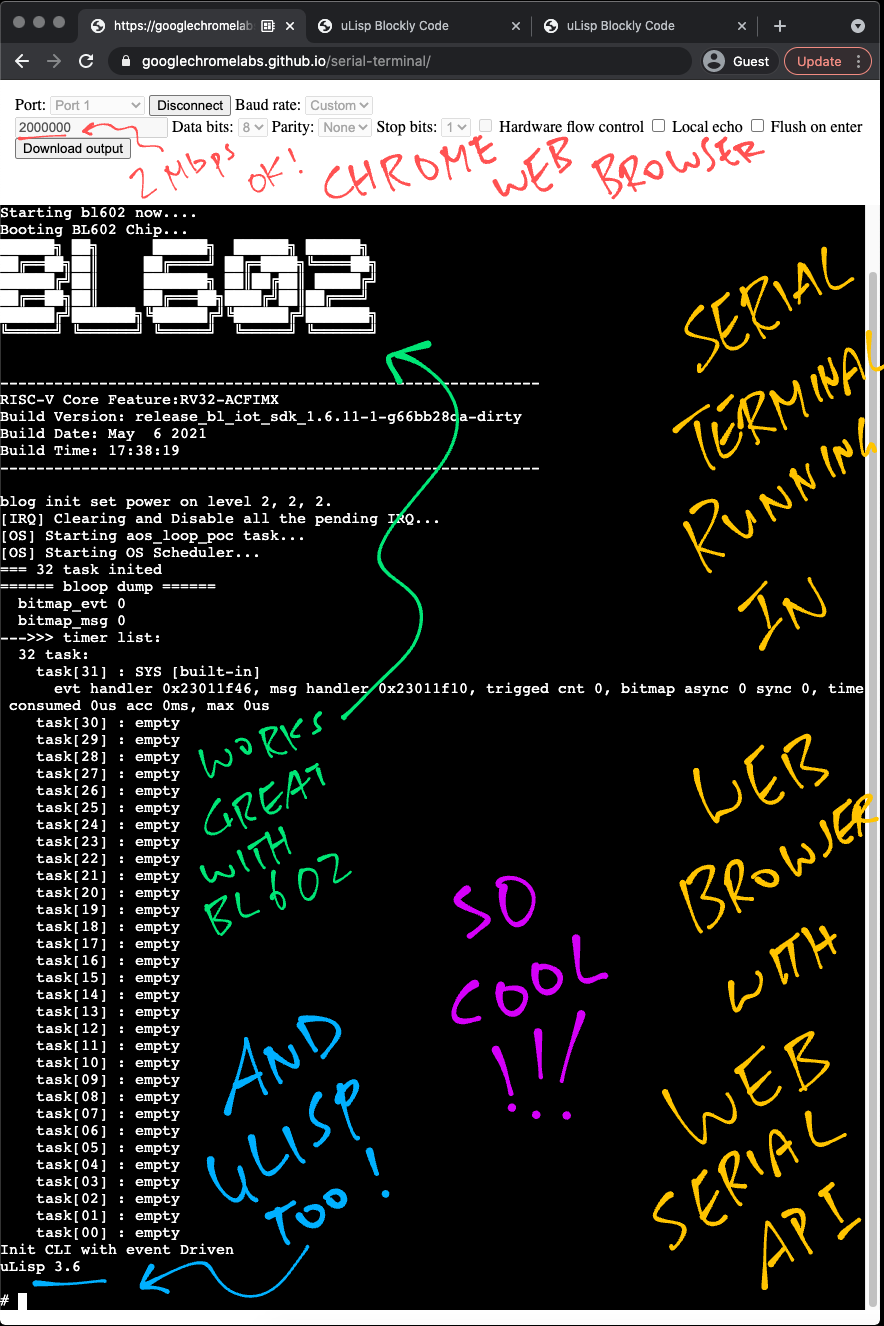
After restarting, connect to BL602's UART Port at 2 Mbps like so...
For Linux:
screen /dev/ttyUSB0 2000000For macOS: Use CoolTerm (See this)
For Windows: Use putty (See this)
Alternatively: Use the Web Serial Terminal (See this)
More details on connecting to BL602
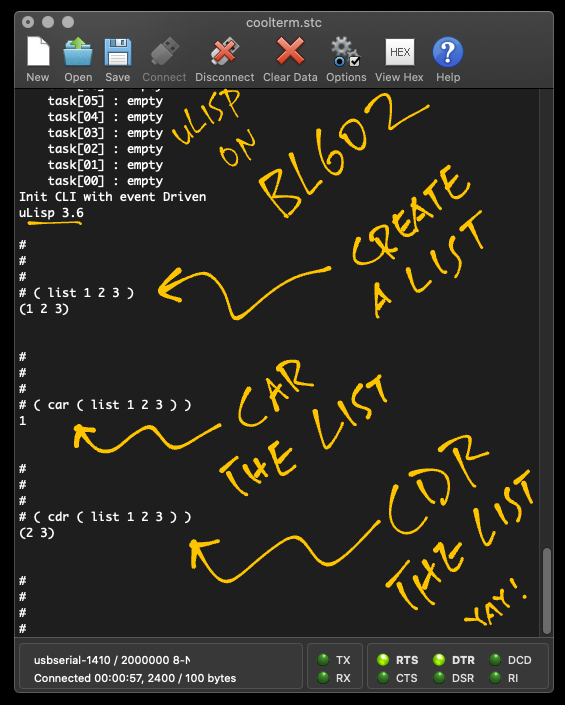
Let's enter some uLisp commands and test the BL602 uLisp Interpreter!
Please Note: For each uLisp command line we insert a space " " after the first bracket "(".
That's because we programmed the BL602 Command Line to recognise "(" as a Command Keyword that will call the uLisp Interpreter.
-
Enter this to create a list of numbers...
( list 1 2 3 )This returns
(1 2 3) -
In Lisp, to
cara list is to take the head of the list...( car ( list 1 2 3 ) )This returns
1(It's like deshelling a prawn)
-
And to
cdra list is to take the tail of the list...( cdr ( list 1 2 3 ) )This returns
(2 3)
(Based on the List Commands from uLisp)
Now let's flip the BL602 LED on and off!
On PineCone BL602 the Blue LED is connected to GPIO Pin 11.
(If you're using a different BL602 board, please change the GPIO Pin Number accordingly)
-
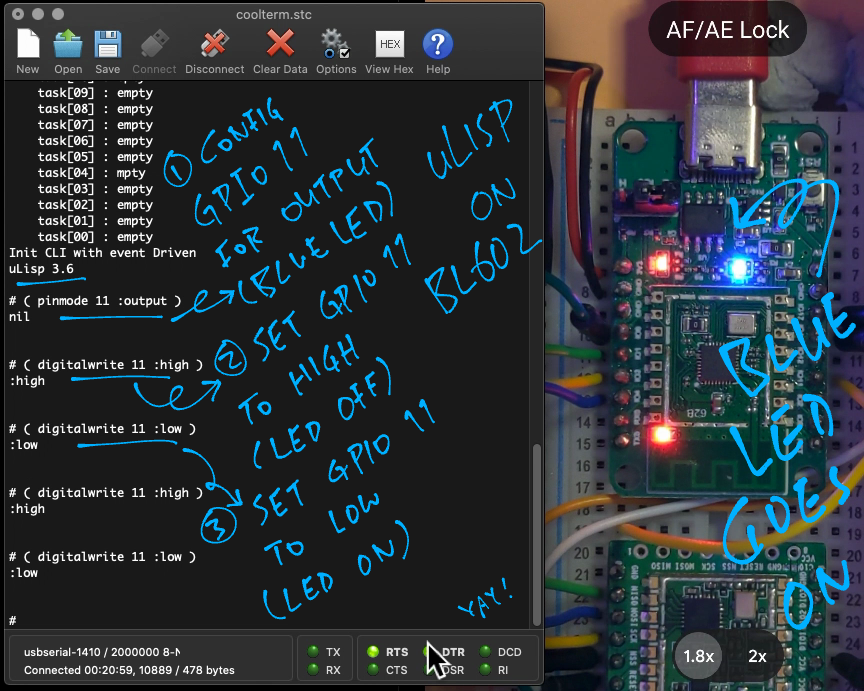
We configure GPIO Pin 11 (Blue LED) for output (instead of input)...
( pinmode 11 :output ) -
Set GPIO Pin 11 to High...
( digitalwrite 11 :high )The Blue LED switches off.
-
Set GPIO Pin 11 to Low...
( digitalwrite 11 :low )The Blue LED switches on.
-
And we sleep 1,000 milliseconds (1 second)...
( delay 1000 )
(Based on the GPIO Commands from uLisp)
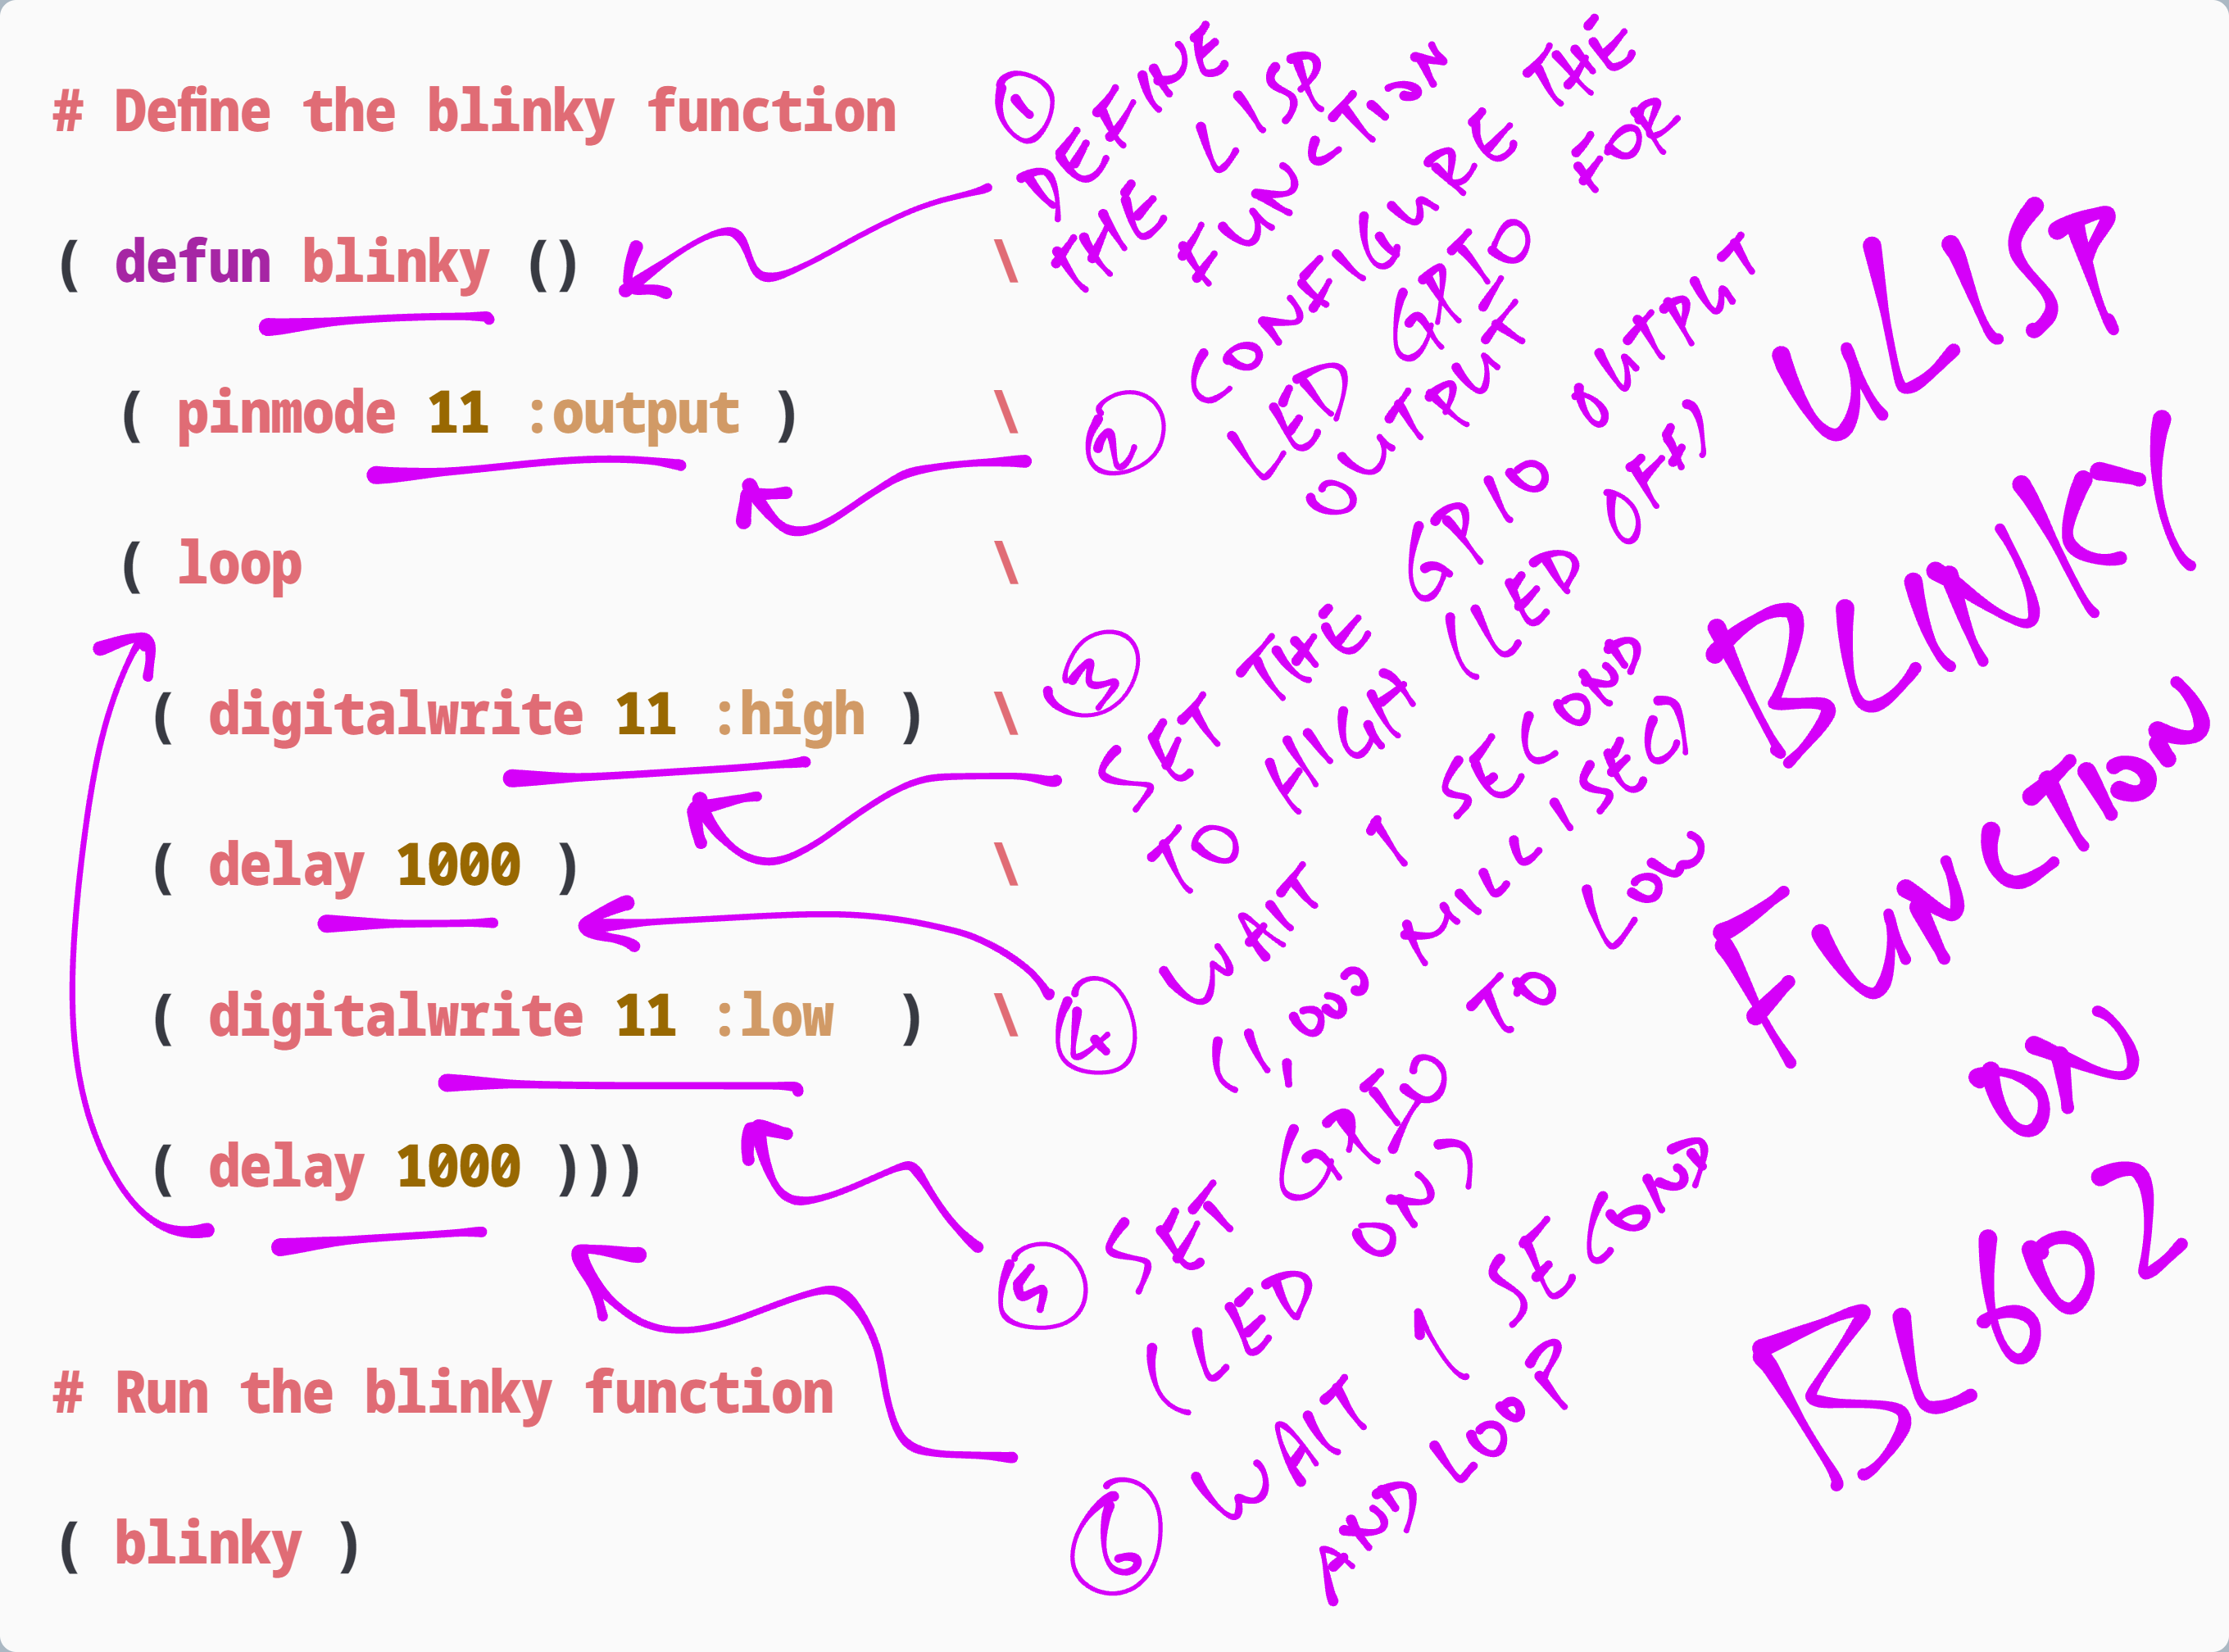
Now the show gets exciting: With uLisp we can define functions and loops at the command line... Just like bash!
( defun blinky ()             \
  ( pinmode 11 :output )      \
  ( loop                      \
   ( digitalwrite 11 :high )  \
   ( delay 1000 )             \
   ( digitalwrite 11 :low  )  \
   ( delay 1000 )))
Here's what it means...
Enter the lines above into the BL602 command line. Note that...
-
Each line starts with a bracket "
(" followed by a space " "(Because "
(" is a Command Keyword that will select the uLisp Interpreter) -
Each line (except the last line) ends with backslash "
\"(Because each line is a continuation of the previous line)
-
Alternatively, we may merge the lines into a single loooong line, remove the backslashes "
\", and paste the loooong line into the BL602 command line.
We run the blinky function like so...
( blinky )
And the LED blinks every second!
(Restart the board to stop it, sorry)
(Based on the Blinky function from uLisp)
According to the Blockly Overview...
Blockly is a library that adds a visual code editor to web and mobile apps.
The Blockly editor uses interlocking, graphical blocks to represent code concepts like variables, logical expressions, loops, and more.
It allows users to apply programming principles without having to worry about syntax or the intimidation of a blinking cursor on the command line.
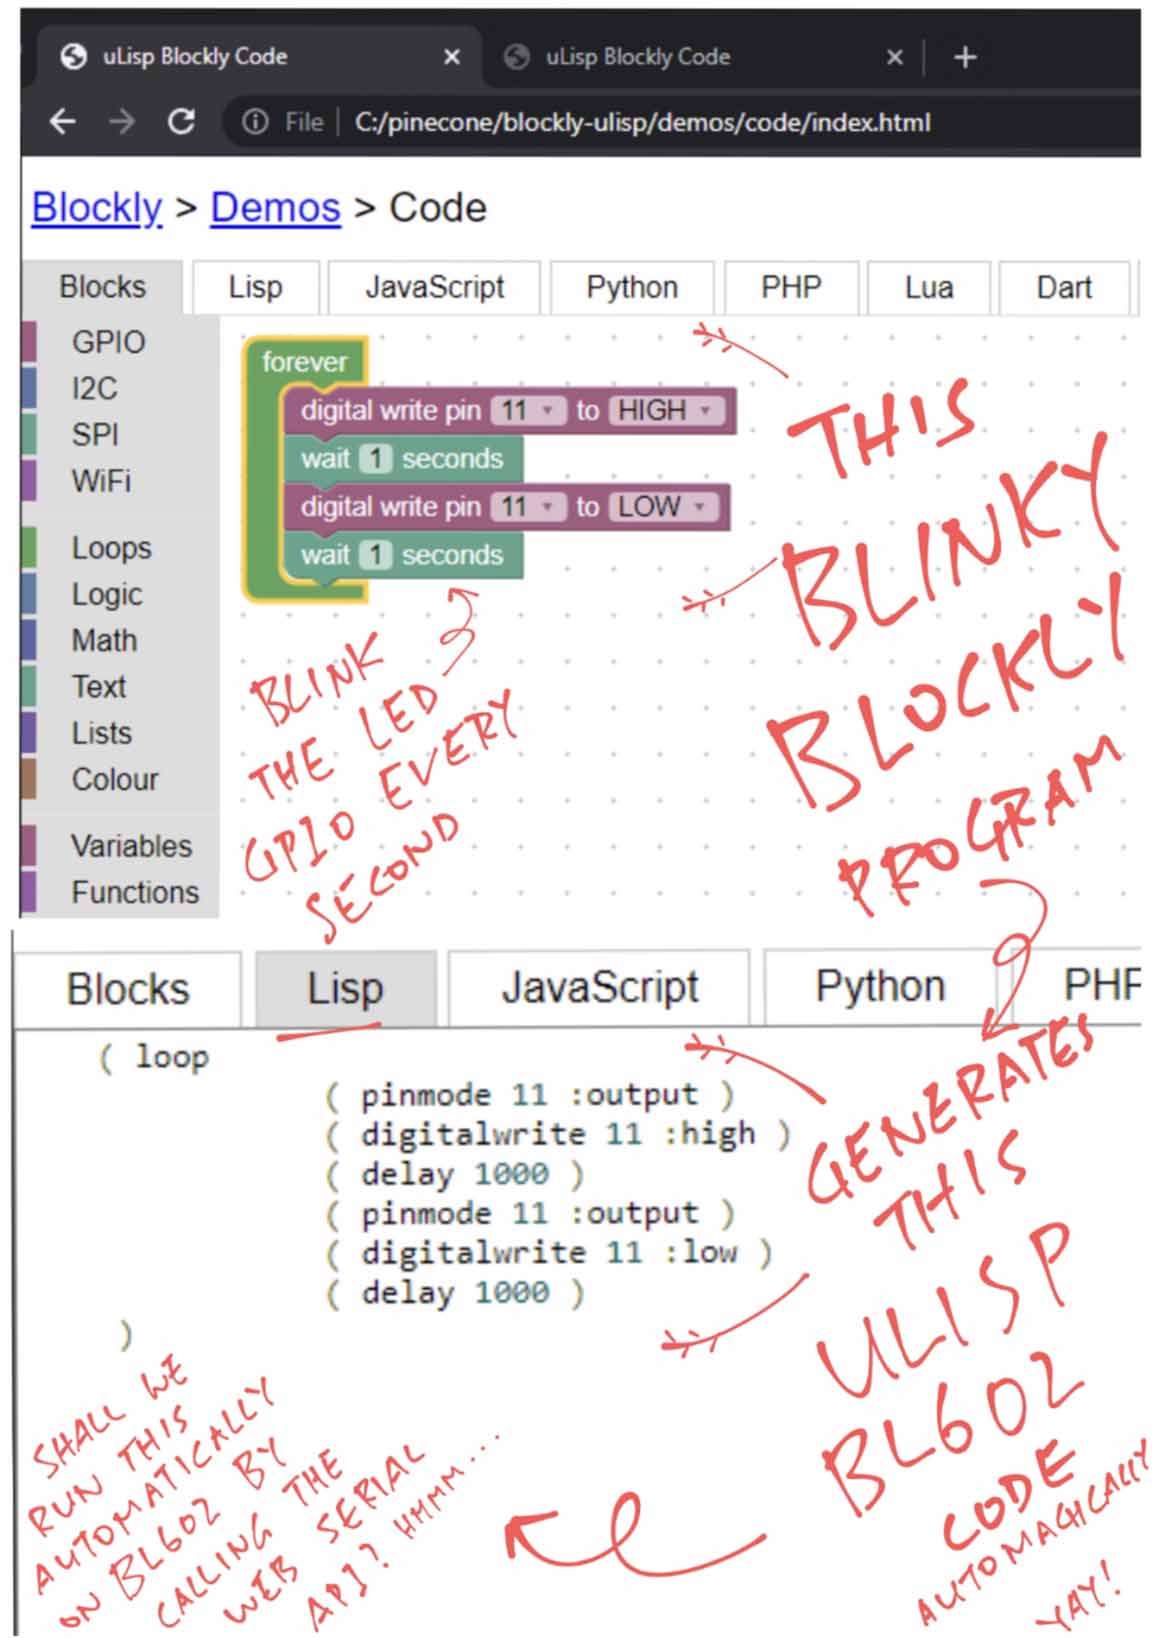
In short, Blockly will let us create uLisp programs through a Web Browser (with some customisation)...
(Yep it looks a lot like Scratch)
Does Blockly require any server-side code?
Nope, everything is done in plain old HTML and JavaScript, without any server-side code. It runs locally on our computer too.
(Which is great for developers)
So we copy and paste the generated uLisp code from Blockly to BL602?
Nope we're in 2021, everything can be automated!
See the Run Button [ ▶ ] at top right?
Pressing it will automatically transfer the uLisp Code from Blockly to BL602... Thanks to the Web Serial API!
Let's try it now.
We shall do two things with Blockly and uLisp on BL602...
-
Flip the BL602 LED on and off
-
Blink the BL602 LED every second
Just by dragging-and-dropping in a Web Browser!
-
Close the BL602 serial connection in
screen/ CoolTerm /putty/ Web Serial Terminal (close the web browser) -
Disconnect BL602 from our computer, and reconnect it to the USB Port.
-
Click this link to run the Blockly Web Editor for uLisp...
(This website contains plain HTML and JavaScript, no server-side code. See
blockly-ulisp) -
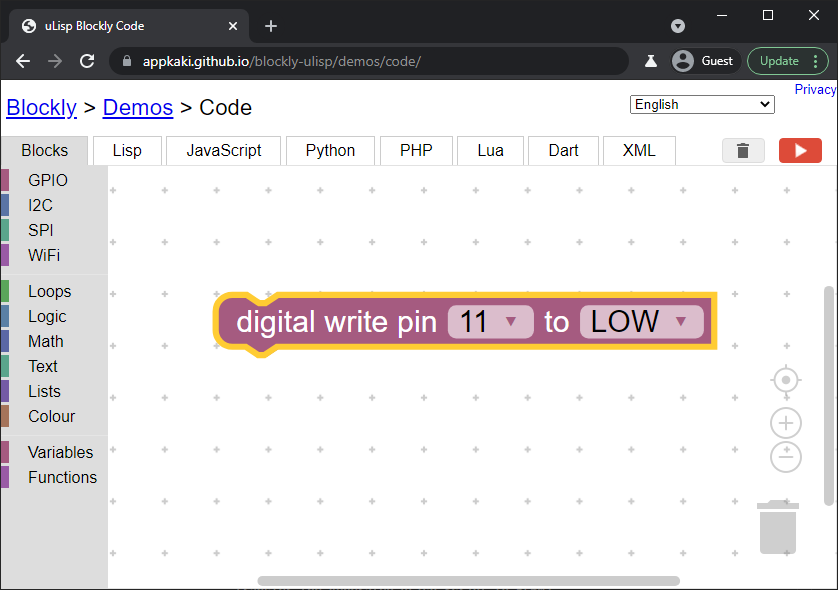
Click
GPIOin the left bar.Drag the
digital writeblock to the empty space.We should see this...
-
In the
digital writeblock, change11to the GPIO Pin Number for the LED.For PineCone BL602 Blue LED: Set it to
11 -
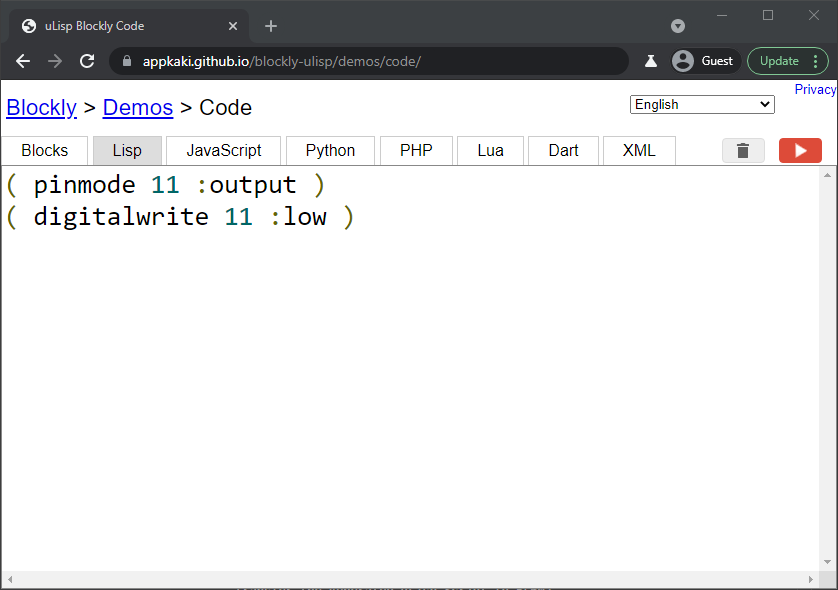
Click the
Lisptab at the top.We should see this uLisp code generated by Blockly...
-
Click the Run Button [ ▶ ] at top right.
When prompted, select the USB port for BL602.
(It works on macOS, Windows and probably Linux too)
The LED switches on!
-
In the
digital writeblock, changeLOWtoHIGHClick the Run Button [ ▶ ] at top right.
The LED switches off!
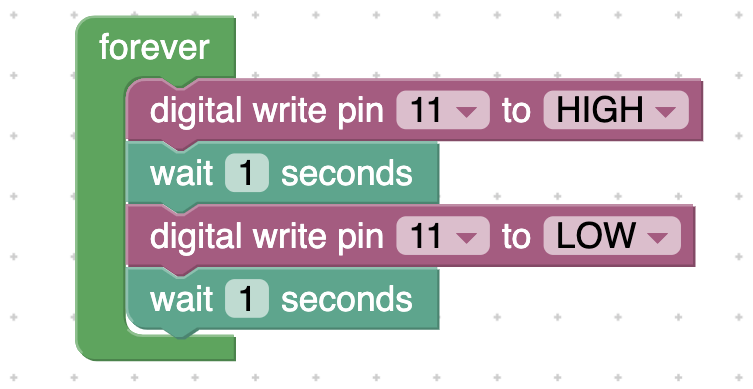
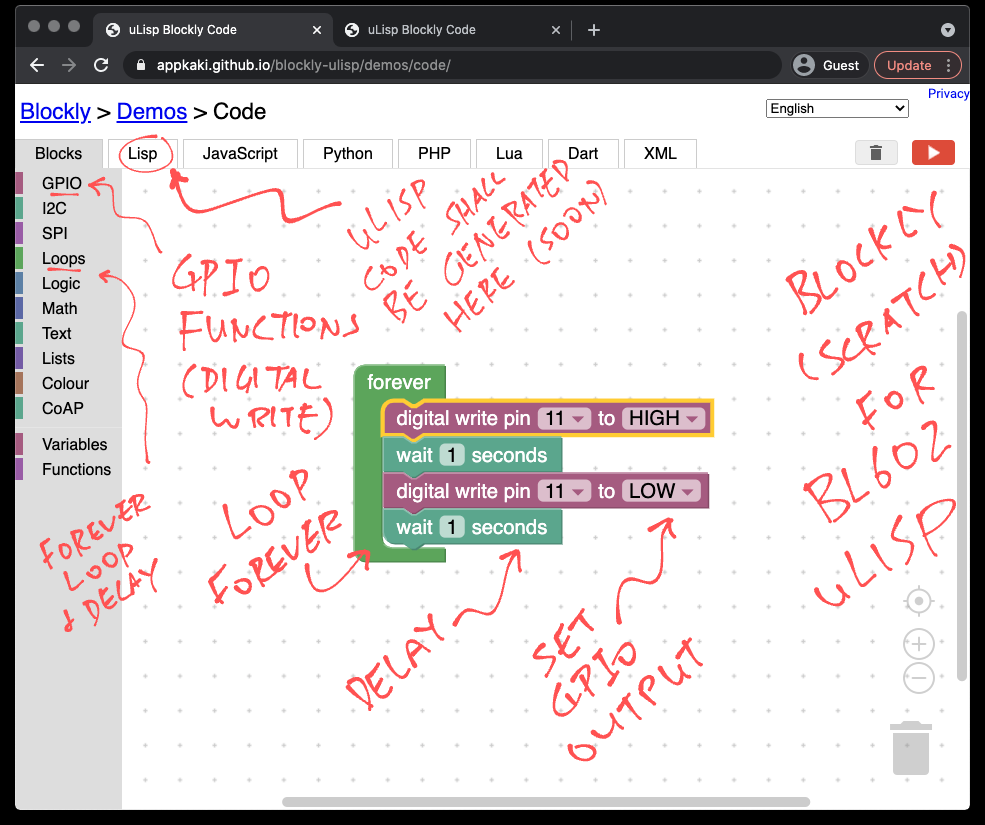
Now we do the Blinky Program the drag-and-drop way with Blockly...
-
Erase the
digital writeblock from the last section -
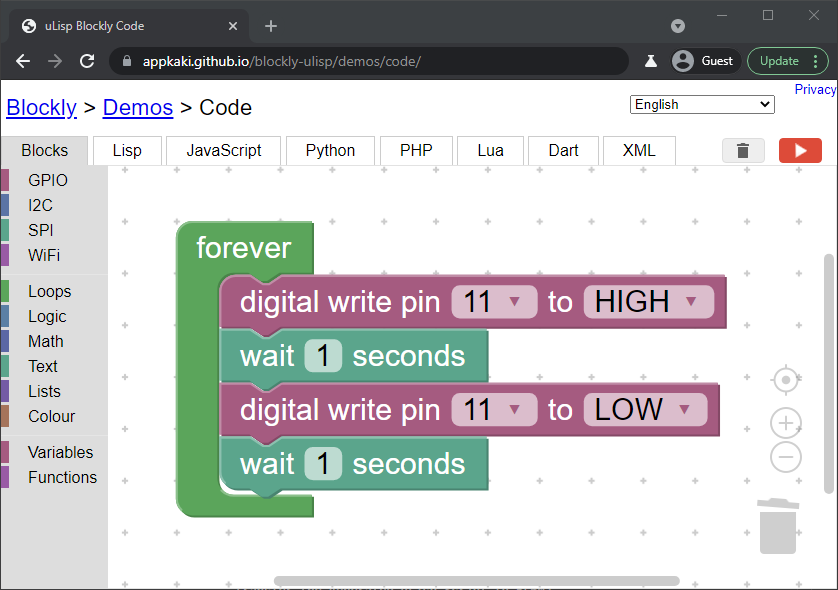
Drag-and-drop this Blockly Program...
By snapping these blocks together...
-
foreverfromLoops(left bar) -
digital writefromGPIO(left bar) -
waitfromLoops(left bar)
Make sure they fit snugly. (Not floaty)
-
-
Set the values for the
digital writeandwaitblocks as shown above.In the
digital writeblock, change11to the GPIO Pin Number for the LED.For PineCone BL602 Blue LED: Set it to
11 -
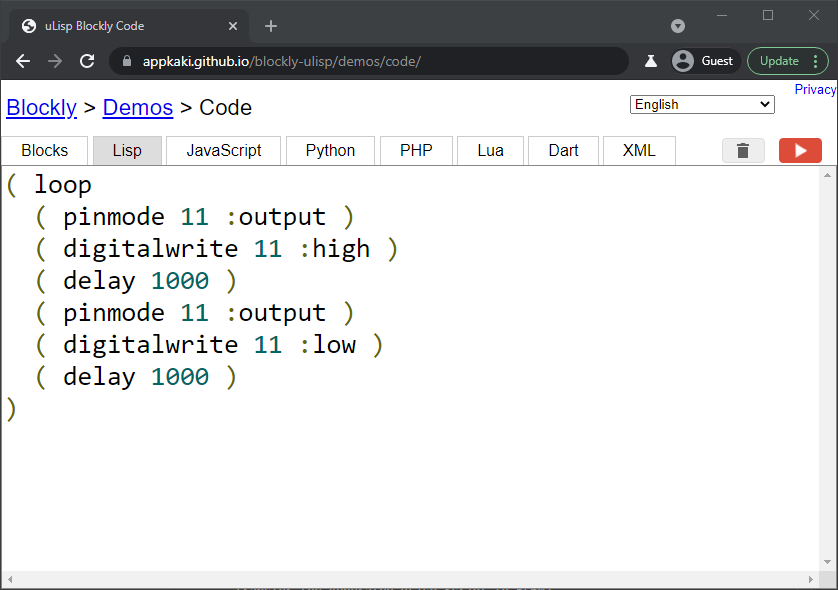
Click the
Lisptab at the top.We should see this uLisp code generated by Blockly...
-
Click the Run Button [ ▶ ] at top right.
The LED blinks every second!
(Restart the board to stop it, sorry)
What is this magic that teleports the uLisp code from Web Browser to BL602?
The Blockly Web Editor calls the Web Serial API (in JavaScript) to transfer the generated uLisp code to BL602 (via the USB Serial Port).
Web Serial API is supported on the newer web browsers. To check whether our web browser supports the Web Serial API, click this link...
We should be able to connect to BL602 via the USB Serial Port...
(Remember to set the Baud Rate to Custom with value 2000000)
So the Web Serial API lets us send commands to BL602?
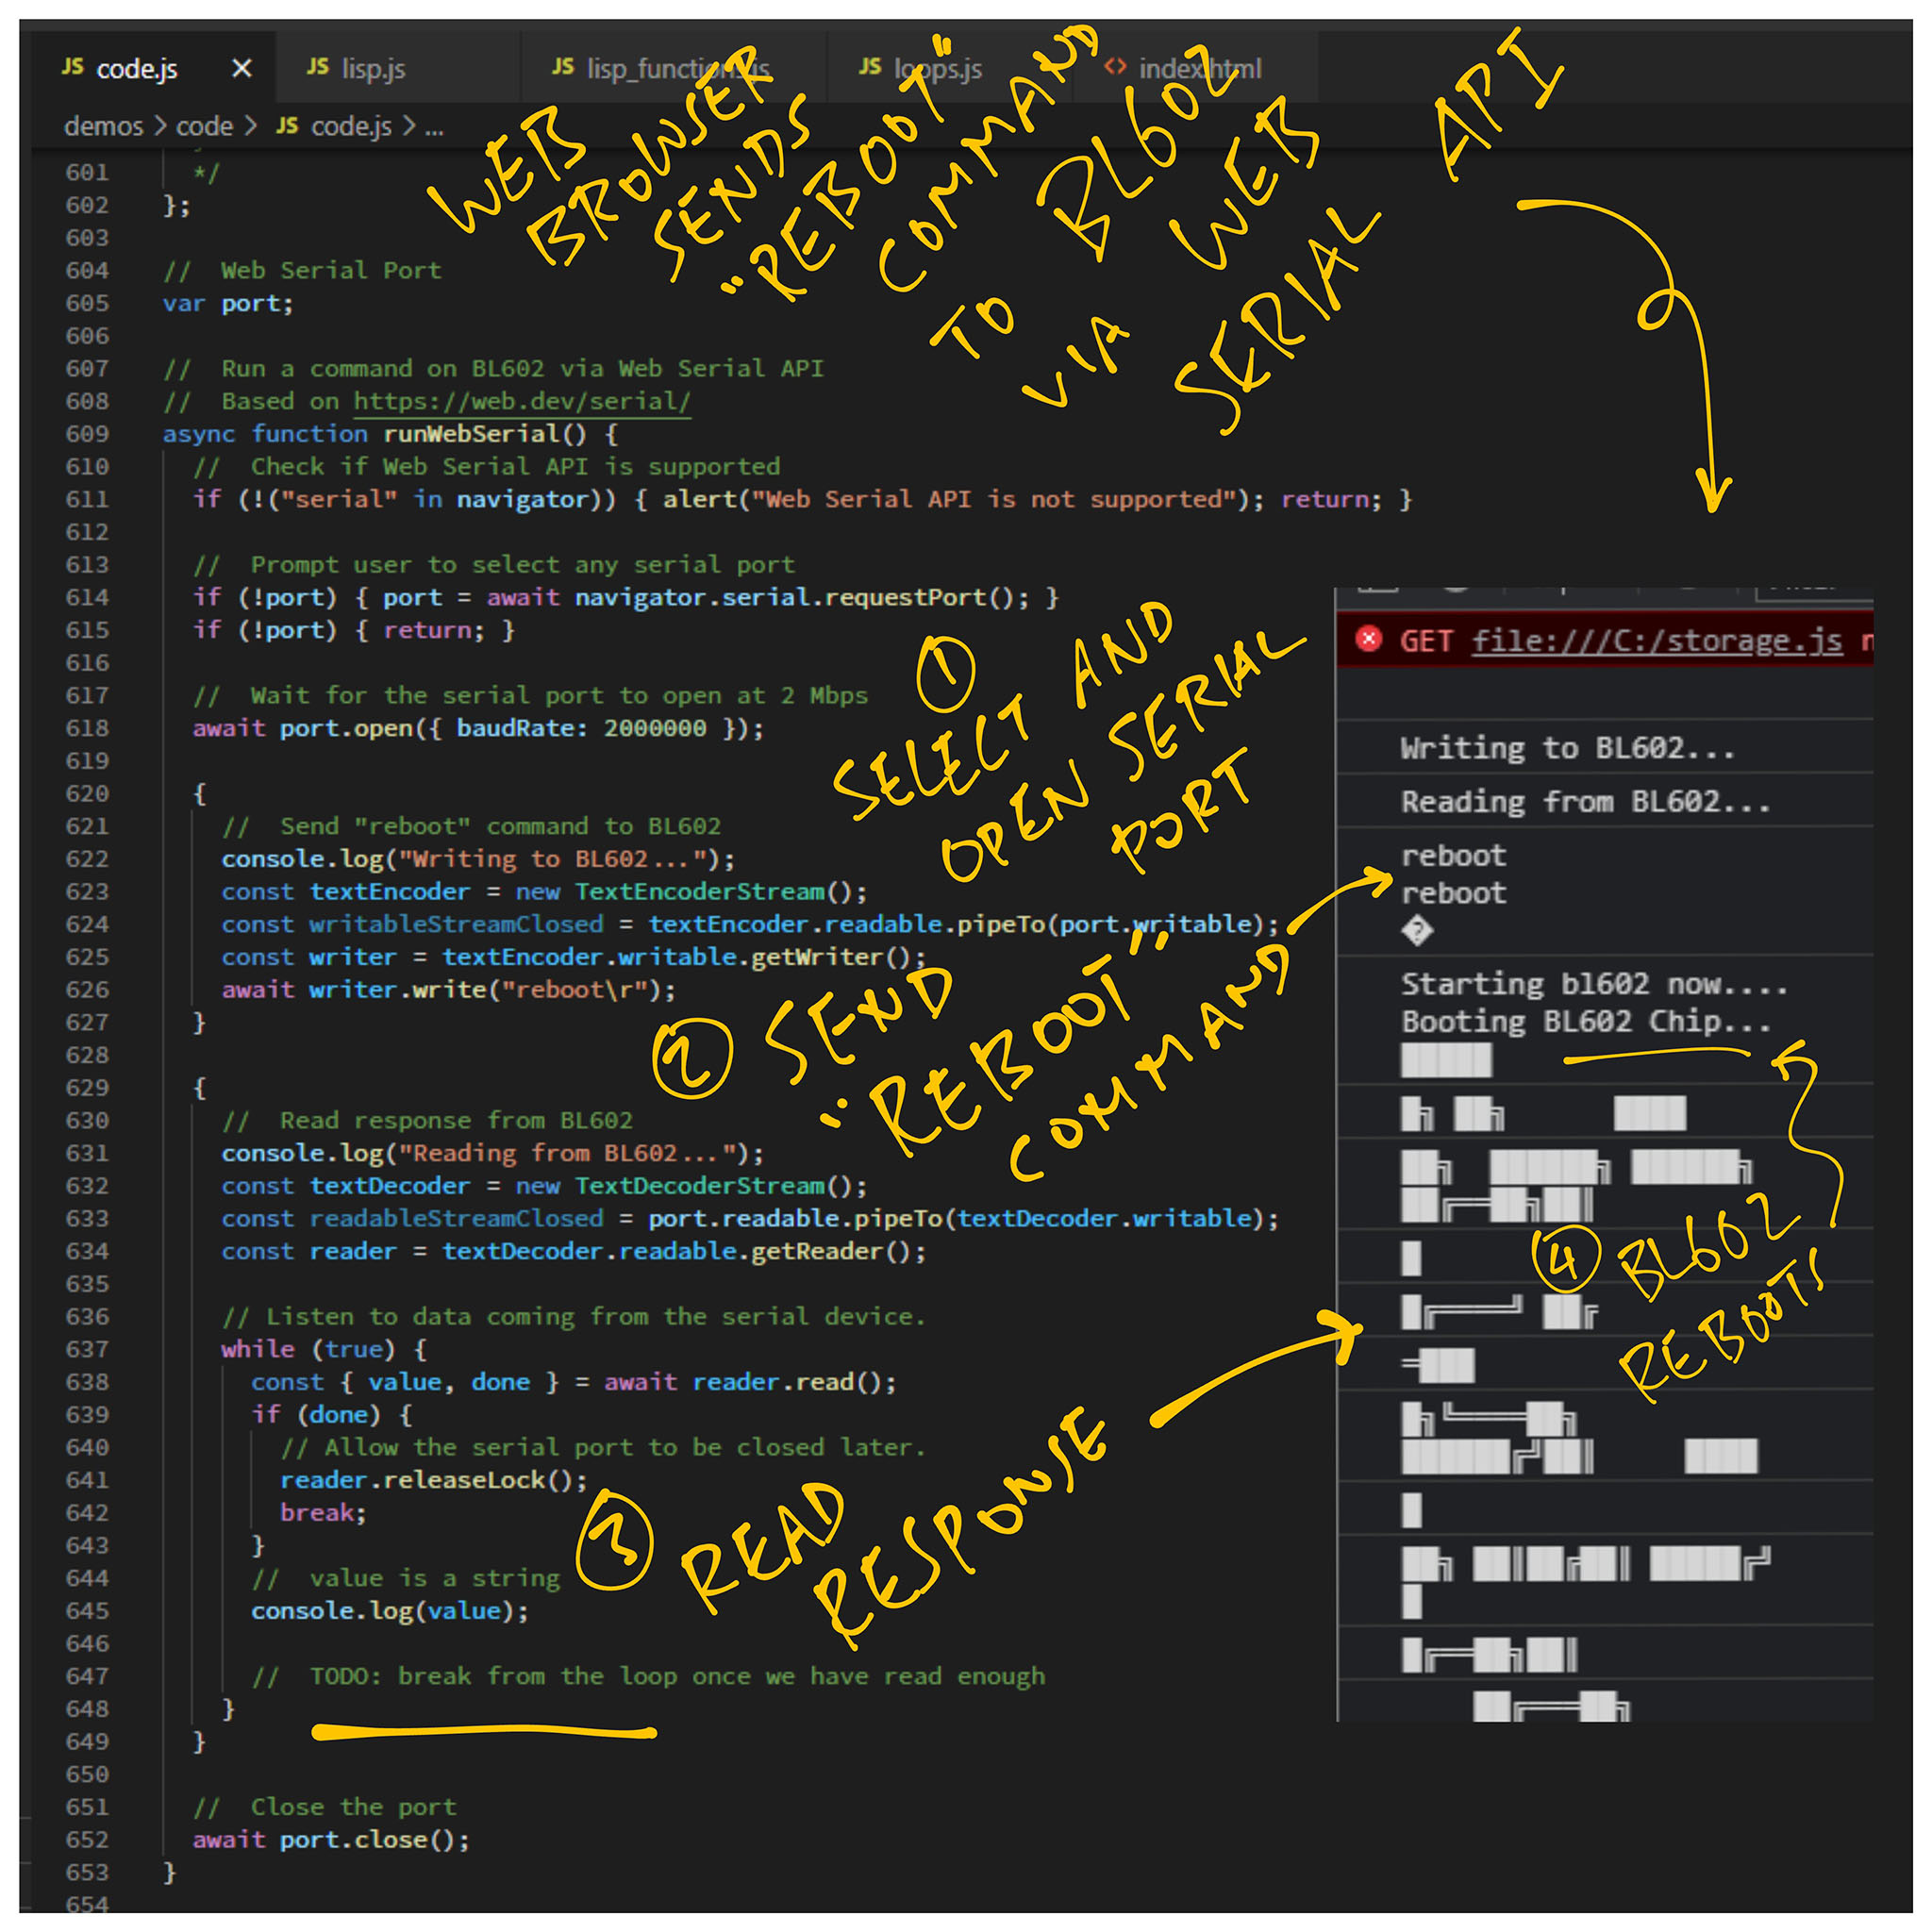
Yep it does! Here we send the reboot command to BL602 via a Web Browser with the Web Serial API...
But there were two interesting challenges...
-
When do we stop?
Our JavaScript code might get stuck waiting forever for a response from the BL602 command.
For the
rebootcommand we tweaked our JavaScript code to stop when it detects the special keywords...Init CLI(Which means that BL602 has finished rebooting)
-
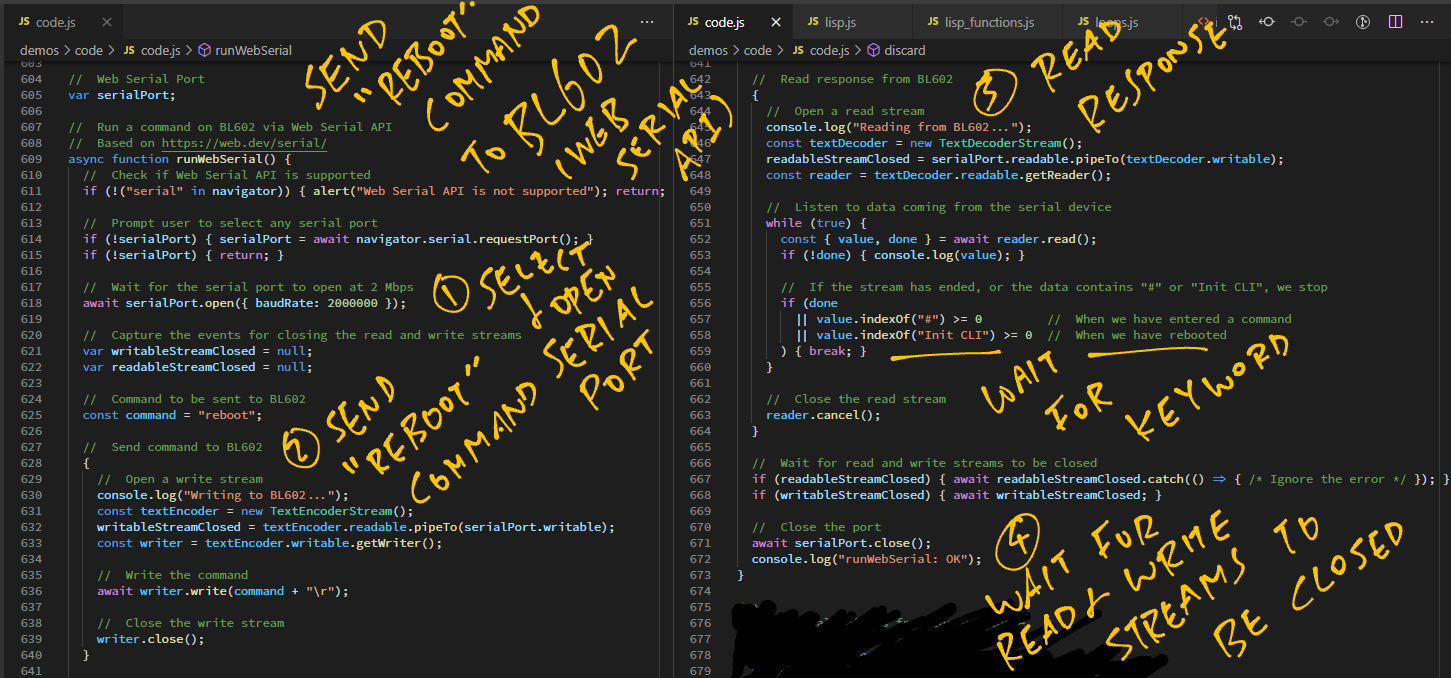
How do we clean up?
We use Async Streams to transmit and receive BL602 serial data.
Async Streams don't close immediately... We need to
awaitfor them to close.(Or our serial port will be locked from further access)
The proper way to send a reboot command to BL602 looks like this...
Let's look at the fixed code in Blockly (our bespoke version) that sends uLisp Commands to BL602.
For convenience, we wrap the Web Serial API in a high-level JavaScript Async Function: runWebSerialCommand
Here's how we call runWebSerialCommand to send the reboot Command to BL602 and wait for the response "Init CLI"...
//  Send the reboot command
await runWebSerialCommand(
  "reboot",   //  Command
  "Init CLI"  //  Expected Response
);
(This also sends Enter / Carriage Return after the reboot Command)
We don't actually send the reboot Command in Blockly (because it's too disruptive).
Instead we send to BL602 an Empty Command like so: code.js
//  Send an empty command and
//  check that BL602 responds with "#"
await runWebSerialCommand(
  "",  //  Command
  "#"  //  Expected Response
);
This is equivalent to hitting the Enter key and checking whether BL602 responds with the Command Prompt "#"
We do this before sending each command to BL602. (Just to be sure that BL602 is responsive)
Now to send an actual command like "( pinmode 11 :output )", we do this...
//  Send the actual command but
//  don't wait for response
await runWebSerialCommand(
  command,  //  Command
  null      //  Don't wait for response
);
We don't wait for the response from BL602, because some uLisp commands don't return a response (loop) or they return a delayed response (delay).
That's why we send the Empty Command before the next command, to check whether the previous command has completed.
(In future we should make this more robust by adding a timeout)
Let's look inside the runWebSerialCommand function and learn how it sends commands from Web Browser to BL602 via the Web Serial API.
runWebSerialCommand accepts 2 parameters...
-
command: The command that will be sent to from the Web Browser to BL602, like...( pinmode 11 :output )The function sends a Carriage Return after the command.
-
expectedResponse: The expected response from BL602, like "#".The function will wait for the expected response to be received from BL602 before returning.
If the expected response is null, the function returns without waiting.
We start by checking whether the Web Serial API is supported by the web browser: code.js
//  Web Serial Port
var serialPort;

//  Run a command on BL602 via Web Serial API and wait for the expectedResponse (if not null)
//  Based on https://web.dev/serial/
async function runWebSerialCommand(command, expectedResponse) {
  //  Check if Web Serial API is supported
  if (!("serial" in navigator)) { alert("Web Serial API is not supported"); return; }
Next we prompt the user to select the Serial Port, and we remember the selection...
  //  Prompt user to select any serial port
  if (!serialPort) { serialPort = await navigator.serial.requestPort(); }
  if (!serialPort) { return; }
We open the Serial Port at 2 Mbps, which is the standard Baud Rate for BL602 Firmware...
  //  Wait for the serial port to open at 2 Mbps
  await serialPort.open({ baudRate: 2000000 });
In a while we shall set these to defer the closing of the Read / Write Streams for the Serial Port...
  //  Capture the events for closing the read and write streams
  var writableStreamClosed = null;
  var readableStreamClosed = null;
Now we're ready to send the Command String to the Serial Port...
-
We create a TextEncoderStream that will convert our Command String into UTF-8 Bytes
-
We pipe the
TextEncoderStreamto Serial Port Output -
We fetch the
writableStreamClosedPromise that we'll call to close the Serial Port -
We get the
writerStream for writing our Command String to the Serial Port Output
  //  Send command to BL602
  {
    //  Open a write stream
    console.log("Writing to BL602: " + command + "...");
    const textEncoder = new TextEncoderStream();
    writableStreamClosed = textEncoder.readable.pipeTo(serialPort.writable);
    const writer = textEncoder.writable.getWriter();
We write the Command String to the writer Stream (including the Carriage Return)...
    //  Write the command
    await writer.write(command + "\r");

    //  Close the write stream
    writer.close();
  }
And we close the writer Stream (Serial Port Output).
If we're expected to wait for the response from the Serial Port...
-
We create a TextDecoderStream that will convert the Serial Port input from UTF-8 Bytes into Text Strings
-
We pipe the Serial Port Input to
TextDecoderStream -
We fetch the
readableStreamClosedPromise that we'll call to close the Serial Port -
We get the
readerStream for reading response strings from the Serial Port Input
  //  Read response from BL602
  if (expectedResponse) {
    //  Open a read stream
    console.log("Reading from BL602...");
    const textDecoder = new TextDecoderStream();
    readableStreamClosed = serialPort.readable.pipeTo(textDecoder.writable);
    const reader = textDecoder.readable.getReader();
We loop forever reading strings from the reader Stream (Serial Port Input)...
    //  Listen to data coming from the serial device
    while (true) {
      const { value, done } = await reader.read();
      if (!done) { console.log(value); }
Until we find the expected response...
      //  If the stream has ended, or the data contains expected response, we stop
      if (done || value.indexOf(expectedResponse) >= 0) { break; }
    }
And we close the reader Stream (Serial Port Input)...
    //  Close the read stream
    reader.cancel();
  }
Here's the catch (literally)... Our reader and writer Streams are not actually closed yet!
We need to wait for the reader and writer Streams to close...
  //  Wait for read and write streams to be closed
  if (readableStreamClosed) { await readableStreamClosed.catch(() => { /* Ignore the error */ }); }
  if (writableStreamClosed) { await writableStreamClosed; }
Finally it's safe to close the Serial Port...
  //  Close the port
  await serialPort.close();
  console.log("runWebSerial: OK");
}
And that's how Blockly sends a uLisp command to BL602 with the Web Serial API!
Today we've seen uLisp on BL602, ported from the ESP32 Arduino version of uLisp.
Porting uLisp from ESP32 Arduino to BL602 sounds difficult?
Not at all!
(Wait... We've said this before)
-
No Heap Memory, just Static Memory
uLisp needs only Static Memory, no Heap Memory.
This makes uLisp highly portable across microcontrollers:
ulisp.c#define WORKSPACESIZE 8000 // Cells (8*bytes) #define SYMBOLTABLESIZE 1024 // Bytes object Workspace[WORKSPACESIZE]; char SymbolTable[SYMBOLTABLESIZE];
-
Reading from BL602 Flash Memory is simpler
On Arduino we access Flash Memory by calling
PSTR.That's not necessary on BL602, so we stub out the Flash Memory functions:
ulisp.c#define PGM_P const char * #define PROGMEM #define PSTR(s) s
-
printfworks on BL602No more
Serial.write. (Nice!) -
Compiles in C, no C++ needed
Because the Arduino C++ bits (like
Serial.write) have been converted to C (likeprintf). -
GPIO Functions
This GPIO code from the ESP32 Arduino version of uLisp:
ulisp-esp.ino/// Set the GPIO Output to High or Low object *fn_digitalwrite (object *args, object *env) { // Omitted: Parse the GPIO pin number and High / Low ... // Set the GPIO output (from Arduino) digitalWrite(pin, mode);
Was ported to BL602 by calling the BL602 GPIO Hardware Abstraction Layer:
ulisp.c/// Set the GPIO Output to High or Low object *fn_digitalwrite (object *args, object *env) { // Omitted: Parse the GPIO pin number and High / Low // (Same as before) ... // Set the GPIO output (from BL602 GPIO HAL) int rc = bl_gpio_output_set( pin, // GPIO pin number mode // 0 for low, 1 for high ); assert(rc == 0); // Halt on error
-
Delay Function
BL602 runs on a multitasking operating system (FreeRTOS).
Thus we need to be respectful of other Background Tasks that may be running.
Here's how we implement the uLisp
delayfunction on BL602:ulisp.c/// Delay for specified number of milliseconds object *fn_delay (object *args, object *env) { (void) env; object *arg1 = first(args); // Convert milliseconds to ticks int millisec = checkinteger(DELAY, arg1); uint32_t ticks = time_ms_to_ticks32(millisec); // Sleep for the number of ticks time_delay(ticks); return arg1; }
time_ms_to_ticks32andtime_delayare multitasking functions provided by the NimBLE Porting Layer, implemented with FreeRTOS. -
Loop and Yield
The BL602 implementation of the uLisp
loopfunction is aware of multitasking too.We preempt the current task at every iteration of the loop:
ulisp.c/// "loop" implementation in uLisp object *sp_loop (object *args, object *env) { object *start = args; for (;;) { // Sleep 100 ticks in each iteration time_delay(100); // TODO: Tune this
(This is probably no good for time-sensitive uLisp functions... We will have to rethink this)
-
BL602 cares about the Command Line
On Arduino we read and parse the Serial Input, byte by byte.
Whereas on BL602, the BL602 IoT SDK parses the Command Line for us.
Here's how we define "
(" as a Command Keyword in BL602:demo.c/// List of commands. STATIC_CLI_CMD_ATTRIBUTE makes this(these) command(s) static const static struct cli_command cmds_user[] STATIC_CLI_CMD_ATTRIBUTE = { { "(", "Run the uLisp command", run_ulisp }, };
When we enter a command like "
( delay 1000 )", the command-line interface calls our functionrun_ulispdefined indemo.c/// Command-Line Buffer that will be passed to uLisp static char cmd_buf[1024] = { 0 }; /// Run a uLisp command void run_ulisp(char *buf, int len, int argc, char **argv) { // If the last command line arg is `\`, we expect a continuation bool to_continue = false; if (strcmp(argv[argc - 1], "\\") == 0) { to_continue = true; argc--; // Skip the `\` } // Concatenate the command line, separated by spaces for (int i = 0; i < argc; i++) { assert(argv[i] != NULL); strncat(cmd_buf, argv[i], sizeof(cmd_buf) - strlen(cmd_buf) - 1); strncat(cmd_buf, " ", sizeof(cmd_buf) - strlen(cmd_buf) - 1); } cmd_buf[sizeof(cmd_buf) - 1] = 0; // If this the end of the command line... if (!to_continue) { // Execute the command line execute_ulisp(cmd_buf); // Erase the buffer cmd_buf[0] = 0; } }
The command-line interface splits the command line into multiple arguments (delimited by space), so we need to merge the arguments back into a single command line.
(Yeah, not so efficient)
We support continuation of command lines when the command line ends with "
\"We pass the merged command line to
execute_ulispdefined inulisp.c/// Console input buffer, position and length const char *input_buf = NULL; int input_pos = 0; int input_len = 0; /// Execute the command line void execute_ulisp(const char *line) { // Set the console input buffer input_buf = line; input_pos = 0; input_len = strlen(line); // Start the uLisp Interpreter loop_ulisp(); }
Here we save the merged command line into a buffer and start the uLisp Interpreter.
Lastly we modified the
gserialfunction in uLisp to read the command line from the buffer (instead of Serial Input):ulisp.c/// Return the next char from the console input buffer int gserial() { if (LastChar) { // Return the previous char char temp = LastChar; LastChar = 0; return temp; } if (input_pos >= input_len) { // No more chars to read return '\n'; } // Return next char from the buffer return input_buf[input_pos++]; }
What else needs to be ported to BL602?
If the Community could help to port the missing uLisp Features... That would be super awesome! 🙏 👍
-
GPIO
Port these uLisp GPIO Functions to BL602 with the BL602 GPIO HAL...
-
I2C
Port these uLisp I2C Functions to BL602 with the BL602 I2C HAL...
-
SPI
Port these uLisp SPI Functions to BL602 with the BL602 SPI HAL...
-
ADC
Port these uLisp ADC Functions to BL602 with the BL602 ADC HAL...
-
DAC
Port these uLisp DAC Functions to BL602 with the BL602 DAC HAL...
-
WiFi
Port these uLisp WiFi Functions to BL602 with the BL602 WiFi HAL...
More about BL602 WiFi HAL...
-
EPROM
Port these uLisp EPROM Functions to BL602 with the BL602 Flash Memory HAL...
Porting the EPROM functions to BL602 will allow us to save and load uLisp images to / from Flash Memory.
How did we customise Blockly for uLisp and BL602?
-
We added Custom Blocks like
forever,digital writeandwaitAll blocks under GPIO, I2C and SPI are Custom Blocks. (See pic below)
-
We created a Code Generator that generates uLisp code.
(More about this in the next section)
-
We integrated Blockly with Web Serial API to transfer the generated uLisp code to BL602
(The Web Serial API code we saw earlier)
Which Blockly source files were modified?
We modified these Blockly source files to load the Custom Blocks and generate uLisp code...
-
This is the HTML source file for the Blockly Web Editor. (See pic above)
-
This is the main JavaScript source file for the Blockly Web Editor.
This file contains the JavaScript function
runWebSerialCommandthat transfers the generated uLisp code to BL602 via Web Serial API. -
This JavaScript file renders the Blockly Workspace as SVG, including the Toolbox Bar at left.
How did we create the Custom Blocks?
We used the Block Exporter from Blockly to create the Custom Blocks...
generators/lisp/ lisp_library.xml: XML for Custom Blocks
With Block Explorer and the Custom Blocks XML file, we generated this JavaScript file containing our Custom Blocks...
generators/lisp/ lisp_blocks.js: JavaScript for Custom Blocks
Block Exporter and Custom Blocks are explained here...
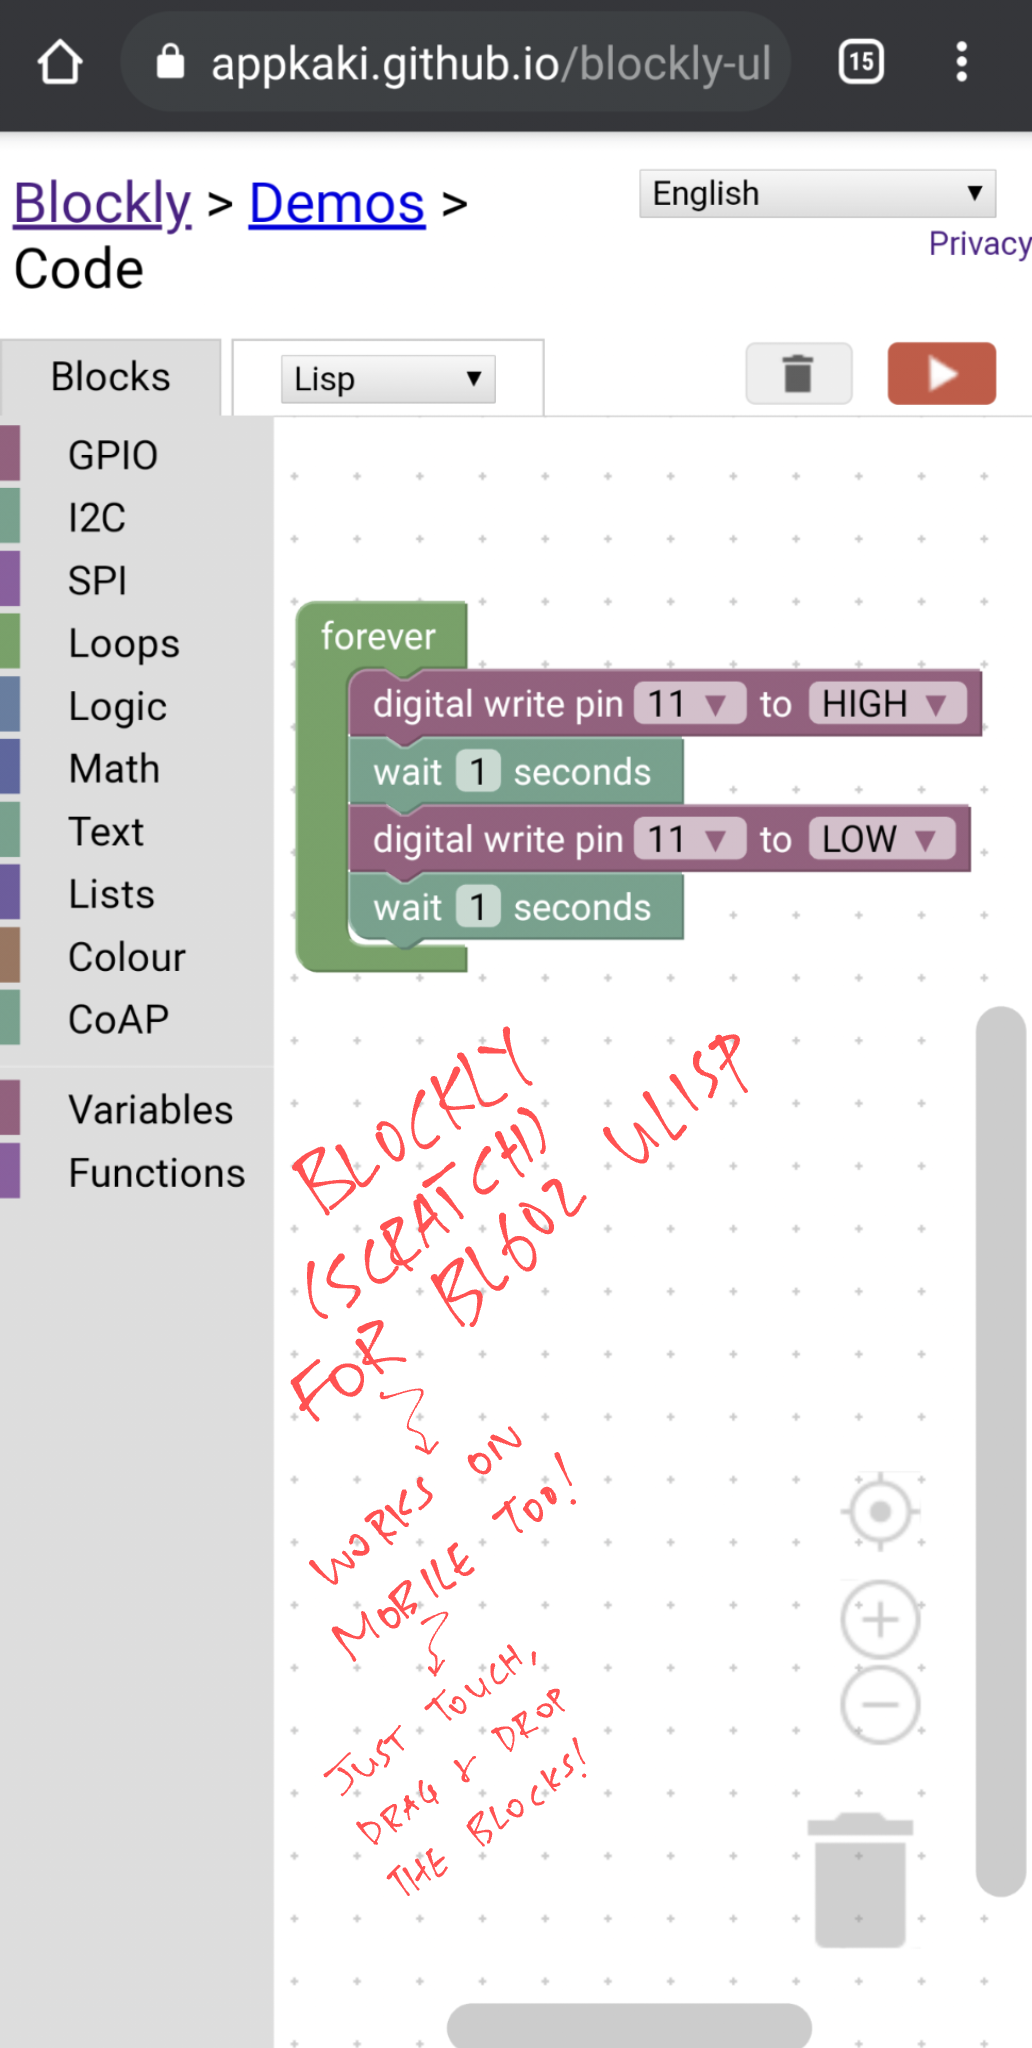
Does Blockly work on Mobile Web Browsers?
Yes but the Web Serial API won't work for transferring the generated uLisp code to BL602. (Because we can't connect BL602 as a USB Serial device)
In future we could use the Web Bluetooth API instead to transfer the uLisp code to BL602. (Since BL602 supports Bluetooth LE)
Here's how it looks on a Mobile Web Browser...
What were we thinking when we designed the Custom Blocks: forever, on_start, digital write, wait, ...
The custom blocks were inspired by MakeCode for BBC micro:bit...
How did we generate uLisp code in Blockly?
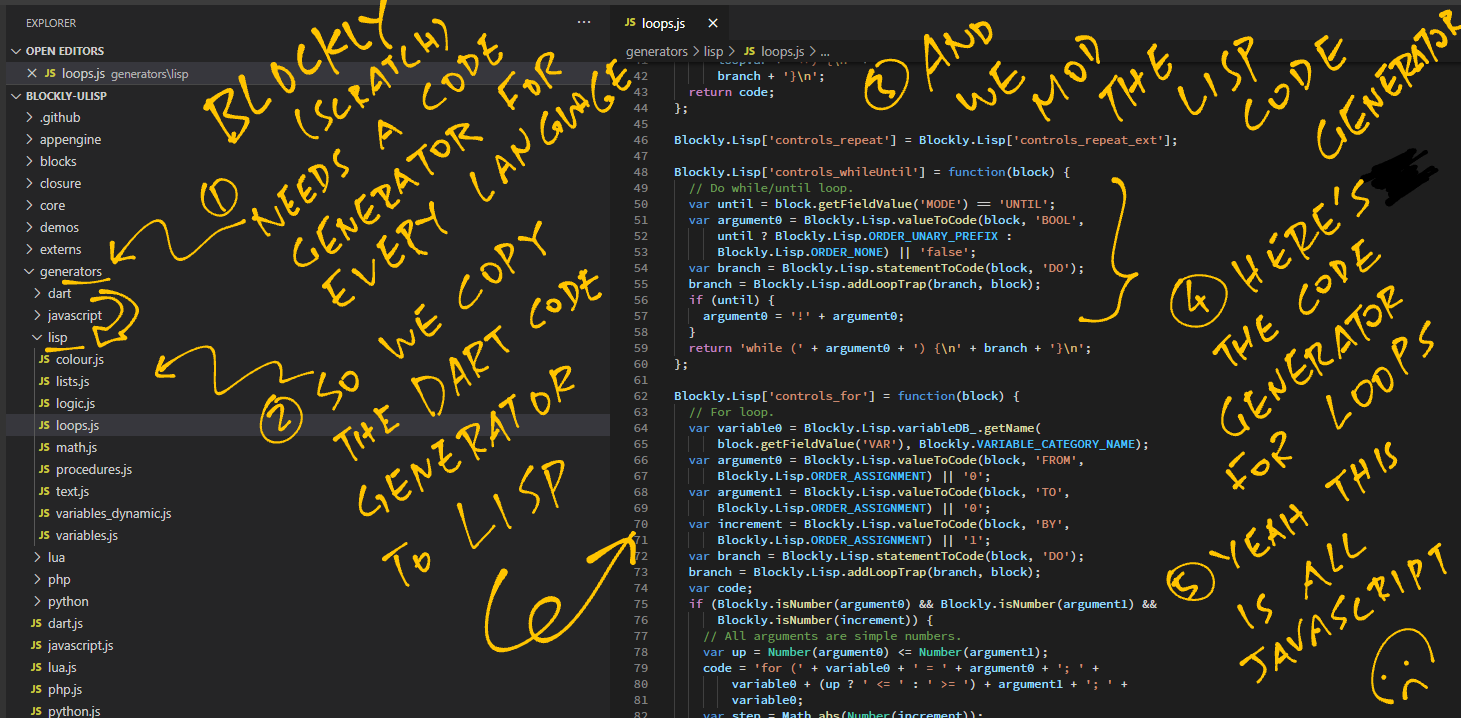
We created Code Generators for uLisp. Our Code Generators are JavaScript Functions that emit uLisp code for each type of Block...
We started by copying the Code Generators from Dart to Lisp into this Blockly folder...
generators/lisp: Code Generators for uLisp
Then we added this Code Generator Interface for uLisp...
generators/lisp.js: Interface for uLisp Code Generator
Which Blocks are supported by the uLisp Code Generator?
The uLisp Code Generator is incomplete.
The only Blocks supported are...
-
forever(See this) -
on_start(See this) -
wait(See this) -
digital write(See this)
How do we define a uLisp Code Generator?
Here's how we define the forever Code Generator: lisp_functions.js
//  Emit uLisp code for the "forever" block.
//  Inspired by MakeCode "forever" and Arduino "loop".
Blockly.Lisp['forever'] = function(block) {
  //  Convert the code inside the "forever" block into uLisp
  var statements_stmts = Blockly.Lisp.statementToCode(block, 'STMTS');
  var code = statements_stmts;

  //  Wrap the converted uLisp code with "loop"
  code = [
    '( loop  ',
    code + ')',
  ].join('\n');

  //  Return the wrapped code
  return code;
};
This JavaScript function emits a uLisp loop that wraps the code inside the forever block like so...
( loop
    ...Code inside the loop block...
)
And here's the digital write Code Generator: lisp_functions.js
//  Emit uLisp code for the "digtial write" block.
Blockly.Lisp['digital_write_pin'] = function(block) {
  //  Fetch the GPIO Pin Number (e.g. 11)
  var dropdown_pin = block.getFieldValue('PIN');

  //  Fetch the GPIO Output: ":high" or "low"
  var dropdown_value = block.getFieldValue('VALUE');

  //  Compose the uLisp code to set the GPIO Pin mode and output.
  //  TODO: Call init_out only once,
  var code = [
    '( pinmode ' + dropdown_pin + ' :output )',
    '( digitalwrite ' + dropdown_pin + ' ' + dropdown_value + ' )',
    ''
  ].join('\n');

  //  Return the uLisp code
  return code;
};
This JavaScript function emits uLisp code that sets the GPIO Pin mode and output like so...
( pinmode 11 :output )
( digitalwrite 11 :high )
What about the missing uLisp Code Generators?
If the Community could help to fill in the missing uLisp Code Generators... That would be incredibly awesome! 🙏 👍 😀
-
Expressions
This Expression Code Generator should emit this uLisp Code...
( / ( - 7 1 ) ( - 4 2 ) ) -
Strings
This String Code Generator should emit this uLisp Code...
"This is a string" -
Lists
This List Code Generator should emit this uLisp Code...
( first '( 1 2 3 ) ) -
If
This If Code Generator should emit this uLisp Code...
( if ( < ( analogread 0 ) 512 ) ( digitalwrite 2 t ) ( digitalwrite 3 t ) ) -
For Loops
This For Loop Code Generator should emit this uLisp Code...
( dotimes ( pin 3 ) ( digitalwrite pin :high ) ) -
While Loops
This While Loop Code Generator should emit this uLisp Code...
( loop ( unless ( digitalread 8 ) ( return ) ) ) -
Variables
This Variable Code Generator should emit this uLisp Code...
( defvar led 11 ) ( setq led 11 ) ( let* ( ( led 11 ) ... ) body ) -
Functions
This Function Code Generator should emit this uLisp Code...
( defun function_name ( ... ) ( ... ) ) -
GPIO
The Code Generators for
digital readanddigital toggleshould emit uLisp Code for... -
I2C, SPI, ADC, DAC
We need to create Custom Blocks and Code Generators for I2C, SPI, ADC and DAC that will emit uLisp Code for...
-
WiFi
We need to create WiFi Custom Blocks and Code Generators that will emit uLisp Code for...
-
Storage
Blockly doesn't save our program... Refresh the Web Browser and our program disappears.
We could enhance Blockly to save our program locally with JavaScript Local Storage...
This script is not used in our version of Blockly. But it's referenced by our HTML code here:
index.html -
Copy and paste the XML Code
But in the meantime, we can manually save and restore the program by copying and pasting the contents of the
XMLtab in Blockly.
You sound strangely familiar with Blockly Code Generators?
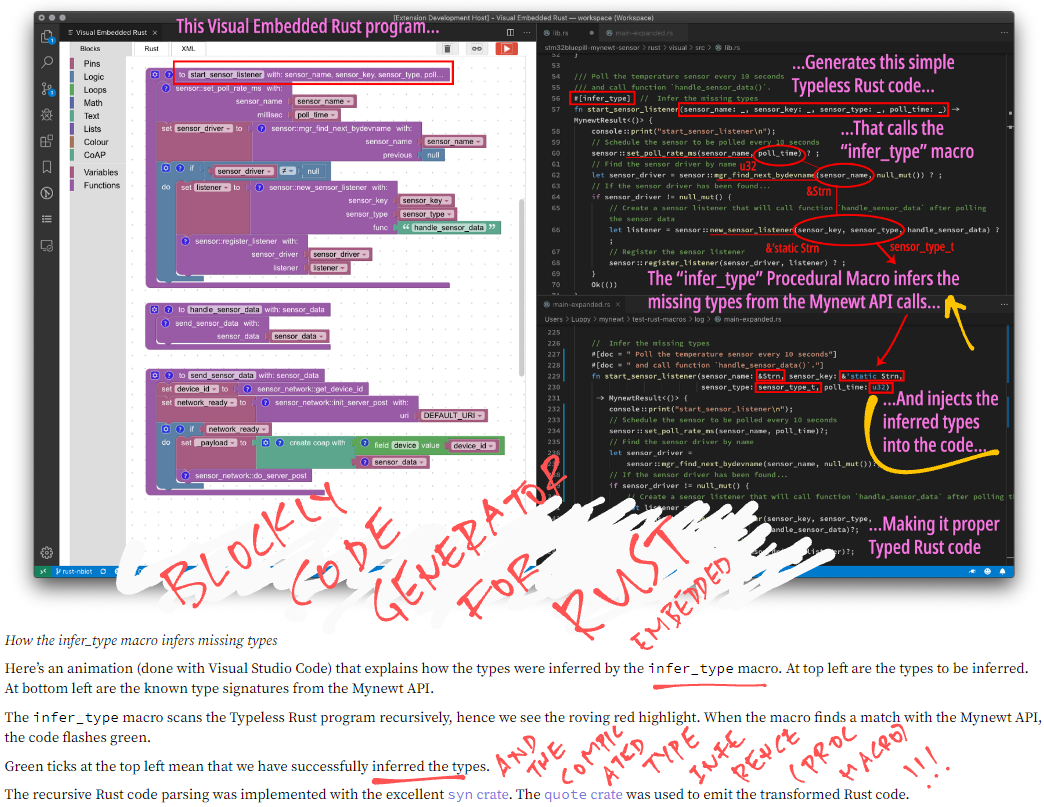
Yes the uLisp Code Generator is based on my earlier project on Visual Embedded Rust...
Generating Rust code in Blockly was highly challenging because we had to do Type Inference with Procedural Macros.
uLisp is not Statically Typed like Rust, so generating uLisp code in Blockly looks a lot simpler.
(Blockly for Visual Embedded Rust is wrapped inside a VSCode Extension that allows local, offline development. We could do the same for Blockly and uLisp)
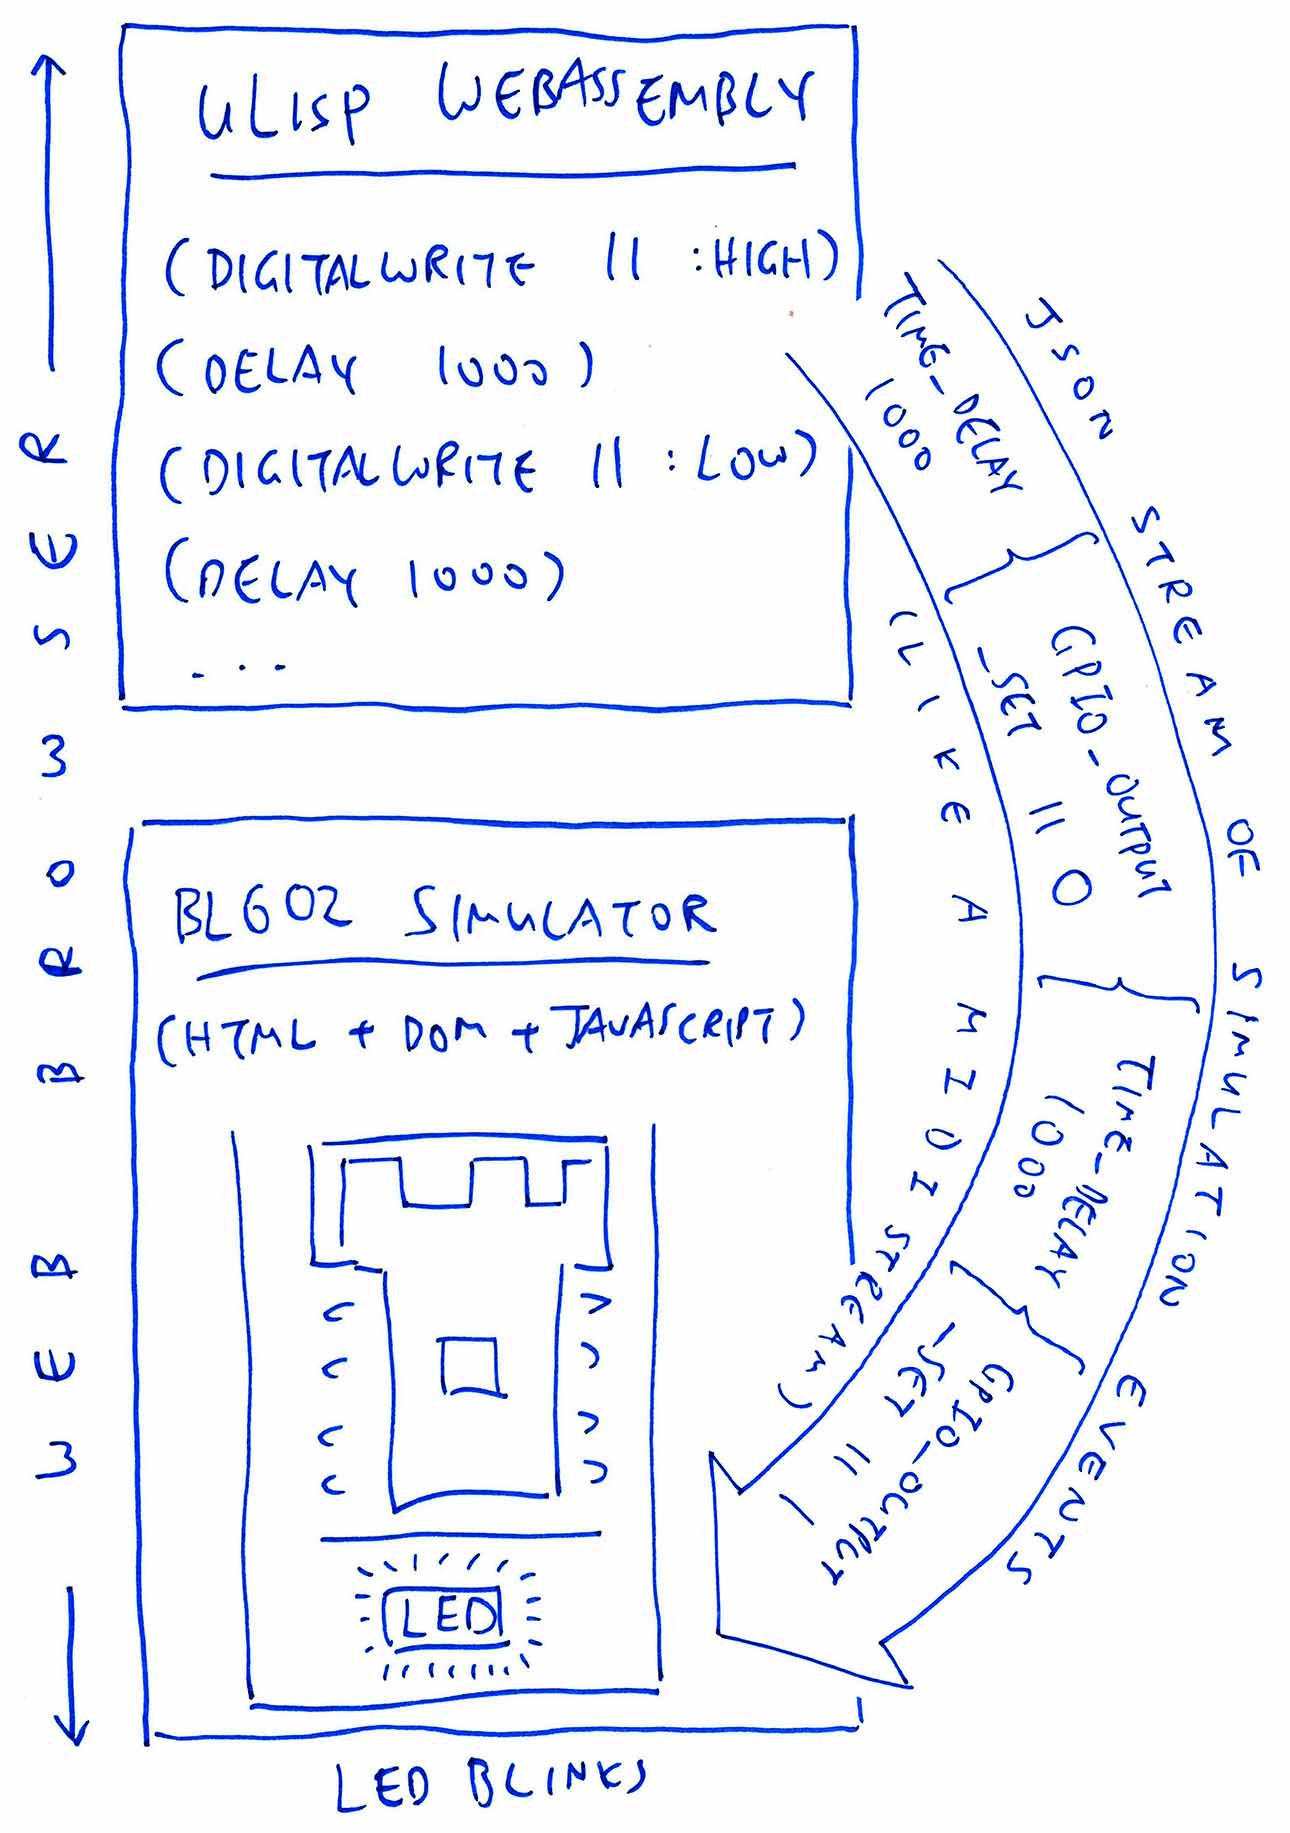
What if we...
-
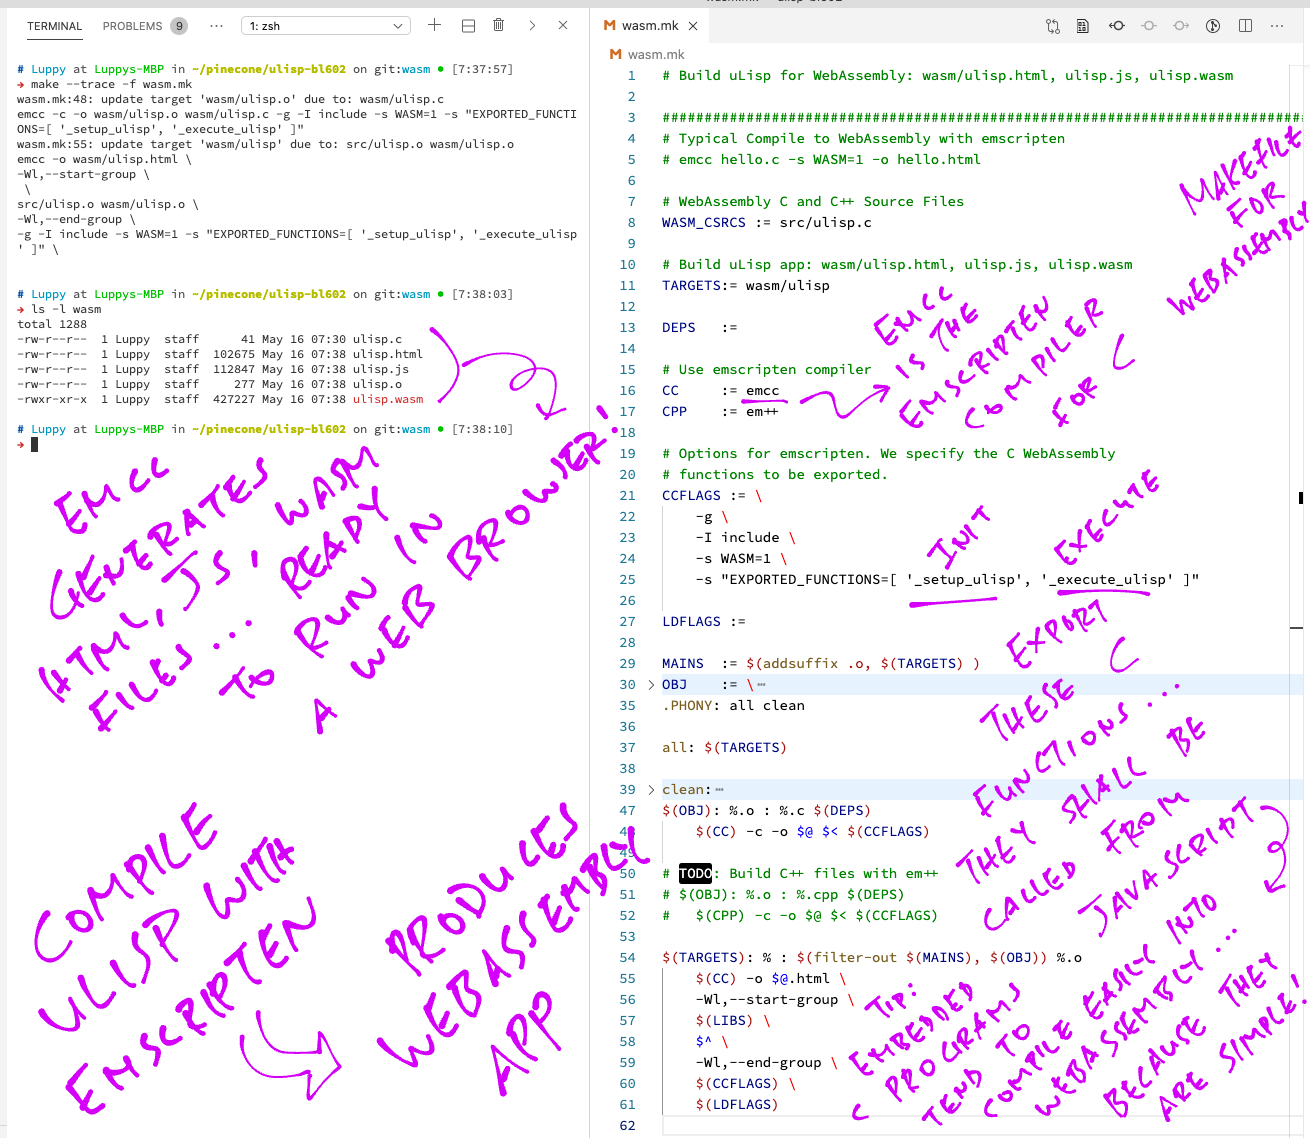
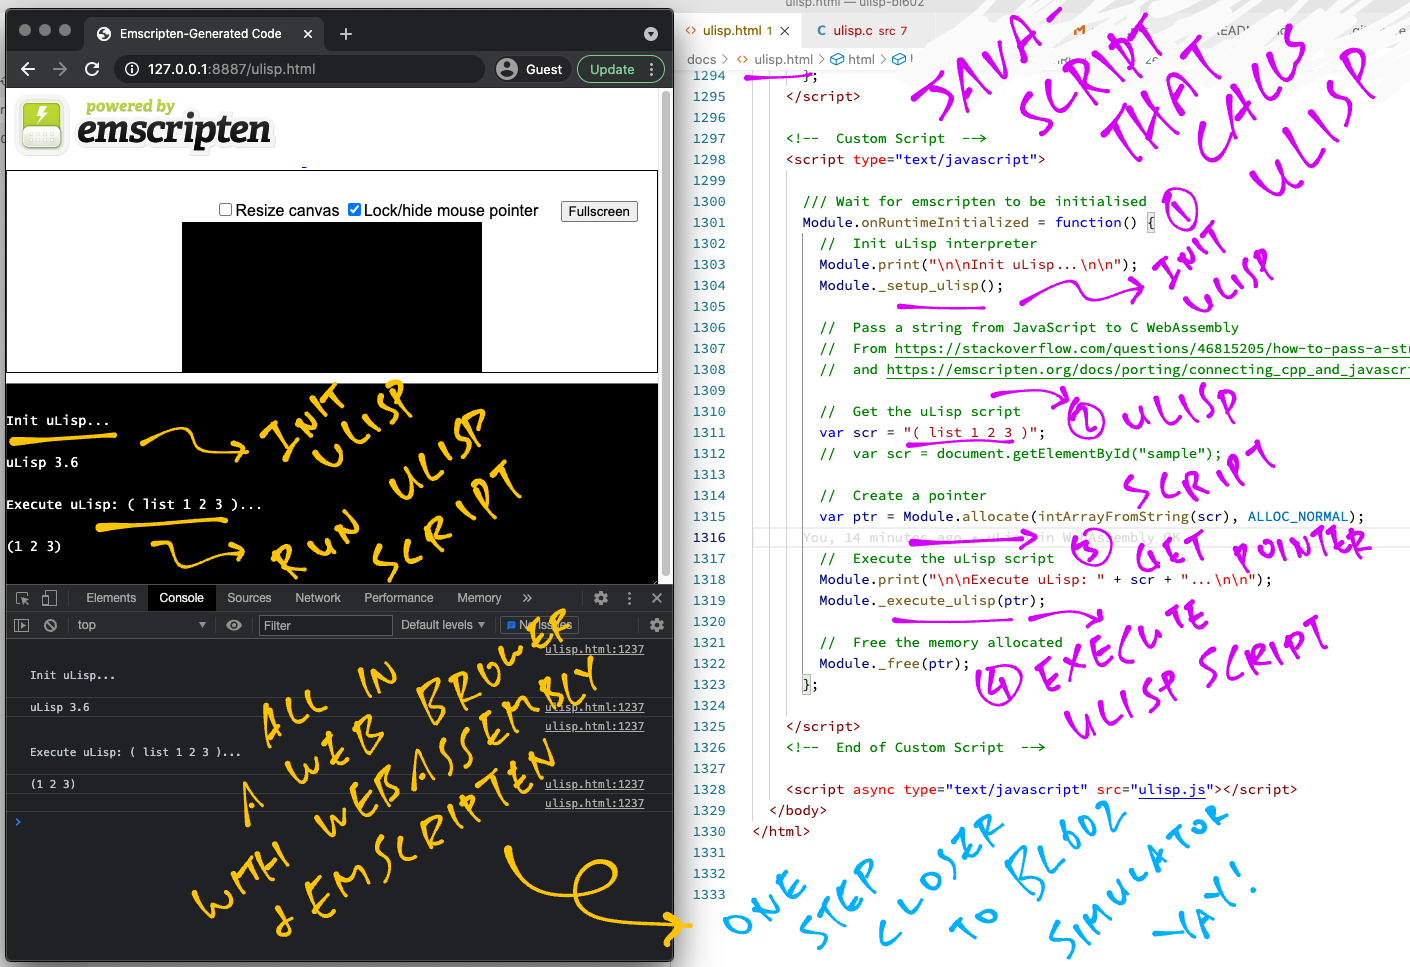
Compile the uLisp Interpreter to WebAssembly...
-
Use the WebAssembly version of uLisp to simulate BL602 in a Web Browser...
(Including GPIO, I2C, SPI, Display Controller, Touch Controller, LoRaWAN... Similar to this)
-
Integrate the BL602 Simulator with Blockly...
-
To allow embedded developers to preview their BL602 Blockly Apps in the Web Browser?
Read the article...
Porting uLisp and Blockly to BL602 has been a fun experience.
But more work needs to be done, I hope the Community can help.
Could this be the better way to learn Embedded Programming on modern microcontrollers?
Let's build it and find out! 🙏 👍 😀
Got a question, comment or suggestion? Create an Issue or submit a Pull Request here...
- This article is the expanded version of this Twitter Thread
