HOWTO: Setup provider: Amazon Web Services (AWS)
This document describes how to setup your AWS account to use it in BlendNet.
Useful info to compare with the other providers:
- Configs:
- Manager: 1CPU (t2.small $0.028/H)
- Agents: 3x, 2CPU (c4.large $0.124/H)
- Cheap agents disabled
- Upload blendnet to storage: 26s
- Manager run: 235s
- Manager rerun (already existing instance): 83s
- Render frame blendnet-test-project (upload, run agents, render, get compose): 521s
- Rerender frame blendnet-test-project (same but agents active and cache here): 317s
You will need to have a registered AWS account to activate Console https://console.aws.amazon.com/ - login with the existing account or create a new one. AWS have a Free tier Which allows to run some limited amount of instances and other stuff, but not giving the credit for the new users (like GCP doing).
In registering the new account you will need to enter your email, tell your phone number, put your address into the form and enter your credit card number of course.
After logging to the console (https://console.aws.amazon.com/) you need to obtain the security credentials. The creds are needed to enter into AWS cli configuration in step 3.
-
Go to https://console.aws.amazon.com/iam/home#/security_credentials and open
Access keyspanel.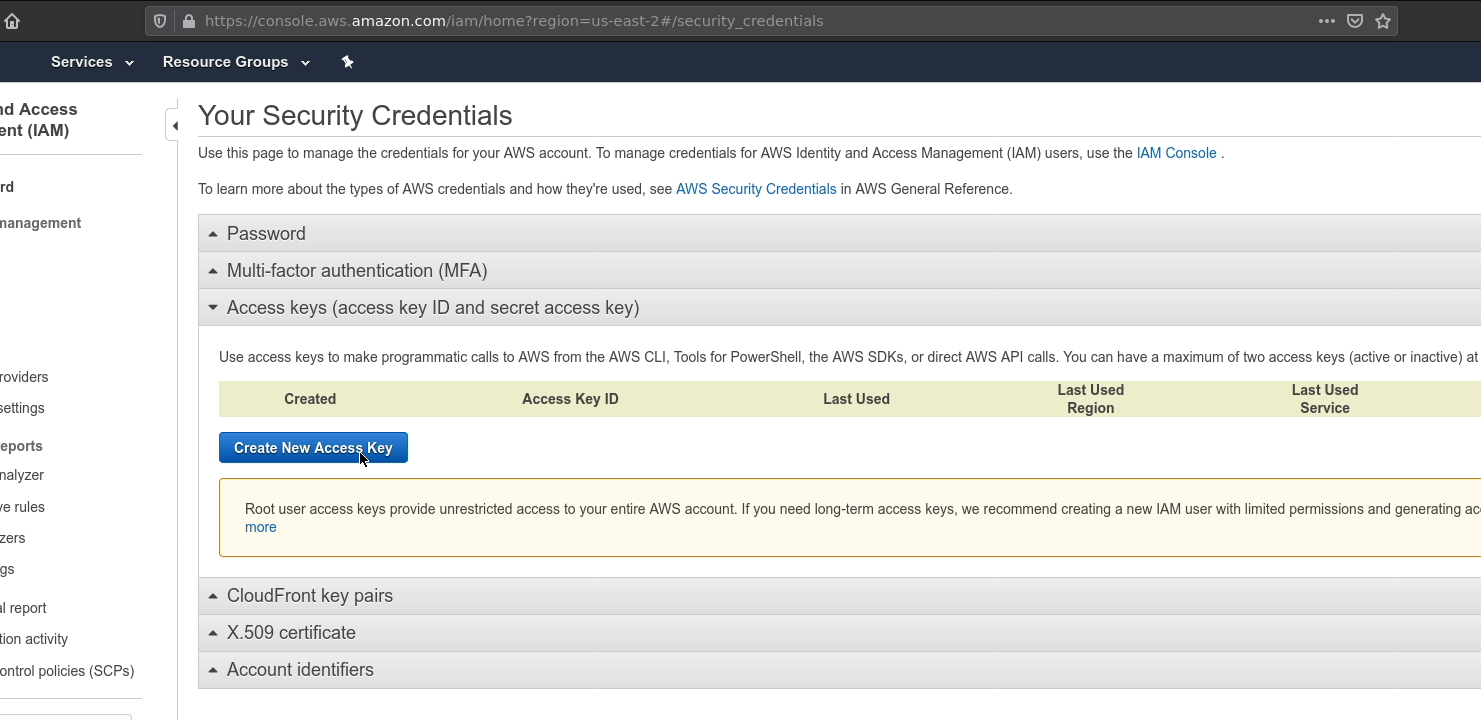
-
Click on
Create New Access Keybutton and show or download the access key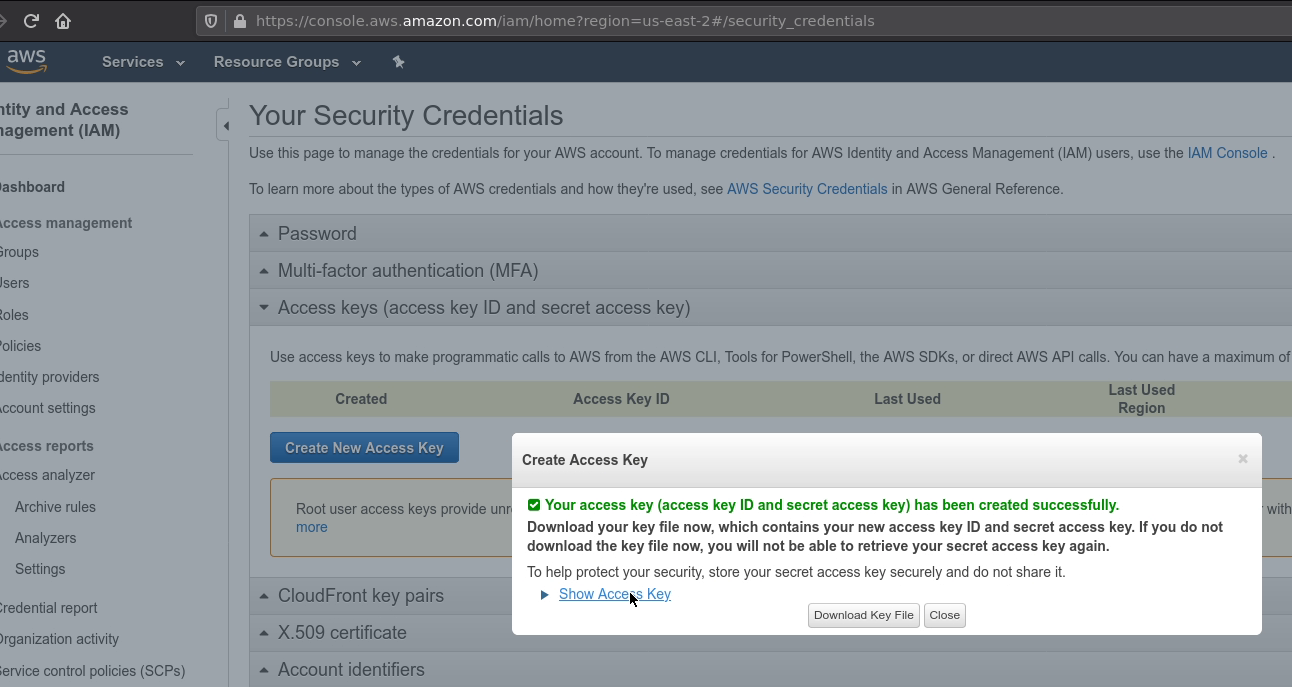
-
Don't close the tab until you will enter the key data into aws cli in the next step 3
BlendNet uses the original AWS CLI v2 binary to control the AWS resources, so you need to install it from
https://aws.amazon.com/cli/ - just follow the documentation and make sure aws executable will be available
from your regular console. When installation is completed - you will need to configure it with the obtained
security creds we've got in step 2:
-
Run the next command to enter your security credentials:
$ aws configure -
It will ask you to enter the next parameters ():
AWS Access Key ID [None]: AKIAIIVY************
AWS Secret Access Key [None]: QjX/sQ**********************************
Default region name [None]: us-west-1
Default output format [None]:
Region name you can take from here
Output format you can leave as is
That's it, now your aws cli should be ready to be used by BlendNet.
By default tools installs their binary path in .bashrc config, but this is working only for terminal. In case of launcher (UI one) - BlendNet will not be able to find the tool binary, but you can help it with changing the lauchctl configuration: https://apple.stackexchange.com/questions/106355/setting-the-system-wide-path-environment-variable-in-mavericks (or just run Blender from terminal to save some hair till v0.4 of BlendNet will come out).
Now aws cli is ok and BlendNet should be able to perform the first render with AWS provider. Default parameters allows to run 1 Manager (1VCPU) and 3 Agents (1VCPU each) - by default uses free-tier t2-micro instances, so you will be able to play a bit without spending money.
Of course you are able to choose the bigger instances, but be prepared to spend some amount on them. Luckily BlendNet supports Spot instances and the way to choose how much you want to pay. It's slightly harder to understand than the simple Preemptible CPUs on GCP, but gives you more freedom to render as much as you want for your money.
-
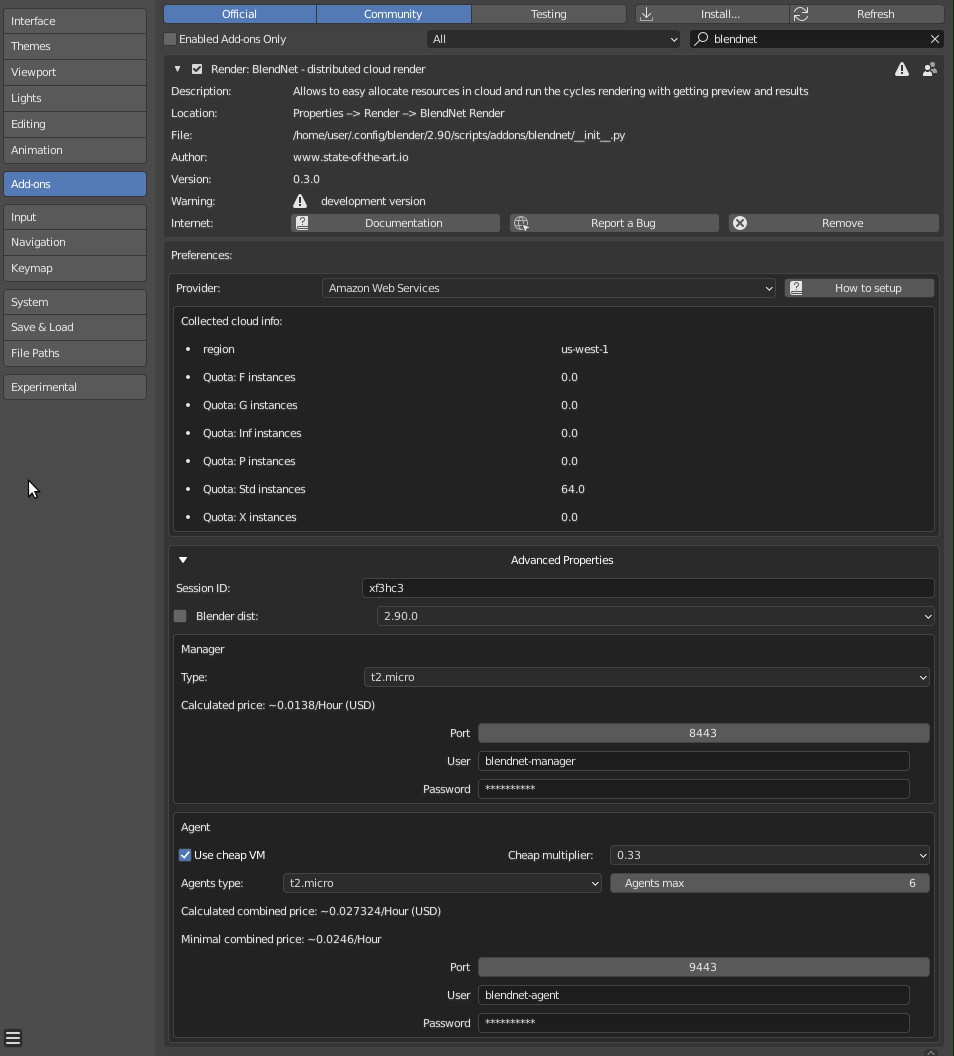
Let's go and check what you should see in the BlendNet addon preferences now:
-
The settings by default should be good enough for the first run.
-
Close the preferences and switch to your Scene
Render Propertiestab. Make sureCyclesis choosen as the Render Engine. If everything is setup properly - you will see the next pic:
-
First of all you will need to start the Manager by pressing
+button on theManagerpanel, that will allocate the instance in AWS cloud (statusStarted- it takes time to setup & run the service) and when the Addon will be able to connect to the Manager - it will change status toActive, so you can see it's its info: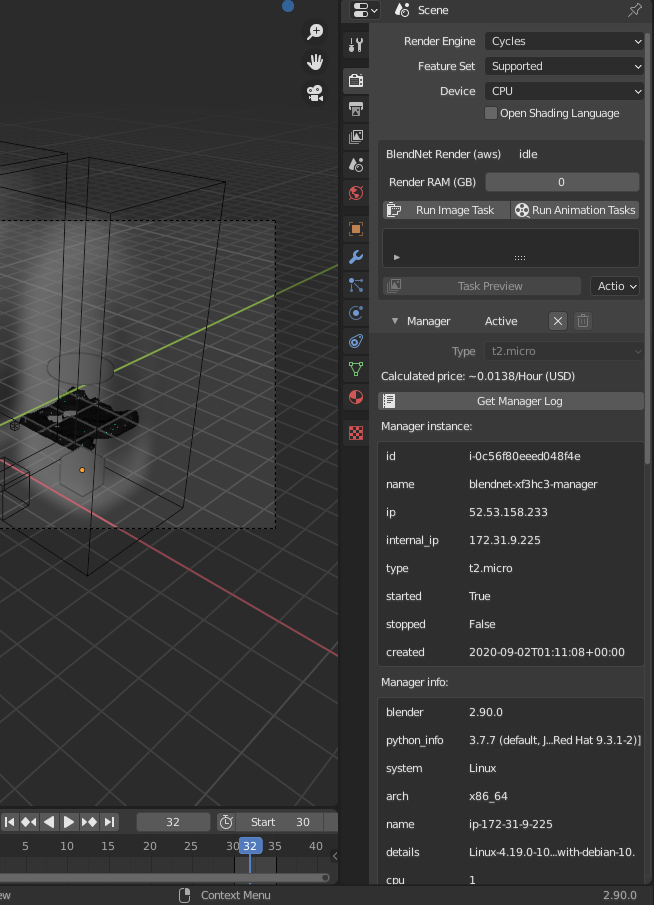
-
If you see that - it's time to open your project and click
Run Image Taskto get the results of your hard work (please check the general practices on the First steps page to get how to do that).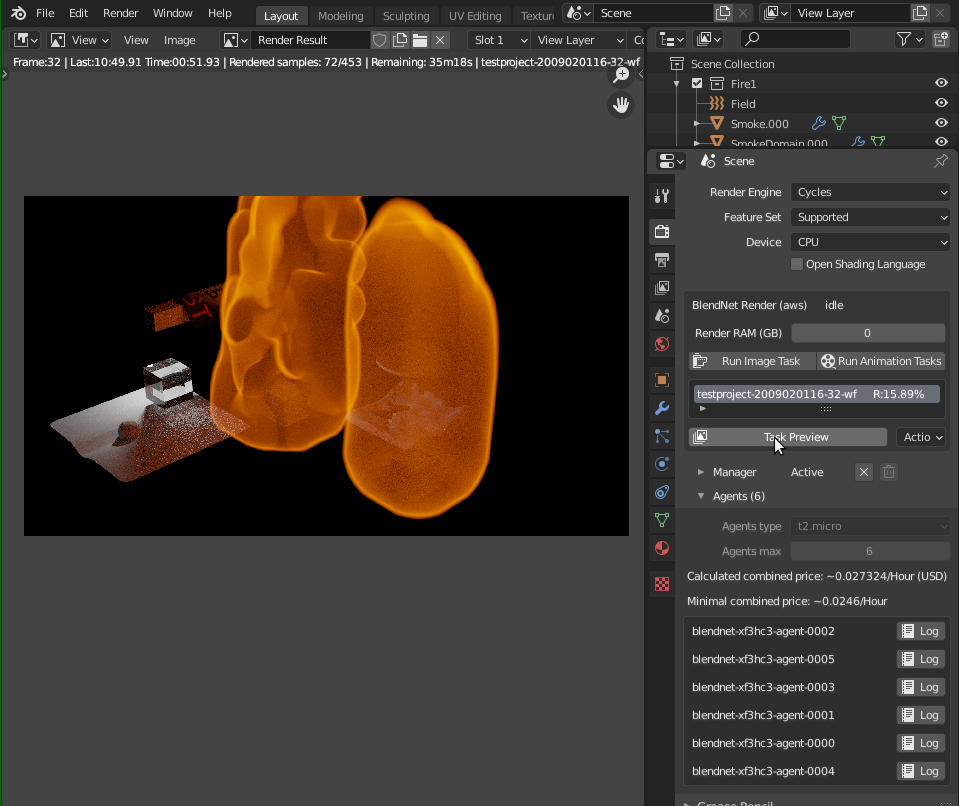
-
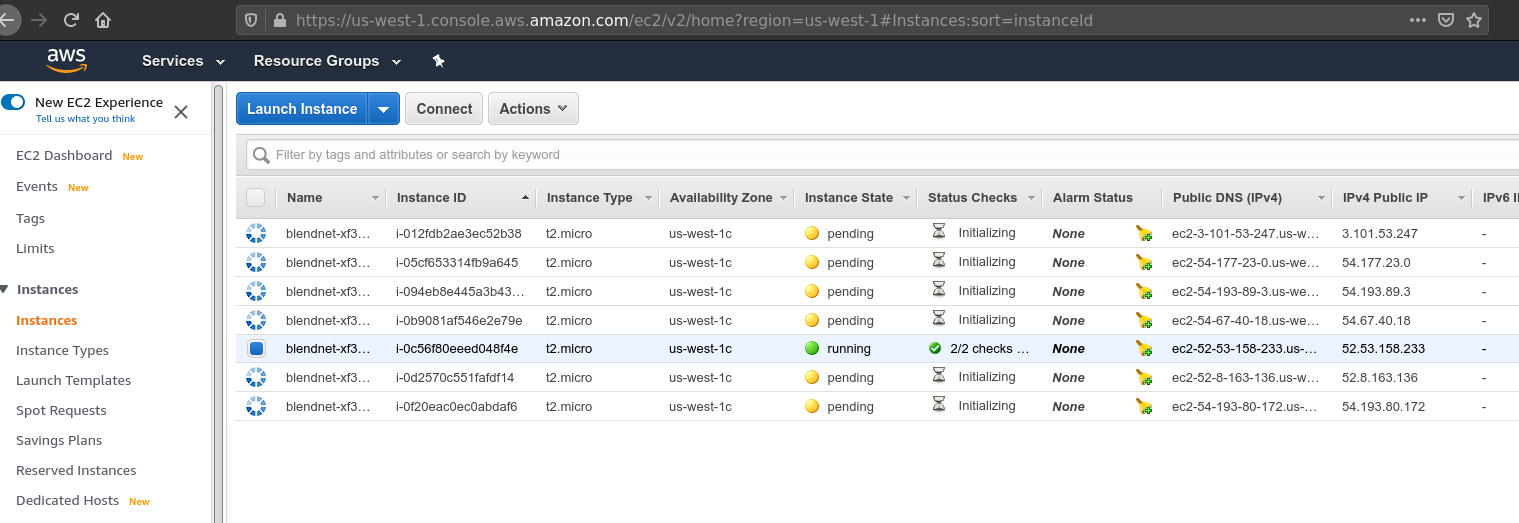
You can see that the Manager and the Agents are running in the cloud console:
By default the created Manager & Agent instances are blocking ssh connection and to enable it you will need to slightly modify the BlendNet addon sources:
- Create SSH key in your AWS console: Console->EC2->Key Pairs
- Find
createInstanceManagerandcreateInstanceAgentfunctions in your localBlendNet/providers/aws/__init__.pyand uncomment--key-nameoption for both and replace the key name to created one:- Before:
options = [ ... #'--key-name', 'default_key', # If you want to ssh to the instance (change createFirewall func too) ... ] - After:
options = [
    ...
    '--key-name', '<YOUR SSH KEY NAME>', # If you want to ssh to the instance (change createFirewall func too)
    ...
]
- Before:
- Find
createFirewallfunction in your localBlendNet/providers/aws/__init__.pyand uncomment the ingress for 22 port:- Before:
#_executeAwsTool('ec2', 'authorize-security-group-ingress', # '--group-name', target_group, # '--protocol', 'tcp', # '--port', '22', # '--cidr', '0.0.0.0/0') - After:
_executeAwsTool('ec2', 'authorize-security-group-ingress',
                '--group-name', target_group,
                '--protocol', 'tcp',
                '--port', '22',
                '--cidr', '0.0.0.0/0')
- Before:
- Make sure you cleaned the
blendnet-*security groups if they are existing AWS->EC2->Security Groups, otherwise they will not be recreated. - Connect to the instance - BlendNet uses debian images, which contains
adminuser for external ssh access:
- Now you can check the service logs by run the next commands on the instance:
- Manager:
journalctl -u blendnet-manager - Agent:
journalctl -u blendnet-agent
- Manager: