Simple code and server/services management tool.
Dispak is a very easy-to-use command-line tool. Its primary goal is to manage versions of any software projet (which source code is managed using git), by helping to list existing tags, create new tags and install tags on servers. It handles MySQL database migrations, JS/CSS files concatenation and minification, crontab installation, Apache configuration files installation, static files versioned access (locally or copied on Amazon S3).
Furthermore, it is very easy to add custom rules; then Dispak becomes a central tool that brings together all the scripts needed by your projects.
It is written in pure shell, so it can be used on any Unix/Linux machine.
Dispak was created by Amaury Bouchard and is open-source software.
Dispak manage three kinds of deployment environments:
dev: Development environment, like developers' workstations.test: Testing/staging environment, used to validate a version.prod: Production environment, where the live service is accessed by users.
Unless specified otherwise in the configuration file, Dispak can guess the platform on which it is executed (see Install tag), using the local machine's name.
- If the hostname starts with
test,staging,stage,qualification,qualif,quality,qa,preprodorpprod, followed or not by numbers, it assumes to be on atestplatform. - If the hostname starts with
server,serv,production,prod,administration,admin,web,www,database,data,db,cron,worker,jobs,frontend,front,backendorback, followed or not by numbers, it assumes to be on aprodplatform. - Otherwise it assumes to be on a
devplatform.
Dispak is based on semantic versioning and odd numbered versions for unstable releases, which are common for software projects.
All tags are named in the form X.Y.Z:
X: Major version number. Should be incremented in case of major feature evolution or backward compatibility break.Y: Minor version number. Should be incremented for every minor feature evolution.- Even numbers (0, 2, 4, ...) are used for 'stable' versions.
- Odd numbers (1, 3, 5, ...) are used for 'unstable' versions.
Z: Revision number. Should be incremented for bug fixes.
Only stable versions can be installed on production servers.
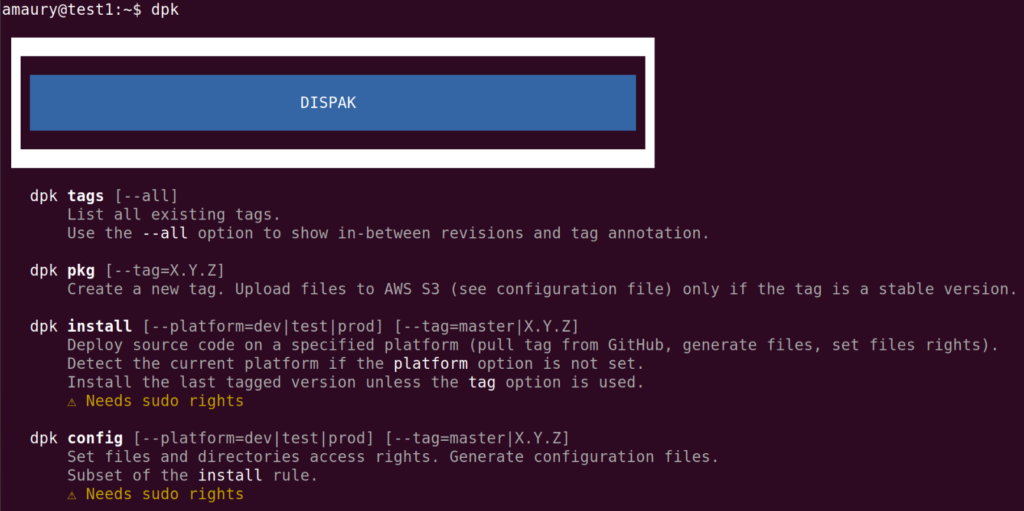
To see the list of rules offered by Dispak (general and project-specific rules), you just have to type:
$ dpk

or

$ dpk help
You can see the documentation of a single rule:
$ dpk help tags
$ dpk help installTo see the list of existing tags already created for the current project:
$ dpk tags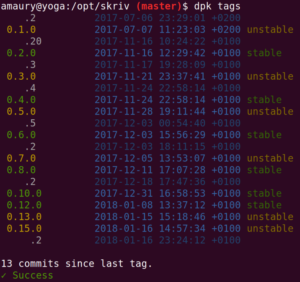
This command displays a condensed list (intermediate revisions are not shown).
To see all revisions, with their detailed annotation messages:
$ dpk tags --all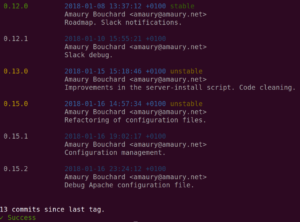
This command also tells the number of commits since the last tag.
You can easily create a new tagged version:
$ dpk pkgDispak will ask you which version number you want to use (new revision, new stable minor, new unstable minor, new major); otherwise you can give the desired version number directly:
$ dpk pkg --tag=3.2.0In any case, it is not possible to "jump" version numbers (for example, going from 1.2.0 to 1.2.5, or from 2.0.0 to 2.3.0).
Dispak will check several things and perform some operations, depending of the configuration (see below):
- Check if you are on the
mainbranch. - Check for uncommitted and unpushed files.
- Execute pre-packaging scripts (see below).
- Commit the database migration file (see below).
- Minify JS/CSS files (see below).
- Create the tag.
- Send static files to Amazon S3 (see below).
- Unminify files (delete minified files if they are not version controlled).
- Execute post-packaging files (see below).
To install the last created tag:
$ dpk installDispak will detect which tag to use, and what kind of platform (dev, test or prod) is corresponding to the local machine.
Alternatively, you can specify the tag and/or the local platform:
$ dpk install --platform=test --tag=3.2.1Dispak will perform these operations:
- On production server, check if the requested tag is not an unstable version (see above).
- Fetch and read the configuration file from the tag.
- Remove previously created symlink (see below).
- Execute pre-install scripts (see below).
- Execute pre-configuration scripts (see below).
- Deploy new version's source code.
- Install crontab file (see below).
- Perform database migration (see below).
- Install Apache configuration files (see below).
- Install xinetd file (see below).
- Set files ownership (see configuration).
- Set files access rights (see configuration).
- Generate files (see below).
- Execute post-configuration scripts (see below).
- Execute post-install scripts (see below).
Options are available to disable some operations:
--no-apache: Apache configuration files are not installed, even if Apache is installed on the current machine.--no-crontab: Crontab file is not installed.--no-xinetd: Xinetd file is not installed.--no-db-migration: Database migration is not performed.
It is possible to re-configure an already deployed tag or branch, by using this command:
$ dpk configDispak will detect which tag to use, and what kind of platform (dev, test or prod) is corresponding to the local machine.
Alternatively, you can specify the tag and/or the local platform:
$ dpk config --platform=test --tag=mainDispak will perform these operations:
- Execute pre-configuration scripts (see below).
- Install crontab file (see below).
- Install Apache configuration files (see below).
- Install xinetd file (see below).
- Set files ownership (see configuration).
- Set files access rights (see configuration).
- Generate files (see below).
- Execute post-configuration scripts (see below).
It is a subset of the dpk install command, useful to refresh the local configuration of a project after updating its files manually.
Dispak helps you to do basic branches management.
You can list all existing tags:
$ dpk branch --listYou can create a new branch. Branches are created from the last commit of the main branch, or from a given tag if the option --tag is used.
# create a branch from the last commit of the 'main' branch
$ dpk branch --create=name_of_the_branch

# create a branch from a tag
$ dpk branch --create=name_of_the_branch --tag=X.Y.Z
Branches are created locally and on the remote git repository.
You can delete a previously created branch:
$ dpk branch --remove=name_of_the_branchBranches are deleted locally and from the remote git repository.
You can merge the current branch on the main branch:
$ dpk branch --mergeThe merged result is pushed to the remote git repository.
You can merge the main branch on the current branch:
$ dpk branch --backportThe merged result is pushed to the remote git repository.
These tools are nedded by Dispak to work correctly. They are usually installed by default on every Unix/Linux distributions.
bashShell interpreter version >= 4.0, located on/bin/bash(mandatory)git(mandatory)tputfor ANSI text formatting (optional: automatically deactivated if not installed)
On Mac OS X, the installed version of bash is obsolete. You need to install a recent version using brew, and then change the /bin/bash symlink:
# brew install bash
# rm -f /bin/bash
# ln -s /usr/local/bin/bash /bin/bash
To install git on Ubuntu:
# apt install gitIf you want to use Dispak for Javascript and/or CSS files minification, you need to install NodeJS with the minifier package.
To install these tools on Ubuntu:
# apt install nodejs
# npm install -g minifierIf you want to upload static files on Amazon S3, you have to follow these steps:
- Create a dedicated bucket.
- Create an IAM user with read-write access to this bucket.
- Install the AWS-CLI program and configure it.
Install AWS-CLI on Ubuntu:
# apt install awscliConfigure the program (you will be asked for the AWS user's access key and secret key, and the used datacenter):
# aws configureYou can install Dispak anywhere on your disk drive. The preferred path (if you have sudo rights) is /opt/Dispak, but it can be under your own home.
Get the last version:
$ wget https://github.com/Digicreon/Dispak/archive/refs/tags/1.0.1.zip -O Dispak-1.0.1.zip
$ unzip Dispak-1.0.1.zip

or

$ wget https://github.com/Digicreon/Dispak/archive/refs/tags/1.0.1.tar.gz -O Dispak-1.0.1.tar.gz
$ tar xzf Dispak-1.0.1.tar.gz
You can also clone the git source code repository:
$ git clone https://github.com/Digicreon/DispakOnce Dispak is installed, you can add an alias in your ~/.bashrc or ~/.bash_aliases file:
alias dpk='/path/to/Dispak/dpk'This alias is very useful, it allows you to simply type dpk from anywhere in a git repository tree.
More, if you are using Bash as your command-line shell, you can take advantage of the bundled automatic completion script.
First, ensure to have the package bash-completion installed on your computer:
# apt install bash-completionAfter that, add this line to the file ~/.bash_completion:
. /path/to/Dispak/dispak_completion.bashDispak can manage the evolution of your database model.
First of all, you must create a table in all your database servers (testing, staging and production). This table will be used to keep track of which evolutions have been processed on the server.
Definition of the table:
CREATE TABLE DatabaseMigration (
	dbm_i_id	INT UNSIGNED NOT NULL AUTO_INCREMENT,
	dbm_d_creation	DATETIME NOT NULL DEFAULT CURRENT_TIMESTAMP,
	dbm_t_update	TIMESTAMP ON UPDATE CURRENT_TIMESTAMP,
	dbm_d_done	DATETIME DEFAULT NULL,
	dbm_s_version	TINYTEXT NOT NULL,
	PRIMARY KEY (dbm_i_id),
	INDEX dbm_d_creation (dbm_d_creation),
	INDEX dbm_t_update (dbm_t_update),
	INDEX dbm_d_done (dbm_d_done),
	INDEX dbm_d_version (dbm_s_version(10))
) ENGINE=InnoDB DEFAULT CHARSET=utf8;
The rest of the process is fairly simple:
- In your Dispak configuration file (see below), fill the database related variables (
CONF_DB_HOST,CONF_DB_PORT,CONF_DB_USER,CONF_DB_PWD,CONF_DB_MIGRATION_BASE,CONF_DB_MIGRATION_TABLE). - In your project's repository, create a
etc/database/migrationsdirectory. - In this directory, you must create a file named
currentwhich will contain all yourALTERcommands. You must commit this file. - When you create a new tag with
dpk pkg, thecurrentfile will be renamed with the tag version number(X.Y.Z), and a new emptycurrentfile is created. - When you deploy a tag on a server (
dpk installcommand), Dispak will check in the migration table which was the last migration executed; then it will process every migration files that are not already processed, in their creation order.
As you can see, there is no process for migration roll-back. The main reason is to keep the system simple, by only writing ALTER commands in plain SQL (whereas other database migration tools are usually using code written in a more complex programming language).
If you need to roll-back easily, maybe you should spend more time on your testing/staging platform. Anyway, you can do database backups before migrations. The recommended way to do that is to add the execution of Arkiv in a pre-install script.
In your project's git repository, you can create an etc/crontab file. During install, Dispak will add the content of this file to the crontab of the user who is performing the installation. This operation is done every time you install a new tagged version, so you just have to keep your etc/crontab file up-to-date. The previous content is replaced by the new file's content.
Your etc/crontab file must contain a cron-compatible content, including scheduling information.
You can add other commands in the user's crontab. Dispak add the content of the etc/crontab file between markers.
So your crontab will end looking like that:
# your commands
* * * * * local_command1
* * * * * local_command2

# ┏━━━━━┥DISPAK CRONTAB START┝━━━┥/path/to/project/etc/crontab┝━━━━━┓
* * * * * dispak_command1
* * * * * dispak_command2
# ┗━━━━━┥DISPAK CRONTAB END┝━━━━━┥/path/to/project/etc/crontab┝━━━━━┛

# other commands
* * * * * local_command3
* * * * * local_command4
If you manage multiple projects with Dispak, the contents of all their etc/crontab files will be copied in the user's crontab, hence the markers.
If you need to generate the crontab file dynamically, you can create an etc/crontab.gen file. This script will be executed (like other generator scripts) and its output will be used as the crontab content.
Dispak can execute scripts before and after packaging (the action of creating a new tag), configuration and installation.
These scripts could be written in any language. Their return status must be equal to 0 (zero); any other value will make Dispak to abort its processing.
Dispak gives two parameters to these scripts:
- The platform environment (
dev,testorprod). - The tag version number. For pre/post-packaging scripts it is the number of the created tag; for pre/post-config and pre/post-install scripts it is the number of the installed tag.
Pre/post configuration and installation scripts get two additional parameters:
- The old tag version number.
- A character that describes the tag evolution: "+" if the new tag is more recent than the old one; "-" if the new tag is older then the one that was installed.
These two extra parameters are empty if the installation is done over a
mainbranch install.
See all these variables in the configuration file: CONF_PKG_SCRIPTS_PRE, CONF_PKG_SCRIPTS_POST, CONF_INSTALL_SCRIPTS_PRE, CONF_INSTALL_SCRIPTS_POST
Dispak can generate files when it is installing a new tag. Usually it is used for configuration files, but it could be used for any file that must be generated on-the-fly.
Like the pre/post scripts (see the previous section), these scripts could be written in any language, and any return value different than 0 (zero) will stop Dispak processing.
Generator scripts must be placed in the same directory than the generated files, and must have the same name with the .gen extension at the end.
Again like the pre/post scripts (see the previous section), the generator scripts receive two arguments:
- The platform environment (
dev,testorprod). - The tag version number. For pre/post-packing scripts it is the number of the created tag; for pre/post-install scripts it is the number of the installed tag.
Generator scripts are listed in the CONF_INSTALL_GENERATE variable of the configuration file.
Dispak helps you to manage the static files of your web projects.
There is two (non-mutually exclusive) ways to manage these files: Using symlink, and copying files to Amazon S3.
You can define a list of symbolic links in the configuration file. These links will be created during the tag installation process. In fact, you define the target of each link (usually a directory but it can be a file), and the directory where these links are giong to be created. The created links are named with the installed version's number.
Example: Let's say your configuration file contains this line:
CONF_INSTALL_SYMLINK["www/css"]="www/css"Now, when the version 1.2.0 is installed, the following link will be created:
$ ls -l www/css/1.2.0
www/css/1.2.0 -> .
Then you can adapt your templates:
<link href="/css/{$conf.version}/style.css" rel="stylesheet">(in this example, the $conf.version variable have been defined in the framework's configuration file, thanks to the file generation feature)
It is also possible to define a bucket on Amazon S3 where your static files will be copied each time you create a stable version (or even for unstable version if you defined the CONF_PKG_S3_UNSTABLE configuration variable). A subdirectory will be created, named as the tag version number, and all configured files will be copied there.
Then, you can adapt your templates (see previous section) to use the copied assets.
Dispak can concatenate and minify Javascript and CSS files, using the minifier program (see Installation prerequisites above). The files are generated (concatenated and minified) during the packaging process.
In the Dispak configuration file, the CONF_PKG_MINIFY is an associative array. Each key is the path to the generated file, and the value is a space-separated list of paths to the files to concatenate and minify.
If a generated (concatenated and minified) file is version controlled, it is automatically committed after generation. Otherwise it is deleted after the packaging process.
If you list your Apache configuration files in the Dispak configuration file, Dispak will check if they are already added in the system configuration. If not, Dispak will add the needed files in the Apache configuration tree (/etc/apache2/sites-available and /etc/apache2/sites-enabled).
See the CONF_INSTALL_APACHE_FILES variable in the configuration file.
If you need to generate the Apache configuration files dynamically, you can use generator scripts. For example, if you listed the file named apache.conf in the CONF_INSTALL_APACHE_FILES variable, this file doesn't have to exist if there is a generator named apache.conf.gen; this generator will be used to generate the apache.conf file.
In your project's git repository, you can create an etc/xinetd file. During install, Dispak will add the content of this file to the /etc/xinetd.d/dispak file. This operation is done every time you install a new tagged version, so you just have to keep your etc/xinetd file up-to-date. The previous content is replaced by the new file's content.
Your etc/xinetd file must contain one or many xinetd-compatible configurations.
Dispak add the content of the etc/xinetd file between markers.
As a result, the /etc/xinetd.d/dispak file will end looking like that:
# ┏━━━━━┥DISPAK XINETD START┝━━━┥/path/to/project/etc/xinetd┝━━━━━┓
# My first service
service myservice1
{
    type        = UNLISTED
    user        = sysop
    wait        = no
    port        = 32332
    server      = /path/to/project/bin/service1
    protocol    = tcp
    socket_type = stream
}
# My second service
service myservice2
{
    type        = UNLISTED
    user        = sysop
    wait        = no
    port        = 32333
    server      = /path/to/project/bin/service2
    protocol    = tcp
    socket_type = stream
}
# ┗━━━━━┥DISPAK XINETD END┝━━━━━┥/path/to/project/etc/xinetd┝━━━━━┛
If you manage multiple projects with Dispak, the contents of all their etc/xinetd files will be copied in the /etc/xinetd.d/dispak file, hence the markers.
If you need to generate the crontab file dynamically, you can create an etc/xinetd.gen file. This script will be executed (like other generator scripts) and its output will be used as the xinetd configuration content.
In a git repository, you can create an etc/dispak.conf file. Look at the dispak-example.conf example file in the Dispak source repository.
There is three kind of configuration variables:
- Single values. The variable is waiting for a single value or file path.
- List of values. The variable is waiting for a single shell string (the whole content is surrounded by quotes) which can contain many values, separated with space or carriage return characters.
- Associative arrays. The variable may have many keys, each one could be affected to a single value or to a list of values.
Here are the definable variables:
- Main configuration
CONF_GIT_MAIN: If the main branch or your repository is not 'main', you must define it here.CONF_PLATFORM: IF you don't want Dispak to detect the platform, you can set what is the current environment (dev,testorprod).CONF_PLATFORMS: This variable is also used to override the automatic detection of the platform. But here is an associative array that allows you to specify the platform type associated with each server (from the server names).
- pkg rule
CONF_PKG_CHECK_URL: You can ask Dispak to check the return status of the given URL before creating a new tag. This is convenient if you have a local page that show the result of your unit tests; if the HTTP status of this page is an error (not equal to 200), the tag is not created.CONF_PKG_SCRIPTS_PRE: You can ask Dispak to execute a list of scripts before creating a new tag.CONF_PKG_SCRIPTS_POST: You can ask Dispak to execute a list of scripts after creating a new tag. These scripts are not executed if there was an error during the process.CONF_PKG_MINIFY: It is possible to concatenate many files into one Javacript or CSS file, and then to minify this file. TheCONF_PKG_MINIFYvariable is an associative array. For each entry, the key is the path to the generated file, and the value is the list of source files.CONF_PKG_S3: If you want to copy static files to Amazon S3, use this variable. It is an associative array; for each entry, the key is the S3 bucket where the files will be copied, and the value is the path to the file or the directory that will be recursively copied. The files are copied in a sub-directory of the bucket's root, which name is the tag's version number.CONF_PKG_S3_COMPRESS: Set this variable to 1 if you want to compress text files (raw text, HTML, JSON, SVG…) sent to Amazon S3. Files are compressed with GZIP. Note that files are compressed and sent one by one, whereas folder synchronization is used when there is no compression. As a result, upload is quite slower with compression.CONF_PKG_S3_UNSTABLE: Set this variable to 1 if you want to copy static files to Amazon S3 for stable and unstable versions (not only for stable versions).
- install rule
CONF_INSTALL_SYMLINK: Use this variable if you need to create symlinks when you install a new version. It is an associative array; the key is the path to the link's directory; the value is the path pointed by the link. The link will be created in its destination directory, and its name is the installed tag's version number.CONF_INSTALL_SCRIPTS_PRE: Here is a list of scripts to execute before install.CONF_INSTALL_SCRIPTS_POST: Here is a list of scripts to execute after install. The scripts are not executed if an error has occured during the install process.CONF_CONFIG_SCRIPTS_PRE: Here is a list of scripts to execute before install (after pre-install scripts) or at the beginning of configuration (dpk configcommand).CONF_CONFIG_SCRIPTS_POST: Here is a list of scripts to execute after install (before post-install scripts) or at the end of configuration (dpk configcommand). The scripts are not executed if an error has occured during the install process.CONF_INSTALL_APACHE_FILES: This variable must contain a list of Apache configuration files. These files are listed in the system configuration (in/etc/apache2/sites-availableand linked in/etc/apache2/sites-enabled) if they are not already.CONF_INSTALL_CHOWN: Associative array. The keys are user logins, and the values are path to files and/or directories that must be changed of owner.CONF_INSTALL_CHMOD: Associative array. The keys are achmodfile right (like+xor644), and the values are lists of files and/or directories that must bechmod'ed.CONF_INSTALL_GENERATE: The variable must contain a list of files that must be generated after install. Each entry of the list must be the path to the generated file. For each one of them, a generator script must exist with the same name and a.genextension. When a generator script is executed, everything coming out from its STDOUT will be written in the generated file.
- Database management
CONF_DB_HOST: Database host name.CONF_DB_PORT: Database port number.CONF_DB_USER: Database connection user name.CONF_DB_PWD: Database connection password.CONF_DB_MIGRATION_BASE: Name of the base which contains the migration table.CONF_DB_MIGRATION_TABLE: Name of the table which contains migration information.
Dispak's default rules are focused on source code management (create a tag, deploy a tag). Even the most advanced features (database migration, static files management) are dedicated to code deployment.
But Dispak can be used as a central entry point for managing all your command-line scripts. You can imagine an infinite list of additional capabilities:
- Manage users in a database.
- Manage daemons.
- Display data from a database.
- Generate configuration files or documentation.
- ...
Some examples are given in the example-rules/ directory.
Rules are simple Bash scripts. You can name the files as you want, as long as their names end with .sh.
You can put your rules files in two different places:
- In the
rules/subdirectory of your Dispak installation tree. Then the rules will be shared with every other users who are using the same Dispak install. It's the preferred place to put general-usage rules. - In the
etc/dispak-rules/subdirectory of a git repository. Then the rules will be available to anybody working on this repository, but only when the current working directory in under this file tree. It's the dedicated place to put project-specific rules.
You can take a look to the example-rules/minimal.sh file:
#!/usr/bin/env bash

# "minimal" example rule for Dispak
# © 2017, Amaury Bouchard <[email protected]>

# Rule's name.
RULE_NAME="minimal"

# Show help for this rule.
rule_help_minimal() {
	echo "   dpk $(ansi bold)minimal$(ansi reset)"
	echo "       $(ansi dim)Minimal rule that displays the current user login and the current working directory.$(ansi reset)"
}

# Execution of the rule
rule_exec_minimal() {
	USER_LOGIN="$(id -un)"
	WORKING_DIR="$(pwd)"
	echo "Current user login:        $(ansi blue)$USER_LOGIN$(ansi reset)"
	echo "Current working directory: $(ansi yellow)$WORKING_DIR$(ansi reset)"
}
Here you can see the four minimal things in a Dispak rule:
- The Bash shebang on the first line (
#!/bin/sh). - The
RULE_NAMEvariable, which contains the name of the rule. This name must be unique. - The function used to display the rule's documentation. It must be called
rule_help_followed by the rule's name. Please try to follow the same layout of other rules; use theansifunction (see below) to change text color and decoration. - The function called when the rule is executed. It must be called
rule_exec_followed by the rule's name.
As you can see, when you execute this command:
$ dpk minimalyou will see the current user login and the current working directory (the first one written in blue, the second one in yellow).
Dispak checks the options given on the command-line, to be sure that all mandatory parameters are given and no unknown parameter is provided.
In your rule, declare the list of mandatory parameters (separated with space or carriage return characters) in the RULE_MANDATORY_PARAMS variable, and the list of optional parameters in the RULE_OPTIONAL_PARAMS variable.
If an option can get a value, it will be available in ${DPK_OPT["option_name"]}. If an option is used without a value on the command line, the value is then set to the option's name.
When you execute dpk or dpk help, rules are grouped under sections. You can specify your rule's section using the RULE_SECTION variable.
If you don't define the section, your rule will be shown under the Default section.
If needed, your rules can be configured thanks to the dispak.conf file.
There is three different kind of configuration variables:
- Simple strings. These variables could be used (or not) without further ado.
- Arrays. These variables must be defined by including a declaration (
declare -a VAR_NAME) in the rule's file. - Associative arrays. These variables must also be defined (
declare -A VAR_NAME) in the rule's file.
You can take a look to the example-rules/adduser.sh file.
It's a rule that can be used to create a new user in database. It has two mandatory parameters (app and name) and one optional parameter (admin).
The parameters are checked and then a request is sent to a MySQL server. You can see the declaration of a configuration variable (associative array) and a private function.
Some variables are set by Dispak and avaiable to your rule:
DPK_ROOT: Path to the root of the used Dispak installation.GIT_REPO_PATH: When Dispak is called from inside a Git repository, this variable contains the root path to this repository.DPK_OPT: Contains the options given on the command-line (see above).
warn
Write a yellow "⚠" (warning sign) character, followed by your message.
Example:
warn "Something went wrong."Your message should be written in yellow, but it's up to you (using the ansi function, see below).
abort
You must call this function when your rule failed. It displays a red "⛔" (no entry) character, followed by your message, followed by a red "ABORT" string. Then it exits with a status of 1 (which means an error).
Example:
abort "Something went really bad."Your message should be written in red, but it's up to you (using the ansi function, see below).
trim
Remove spaces at the beginning and the end of a string.
Example:
VAR="$(trim "$VAR")"filenamize
Convert a string that contains a path to a file, and return a string suitable as a file name. Replace slashes and spaces by dashes.
Example:
FILENAME="$(filenamize "$PATH_TO_FILE")"ansi
Write ANSI-compatible statements.
Take at least one parameter:
reset: Remove all previously defined text decoration.bold: Write text in bold.dim: Write faint text.under: Write underlined text.black,red,green,yellow,blue,magenta,cyan,white: Change the text color.rev: Write text in reverse video. Could take another parameter with the background color (see previous item for the list of colors).
Example:
echo "$(ansi red)Some colored text$(ansi reset), $(ansi bold)some important text$(ansi reset)"
echo "$(ansi bold)$(ansi under)Some very important text$(ansi reset)"
Don't forget to always end with a reset!
align_spaces
This function helps you to align texts. Call it with a text as first parameter, and it will display as many spaces as the string length. You can modify the length by given a second parameter like "+2" or "-3".
Example:
VAR=foobar
echo $VAR
align_spaces $VAR "+3"
echo "Something smart"
Result:
foobar
         Something smart
git_fetch
Fetch all tags and branches from distant git repository.
git_is_clean
Tell if the current Git repository is clean (all files are committed, no new file and no modified file).
git_get_current_branch
Return the name of the current branch.
git_get_branches
Return the list of branches.
git_get_current_tag
Return the name of the currently installed tag.
find_in_list
Tell if an item exists in a list.
check_aws
Check if the aws-cli program is installed. Abort if not.
check_dhbost
Check if the database host is defined and reachable (using ping). Abort if not.
check_sudo
Check if the user has sudo rights. Abort if not.
check_git
Check if we are in a git repository. Abort if not.
check_git_main
Check if we are on the main branch. Abort if not.
check_git_branch
Check if we are on a branch (not the main branch). Abort if not.
check_git_clean
Check if the git repository is clean (all files are committed, no new file and no modified file). If a "strict mode" parameter is given with a value of 1, it will abort if some uncommitted files exist; otherwise, it will ask the user.
check_git_pushed
Check if all committed files have been pushed to the remote git repository. Abort if not.
check_platform
Check the platform given as parameter (using --platform option), or detect the platform.
The current platform is set in the ${DPK_OPT["platform"]} variable.
check_tag
Check if the tag given as a parameter already exists. Abort if not.
If no tag is given, fetch the last created tag and put it in the ${DPK_OPT["tag"]} variable.
check_next_tag
Check if the tag given as a parameter is valid as the next tag. If not or if no tag is given, a list of valid tags is shown to the user, who must choose between them.
Then the tag is available in the ${DPK_OPT["tag"]} variable.