-
Notifications
You must be signed in to change notification settings - Fork 0
home
Take A Number Please - Concept
The concept of TANPle is taking the blind-calls inbound that clog up Customer Support lines and turning it into a bot-facilitated digital ticket experience. By gathering just a little information up front, TANPle will allow support teams to do a little pre-engagement leg-work, and possibly resolve issues prior to customer call-back.
Please read the project README for more usage details and instructions.
How is this built?
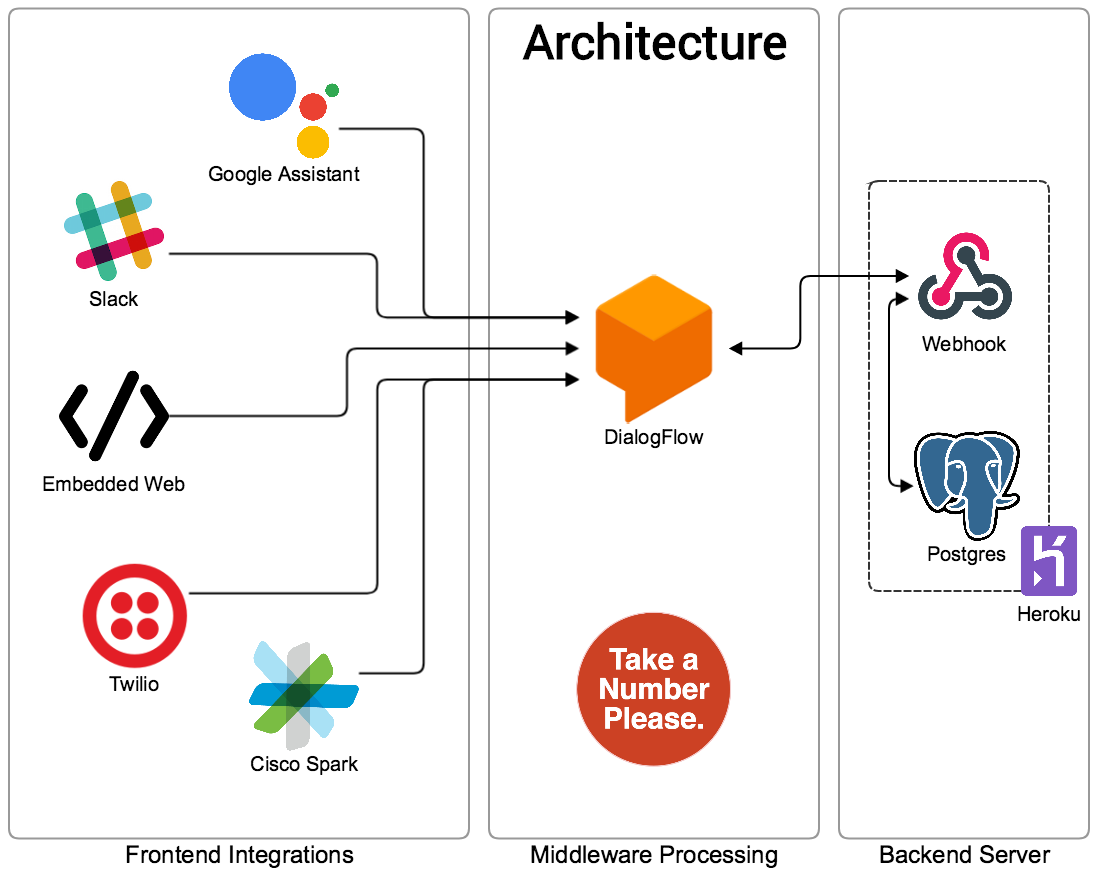
On it's surface: TANPle is a Flask-based Webhook running on Heroku which receives inbound POST requests from Dialogflow.
Backend storage is managed by a Heroku Postgres database and information is transacted using SQLAlchemy.

How each tool is properly used.
- Frontend Integrations
- [Dialogflow](Key\ Concepts/dialogflow)
- [Heroku's Request Fulfillment](Key\ Concepts/heroku)
Interested in installing this yourself? Lets walk through how to get this launched so you can test things out.
<- This will fork the TANPle project and deploy on your own instance of Heroku. You will have to come up with a unique Application name. Please jot it down, you'll need it below.
- Download the Heroku CLI, and it will allow you to interact with your app as if it were local to your laptop.
Make sure and log into Heroku CLI by:
$ heroku login
Heroku offers a deploy from Git option. This allows remote monitoring from Github, or Bitbucket, but for this walkthrough, we'll use Heroku's own Git infrastructure.
Clone your deployed webhook locally by
$ heroku apps
$ heroku git:clone -a <your app name>
Verify your remote is set up properly
$ cd <your app name>
$ git remote -v
heroku  https://git.heroku.com/<your app name>
Make a change to the README file as a test, then push back to Heroku to verify your app redeploys automatically.
$ git add .
$ git commit -am "make it better"
$ git push heroku master
Watch the application logs with:
$ heroku logs -t -a <your app name>Install Free Postgres addon
Spinning up a Postgres DB addon on Heroku is as simple as:
$ heroku addons:create heroku-postgresql:hobby-devStand up the DB Schema
Once the database is setup we should promote it such that the DATABASE_URL environment variable will be set:
$ heroku pg:promote HEROKU_POSTGRESQL_COLOR
Promoting HEROKU_POSTGRESQL_COLOR_URL to DATABASE_URL... done
For the next step, we'll connect to Heroku's running python instance, and create the database manually:
$ heroku run python -a <your app name>
Running python on ⬢ <your app name>... up, run.5560 (Free)
Python 3.6.4 (default, Jan  8 2018, 15:21:09)

>>> from app import db
>>> db.create_all()
TODO: Make a cool python script to build schema
You'll need to create a Dialogflow account For this step I'll need to add you to the existing project on Dialogflow. Send me an email, and We'll get you added to the project's contributors.
Have an idea and want to contribute?
- Follow the Installation Walkthrough above
- Read our

- Submit a

- Mark Reyes - Initial work - Send me an email
- Kevin D - Introduction to Dialogflow
- Naresh Ganatra - building a Chatbot
- Yuval Adam - PostgreSQOL on Heroku
- Dialogflow - Building your first agent
- Dialogflow's Yahoo Weather Webhook
- Special Thanks to Graham and Clara for their Python expertise and guidance.