Getting Started
Everything you need to get started on the terminal!
| Command | Description |
|---|---|
git status |
See cool git information like current branch, staged files, etc. |
git add [filename] |
Adds a file to be committed. [filename] can be a file/folder name, * for all files, or . for current folder. |
git commit -m "[message]" |
Save all added files to a commit, and give the commit a helpful message. |
git pull |
Download and merge in changes from the remote (Github) repo. |
git push |
Upload changes to the remote (Github) repo. |
ls |
List files in the current directory. |
cd [foldername] |
Go to [foldername]; this can be a sub-folder in the current folder, or .. to go "back" to a parent folder. |
| |
| Command | Description |
|---|---|
python3 [filename.py] |
Runs the python file [filename.py]. Depending on your computer, the commands might be python or py instead of python3. |
touch [filename] |
Create a file with the name [filename]
|
mkdir [foldername] |
Create a folder with the name [foldername]
|
cat [filename] |
Print out all the contents of [filename]
|
pwd |
Tells you where you are; the name stands for "print working directory" |
rm [filename] |
Deletes a file. Be careful when using this! |
cp [oldfilename] [newfilename] |
Copy a file from [oldfilename] to [newfilename]. For example, cp folder1/cheese.txt folder2/cheese.txt copies cheese.txt from folder1 into folder2. |
mv [oldfilename] [newfilename] |
Move or rename a file. Usage is the same as cp
|
git clone [repourl] |
Copies a remote (Github) repository from the given url, into a new git repo on your computer. |
git init |
Turn the current folder into a new git repo. This repo will have no remotes, unless you add them. |
git remote -v |
Lists the repo's remotes. Useful for debugging. |
| |
Sometimes if you forget the -m "[message]" when running git commit, or when running git pull, your terminal might suddenly throw you into a strange and unfamiliar environment that looks roughly like this:

This is an ancient text editor called
This is an ancient text editor called vim/Vim. Vim was made specifically to trap unwary young students in a never-ending nightmare that thwarts the best attempts at escape. However, there's a secret passcode passed down by ancient wizards, that will let you sneak out unharmed (usually):
- First, press
Esc. This will ensure you're in Vim's "normal" mode, instead of "insert" mode. - Then type
:x. You will need to holdshiftto type the colon. If successful, you should see:xnear the bottom-left of the screen. If not, pressEsctwice, then try again. In vim,:xmeans "save and quit". - Press
Enter. This should close vim, giving you back your normal terminal. Congratulations! Why does Git do this? Althoughvimis primarily a trap, it can also be a powerful text editor. If you're curious, and would like to join the dark side, you can learnvimby running the commandvimtutor, or by trying one of these intros: ocf, openvim.
When you first start working on a project, often all the code will be in a repository on Github (for example, the Shepherd repo). How do you get it onto your own computer so you can edit it?
This process is called cloning a repo. In your terminal, cd into the folder where you want to store your copy of the repo. For example, if I wanted to clone Shepherd, I would run
cd Documents/pie
since I want my copy of the Shepherd repo to be the folder Documents/pie/shepherd. Now, go to your repository on Github, and look for the green button that says "Code":

Click it, and copy the url it gives you. Now you can run the clone command:
Click it, and copy the url it gives you. Now you can run the clone command:
git clone https://github.com/pioneers/shepherd.git
(replacing the url above with the url that you copied). If all goes well, a new folder should appear, with your copy of the repo. Congratulations! You can now start working in your local copy.
Git will not automatically back up your changes, or upload them to Github. So how do we do that?
First run git status in your local repository. It should give an output similar to this:
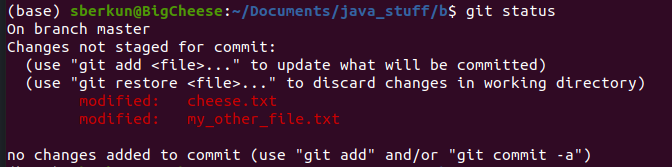
The red lines (
The red lines (modified:) are the files that got changed since the last backup/commit. Make sure they are files that you really intended to change! It's also a good idea to review changed files (either with git diff, or manually by comparing them with what's on Github) before moving on.
Next, git add all your files. You can do this one-by-one (best practice), or you can live life on the edge and use git add . to add all files in the current folder. Run git status again to make sure everything that you wanted to add is added:

Now, run
Now, run git commit -m "I like cheese", replacing "I like cheese" with a descriptive message about what you did. This message will remain on Github until the end of time, so if you ever wanted to make a mark on history, now is your chance. If all goes well, everything should be clean when you run git status again:

Finally, upload your changes to Github by running
Finally, upload your changes to Github by running git push. If you see your changes appear on Github, congratulations! You've successfully created and uploaded a commit.
First, run git status to see if you have changes to be committed. If so, commit your changes (refer to previous section), and then continue.
With your status clear, run git pull. There are 3 possible outcomes for this command:
- It could just work. Congrats!
- It could attempt to trap you in Vim. See the section "Exiting Vim"
- It could have a "merge conflict". See the section "Merge Conflicts and How to Panic Appropriately".
If all went well, your local repo should now be up-to-date with the remote. At this point, you can optionally run
git statusto make sure everything is good, and/orgit pushif you made any commits in the process of pulling.
This is a tutorial on what to do if you see a merge conflict.
- Throw your computer out the window
- Eat cheese
If you have a simple merge conflict when running a git command, Vim may open up so that you can fix the change. To edit your file in Vim, make sure that "INSERT" is showing at the bottom. If this is not the case, press "i" on your keyboard until it is. You should be able to edit your file just like in a normal text editor when Vim is in this mode, albiet with fewer features. To learn how to exit Vim, see the section "Exiting Vim". At every point where the conflicted file differs, there should be two different versions of the file separated by lines of "<" and "=" characters. Keep what you would like from either version, delete the "<" and "=" characters and any git formatting, and save the file. This should fix the merge conflict.
If you have a complex merge conflict, you may get a message in the terminal complaining that there are multiple files with merge conflicts. If this happens, you will need to manually fix the merge conflicts using a text editor of your choice. At every point where each file differs, there should be two different versions of the file separated by lines of "<" and "=" characters. Keep what you would like from either version, delete the "<" and "=" characters and any git formatting, and save the file. After you've done this for all files with merge conflicts, run the following command:
git merge --continue
- Mice/touchpads don't really work on the terminal. Do everything with your keyboard.
- If you start typing a file/folder name, you can press
Tabto autocomplete. - Ctrl-C is used to "kill" a long-running process.
- Ctrl-D is use to exit an environment, such as a python interpreter, an ssh session, or the terminal itself.
- Copy-pasting: Mac: works like normal. Linux: use Ctrl-Shift-C/Ctrl-Shift-V. Windows: shift-insert?
- Ctrl-A will bring your cursor to the beginning of the line
-
clearwill clear your terminal window - You can press
Ctrl-Rto try to autocomplete from your history as you're typing. -
history | tail -n 10will print the last 10 commands you ran
If you accidentally deleted something important, and you have committed that file or code chunk previously, you may be able to recover it using the following command:
git log
This will show your entire local commit history for this repository. If you remember a commmit that had your deleted file or code chunk, run the following command:
git checkout [commit_id]
Where [commit_id] is the large hex number shown next to the commit in the log.
At this point, I'd recommend copying the file / code chunk to a different directory so that you have a version that is not tracked by git. Then, run the following command to get back to the most recent commit:
git checkout HEAD
Now, you should be able to move the file or code chunk back to it's proper place!
Branches are a way of making a new "timeline", so to speak, beginning with the current commit. When you create a git repository, there is a "master" or "main" branch that is created for you automatically. If at any point you create a new branch, you can add new commits to that branch without affecting the default branch ("master" or "main"). This can allow you to experiment with new changes while also keeping the default branch stable.
To create a branch, run:
git branch [branch_name]
Note: this will not switch to the new branch. To switch to a branch, run:
git checkout [branch_name]
Alternatively, to create a branch and switch to it, run:
git checkout -b [branch_name]
To list all branches, run:
git branch
To pull and merge all remote branches, run:
git pull --all
To push a local branch to a remote, run:
git push -u origin [branch_name]
To merge branch B into branch A, first switch to branch A. Then, run the following command:
git merge [branch_B_name]
Note: this command may result in merge conflicts. If this happens, you will need to manually fix the merge conflicts using a text editor of your choice. At every point where each file differs, there should be two different versions of the file separated by lines of "<" and "=" characters. Keep what you would like from either version, delete the "<" and "=" characters and any git formatting, and save the file. After you've done this for all files with merge conflicts, run the following command:
git merge --continue
- Pull often, especially before working locally. Everyone on Shepherd is editing the same branch, so before you start any changes locally, make sure you pull from Github.
- Talk to others working on the same file(s). Merge conflicts, although sometimes easy to resolve, are never fun to deal with, so it's good to know ahead of time what changes others plan on making to the files that you are editing.
- If merge conflicts occur, see "Merge Conflicts and How to Panic Appropriately"