This project is for educational purposes and was built during a three-month internship in the Østfold University College at Halden in Norway 🇳🇴.
The goal is to give users who are already familiar with TelloSDK commands an API to interact with all TelloEDU drone functionalities. This API will firstly be used to manage swarms of drones and complete cooperative drones missions. Secondly, it allows taking photos using the live video stream in order to create 3D Models.
For the moment the video stream is only available with Linux systems. You will not be able to use the UI and take pictures on Windows or Mac but you still be able to take control over movements of a swarm of drones. All Linux only features will be tagged with a 🐧.
- Installation
- How to use the API
- Flight modes
- 3D modeling techniques
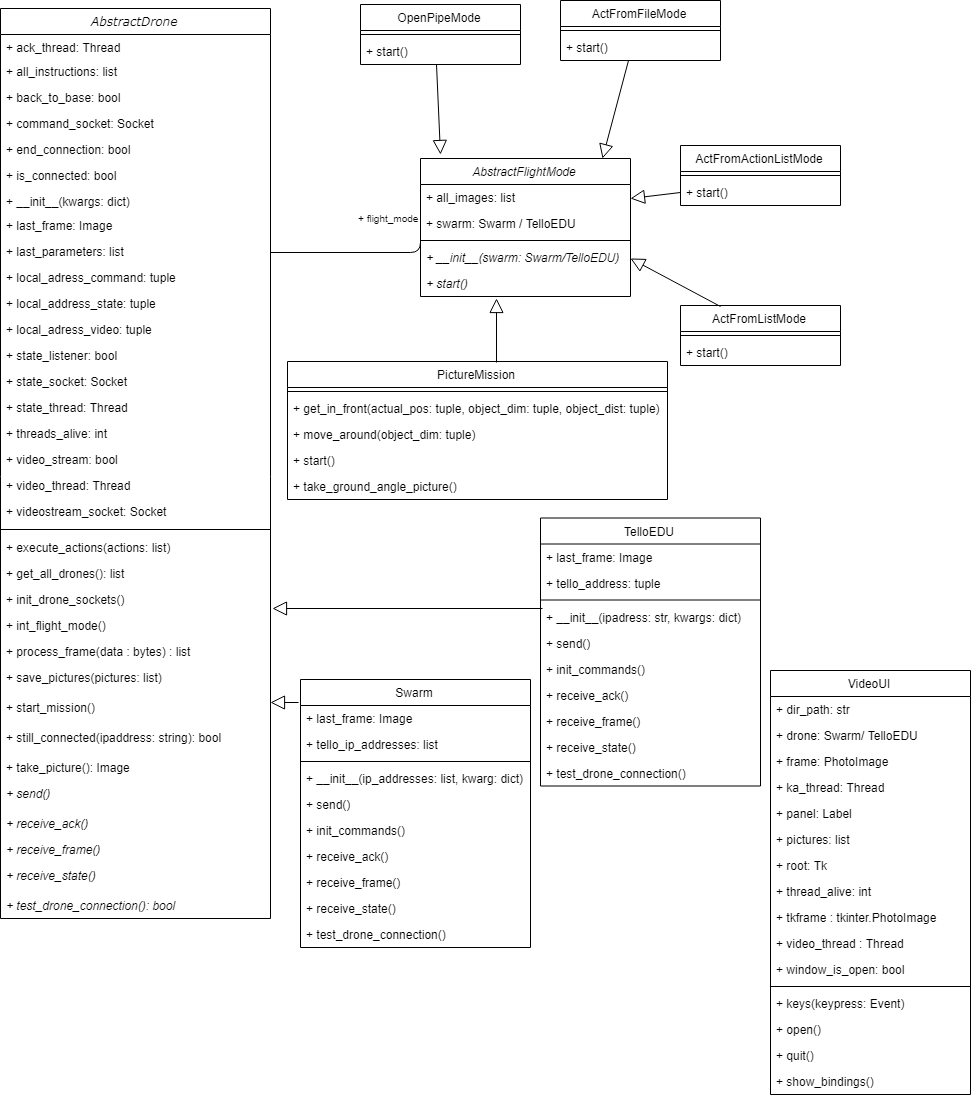
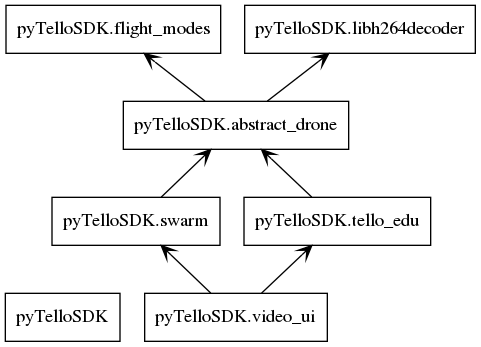
- Application diagrams
-------------------------------------------------------------------------------------------------
If you want to download or use this project, I consider that you already have Python 3.6 or higher and pip (pip3 with Linux) installed. If it's not the case:
- Download Python
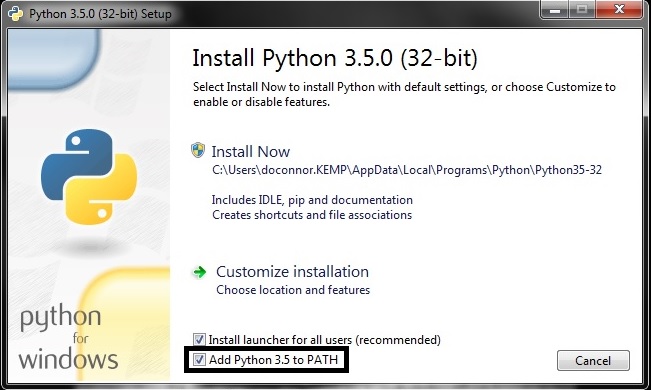
- Don't forget to add Python to your path on Windows :
-
Next step will be to download python modules used for this project, just tap in a console inside your local repository :
pip install -r requirements.txtorpip3 install -r requirements.txt -
Be sure you have access to arp command on your computer, else you will not be able to detect automatically all the drones (If typing arp in your console end with an issue, type .... )
If you are using Unix based system you should type sudo apt-get install python3-pil python3-pil.imagetk in your console in order to be sure to add all dependencies
- Last step will be to download packages for video processing, execute the install.sh.
-------------------------------------------------------------------------------
The API provides a lot of functionalities like :
-
Auto drone detection
-
Many different ways to take control of the drone
-
Drone disconnection handling
-
Ability to return the drone to the starting point
-
🐧 Ability to take and save pictures
-
🐧 A special mode to control the drone as the same time as seeing what the camera sees
mytello = TelloEDU('192.168.10.1')192.168.10.1 is the IP@ when you are directly connected to drone WIFI, fell free to adapt the IP.
If you create a TelloEDU or Swarm object without IP, the API will try to find if you can acces any drone using your WIFI or every network or router you are connected to.
See :
my_tello = TelloEDU()
my_tello = Swarm(back_to_base=True)
In each case you can specify some options like if you want to enable the back_to_base feature, you can also do this to enable 🐧 video_stream or state_listener to see what are the actual 'perception' of the drone.
my_tello = TelloEDU('192.168.10.1',video_stream=False,state_listener=False,back_to_base=True)Second, you will have to choose the way the drone(s) will be controlled :
my_tello.init_flight_mode('reactive')
my_tello.init_flight_mode('open pipe')
my_tello.init_flight_mode('act from file', filename='mission_file_idle.txt')
my_tello.init_flight_mode('act from list', actions=['0-battery?, 0-sn?'])
🐧 my_tello.init_flight_mode('picture mission', object_distance=(0, 100), object_dim=(40, 40, 20))my_tello.start_mission()Code example :
from pyTelloSDK import Swarm

my_swarm = Swarm('192.168.10.1', back_to_base='True')
my_swarm.init_flight_mode('reactive')
my_swarm.start_mission()- Instanciate a drone or a swarm of one drone
- Send the drone to the VideoUI class
- Use the same commands as Reactive Mode to take control of the drone
my_swarm = Swarm(['192.168.10.1', ], video_stream=True)
vui = VideoUI(my_swarm)
vui.open()
-------------------------------------------------------------------------------
There are five alternative ways to take control of the behaviour of the drone when it is flying, those are:
- Open pipe mode 👨💻 : you can send instantly every command of the SDK you want at the connected drone of your desires. For example if you are using the Swarm class to control two drones connected to a router and you want the battery-level of both of them, just type 0-battery? and 1-battery? and the result will be typically displayed in the console. You can also send flight commands, once drone has taken off you can send flip f or 0-flip f If the video_stream is enabled, you can take pictures using the 'p' key. All the pictures will be saved in the picture folder at the end of the mission.
my_tello.init_flight_mode('open pipe')- Act from file mode 📝: in case you identified exactly what you want the drone(s) to do and you just want to execute all orders at a time (one command a line). This helps you not having to type every specific instruction between two similar missions.
my_tello.init_flight_mode('act from file', filename='mission_file_idle.txt')- Act from list mode 📑: really similar to previous mode, you can send a list of commands to the program and it will execute them all. This mode is extremely useful when one program needs to calculate all the instructions the drone(s) have to make and you have your drone to execute them after.
my_tello.init_flight_mode('act from list', actions=['0-battery?, 0-sn?'])- Reactive mode 🕹️ : as open pipe could be a little bit slow when needs to type commands to fly around, this mode comes with some keys already bound and ready to act : press one button and all drones take off, press another one and they all rotate from 30°, etc. If the video_stream is enabled, you can take pictures using the 'p' key. All the pictures will be saved in the picture folder at the end of the mission.
my_tello.init_flight_mode('reactive')


            forward                 clockwise rotation : 4  ↻
              ⬆️           counter clockwise rotation : 6  ↺
       left ⬅️  ➡️ right
              ⬇️
           backward

        land    : +
        takeoff : space bar
        up      : 8
        down    : 2

exit : Ctrl + Z or Ctrl + C- 🐧 Picture mission mode 📷: You will need to provide the object coordinates you want to take picture of and the drone will try to take pictures around the object. It will try to have the most different angles of view.
my_tello.init_flight_mode('picture mission', object_distance=(0, 100), object_dim=(40, 40, 20)) y
↑
| O You need to indicate :
| - object distance (x, y)
←-----D-----→ x - object dimensions (width, length, height)
| (object_distance=(0, 100), object_dim=(40, 40, 20)) in code
|
↓
- User Interface 🎞️ 🖼️: you can launch the user interface and access a real time video from what the drone sees. You can move around using the same keys as the reactive mode, you can also press 'p' to take a picture at any moment.
my_swarm = Swarm(['192.168.10.1', ], video_stream=True)
vui = VideoUI(my_swarm)
vui.open()
-------------------------------------------------------------------------------
One of the goal of the project is to create meshes using all the pictures taken by the drone. (360° view if possible)
I mostly used https://www.youtube.com/watch?v=R0PDCp0QF1o and official Meshroom website for documentation. The video author said the lens quality really mattered and identifiable markers in the background (don't isolate the object).
One of the good ways to process is to obtain high-quality pictures of many angles of the object. Due to the fact the drone is constantly trying to stabilize on a horizontal plane it will be complicated to have diverse points of view like ceiling angle shots. One risky way could be to flip the drone and take the exact interesting frame (very hard to do properly).
The manufacturer did not allow video stream to work properly when Tello is connected to a router so you have to be connected directly on the Tello Wifi (so you can only access one drone at a time)
I found image quality from the video stream of the drone, is reasonably good but not enough to create high-quality models with only few pictures (around 25). The standard of the stream is around 720px but the Tello is built with a camera which captures 5MP shots. Therefore, we should be able to obtain this quality of picture, unfortunately the SDK provided by the manufacturer does not allow us to take pictures.
I have been stated that this project should end and I will continue to work with other existing Tello libraries in Python like pytello and tellopy. This two libraries used low-level buffer addresses to force the drone to take and transmit pictures in a socket.
However, it is possible to create 3D models using this ambitious project (with 720px pictures) but you will need a lot more photos. Once the 3D Model is obtained, post-processing with Intant Meshes may remain a good idea.
----------------------------------------------------------------------------------------------------------------
- Video Stream on Windows (Python-Boost3 | CmakeFile)
- End the Picture Mision mode
- Use Fping for fatser ping on Unix systems
- Change back_to_base to use states (quicker)
- Create a real python package
- Terminal is really dirty (C++ errors)
- Non closing programm (UI thread issue - Tkinter blocking call)


