Hasura helps you build production-level 3factor apps really fast. In addition to generating CRUD GraphQL APIs from your PostgreSQL database, it also provides ways to authenticate users using webhooks or JWT and helps you define granular access controls rules for your GraphQL schema (authorization). However, integrating an auth system with Hasura backend and some frontend still requires a lot of effort, and can be tricky sometimes. This tutorial aims to demonstrate how to do that by making a real-time voting app like the official sample but with auth built in. We are going to use Hasura for the backend, Firebase Authentication for authentication and React for the frontend.
It takes mainly 3 steps:
- Set up Hasura and create the data model using the Hasura Console.
- Set up Authentication.
- Build the React web app.
- React
- GraphQL
- Some SQL
The demo is live at hasura-vote.now.sh, you can try it! It's a simple app in which you can vote for your favorite programming languages. The votes are updated in real time. After you signed in, you can also mark languages as "loved".
Building a robust authentication system is no small effort. It's so important that it can break or make your app. Because the main focus of this tutorial is to integrate an auth system with Hasura and React, we are going to use the off-the-shelf Firebase Authentication. It's secure, has many useful features such as third-party sign-in and passwordless sign-in and has a generous free tier.
It's very easy to get Hasura running. Just follow the Deploy Hasura to Heroku Guide and in the end, you will have a brand new instance running at a domain that looks like "https://[your-heroku-project-name].herokuapp.com".
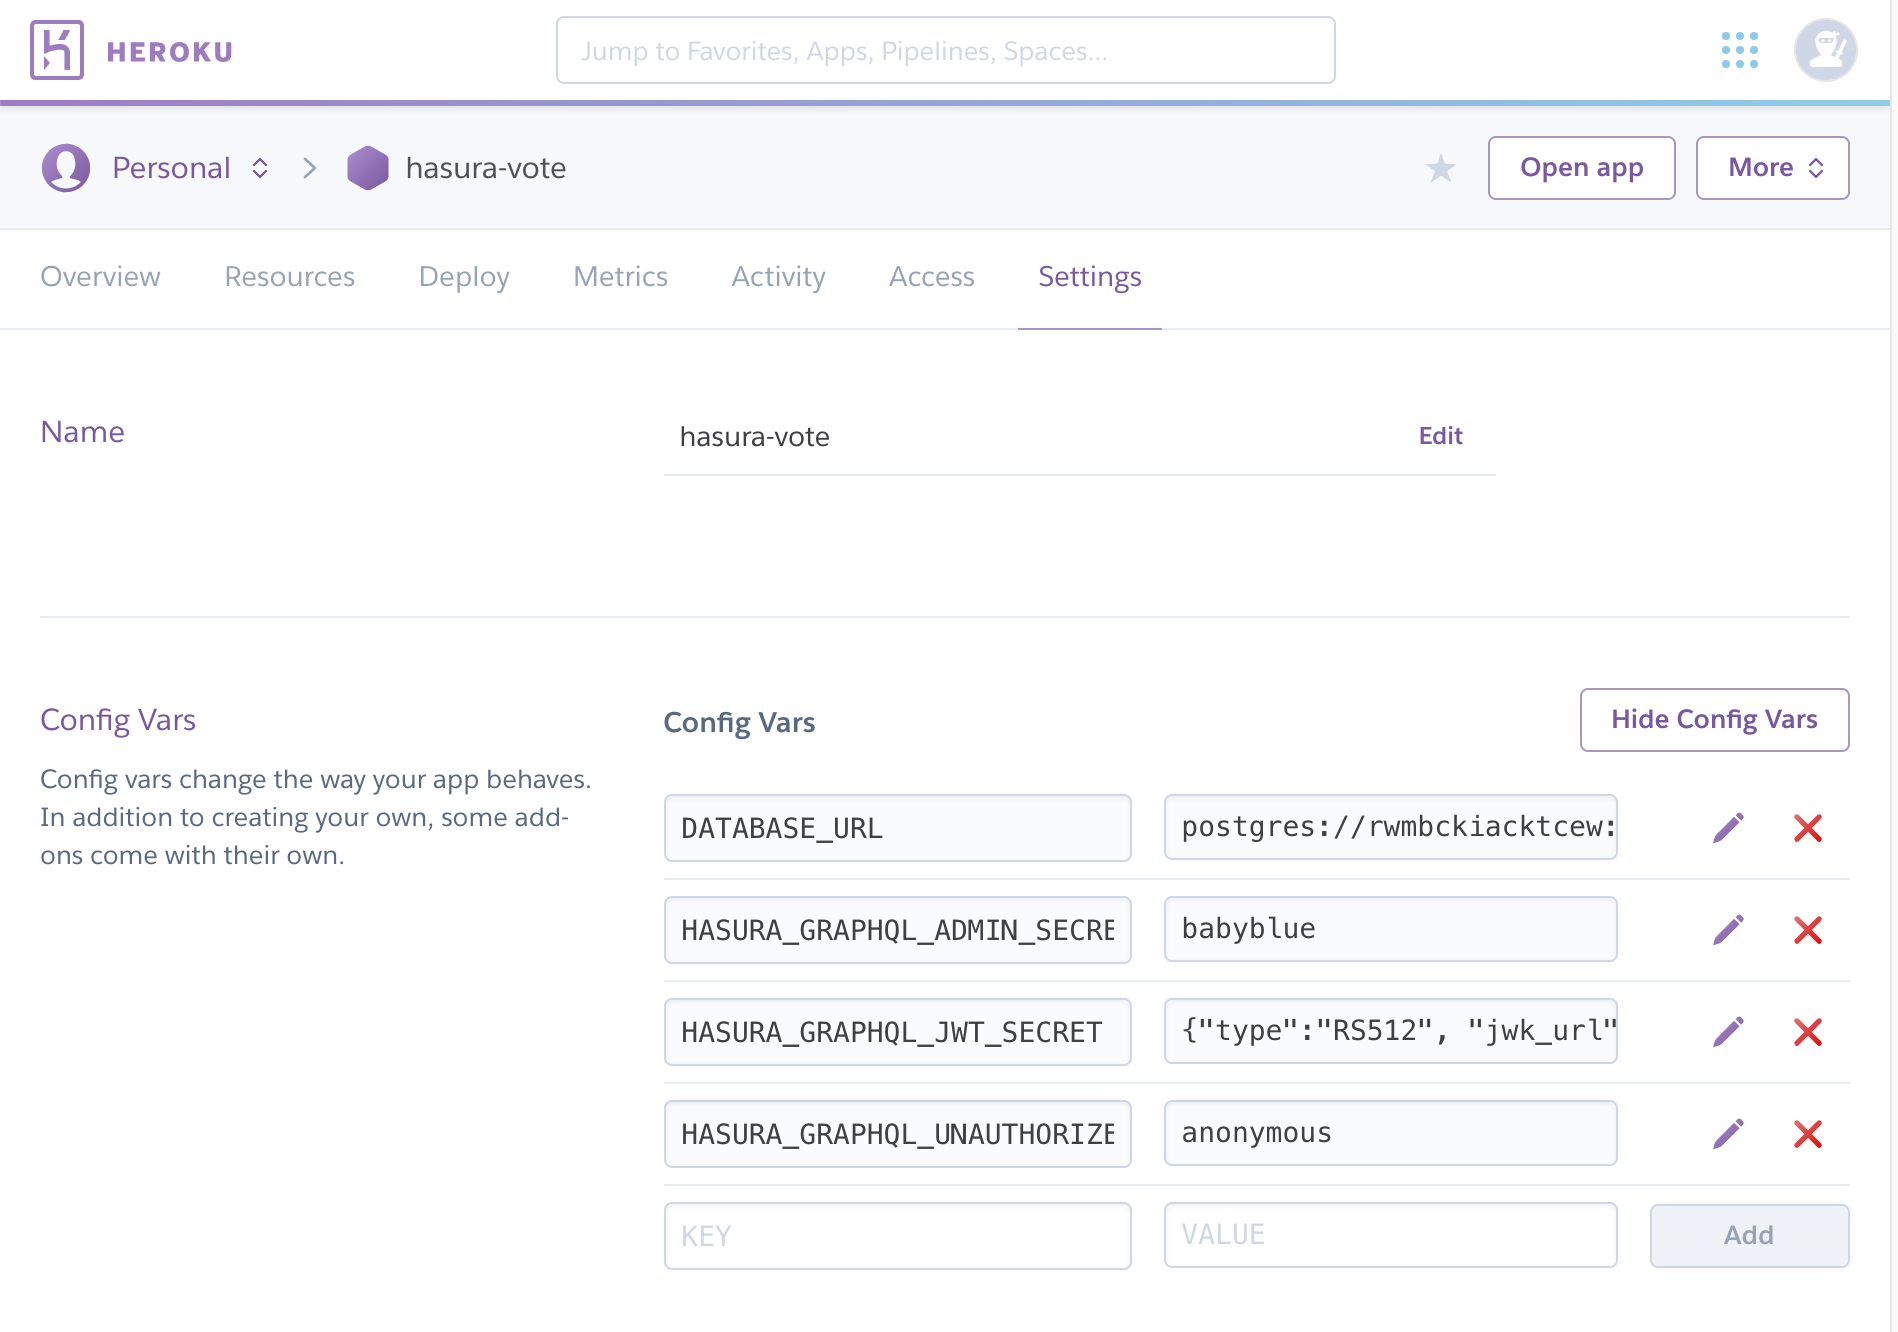
We need to set some environment variables as we are in the Heroku console. Set HASURA_GRAPHQL_ADMIN_SECRET to some secret and write it down before you forget it, thus out API can't be accessed by some random guy on the Internet. Since we will use JWT from Firebase, set HASURA_GRAPHQL_JWT_SECRET to {"type":"RS512", "jwk_url": "https://www.googleapis.com/service_accounts/v1/jwk/[email protected]"}. Finally, set HASURA_GRAPHQL_UNAUTHORIZED_ROLE to anonymous because we do allow unauthenticated users to write and read some data.
Now it's time for data modeling. First, we need a "programming_language" table with "name" and "vote_count" field.

Also, we need a "loved_language" table to record whether a language is loved by some user. Since a user can only love a language once, we need to set the primary key as name and user_id combined. There is no way to do that in the "Add Table" UI, but Hasura conveniently provides a way to execute raw SQL:
CREATE TABLE "public"."loved_language" (
    "name" text NOT NULL,
    "user_id" text NOT NULL,
    CONSTRAINT loved_language_pkey PRIMARY KEY (name, user_id),
    CONSTRAINT loved_language_programming_language_fky FOREIGN KEY (name) REFERENCES programming_language(name),
)
After you create these two tables, Hasura would notice the one-to-many relationship between them and help you create the corresponding GraphQL relationship.

Hooray! Now that we have a data model, you can play with the API in GraphiQL. Insert some of your favorite languages. Give them some vote. Love them by some random "user_id". Since we are signed in as admin, we can do anything we want. But we need to set proper permissions for the "anonymous" and "user" role. We allow both of them to select and update "programming_language":

For "loved_language", we only allow the "user" role to insert, select and delete. Notice for insert the "user_id" must come from "X-Hasura-User-Id".

With permissions set, all we need is a secure way to get the "X-Hasura-User-Id".
Go to the Firebase website to create a new project. By default it's on the free plan, so don't worry about the charge.
In the Authentication section of the Firebase console, turn on the Google sign-in provider. In this tutorial, we only use Google sign-in, but adding other providers is trivial. Notice at the bottom of the page, in "Authorized domains", localhost and a Firebase domain are automatically added. If you later decide to deploy the React app to another domain, you need to add it here for Google sign-in to work.

Now we can sign in users and get their id token for Hasura in the React app, using the Firebase JS SDK. But for Hasura to know the identity of these users, whose data are stored in Firebase, we need to add some specific "custom claims" required by Hasura to the token. We will use Cloud Functions for Firebase to do that, following the example in the Hasura repo.
A cloud function is, well, some function that automatically runs "in response to events triggered by Firebase features and HTTPS requests". In our case the event is firebase user creation. When that happens, we'd like to add some extra data to the user's id token. The code is straghtforward:
const functions = require("firebase-functions");
const admin = require("firebase-admin");
admin.initializeApp(functions.config().firebase);

// On sign up.
exports.processSignUp = functions.auth.user().onCreate(user => {
  const customClaims = {
    "https://hasura.io/jwt/claims": {
      "x-hasura-default-role": "user",
      "x-hasura-allowed-roles": ["user"],
      "x-hasura-user-id": user.uid
    }
  };

  return admin
    .auth()
    .setCustomUserClaims(user.uid, customClaims)
    .then(() => {
      // Update real-time database to notify client to force refresh.
      const metadataRef = admin.database().ref("metadata/" + user.uid);
      // Set the refresh time to the current UTC timestamp.
      // This will be captured on the client to force a token refresh.
      return metadataRef.set({ refreshTime: new Date().getTime() });
    })
    .catch(error => {
      console.log(error);
    });
});
The code with comments needs some more explanation. When a user signs in our React app, Firebase immediately gives us that user's data, including the id token we need to send to Hasura. But if it's the first time, in which the user is just created, the token may not include those custom claims. That's the reason we use Firebase real-time database to listen to a token refresh.
Deploying cloud function is simple. Follow the official Get started guide, replace index.js with the code above and run firebase deploy --only functions. That's it.
Before you leave the Firebase console, you need to do one more setting. Go to the Realtime Database Rules section and change "read" from "false" to "true". Otherwise, the client won't be able to listen to the token refresh.

Finally, it's time for us to build the exciting UI. We will use Apollo Client to query our GraphQL API. Follow the client setup guide to add all the needed npm packages.
Since the app is simple, we are only going to build two components: "Auth" and "App". "Auth" uses Firebase SDK to sign in users and pass that state to "App". "App" includes all the business logic: subscribing to the real-time data, voting and loving languages.
Auth:
import firebase from "firebase/app";
import "firebase/auth";
import "firebase/database";
import React, { useState, useEffect } from "react";
import App from "./App";

const provider = new firebase.auth.GoogleAuthProvider();

// Find these options in your Firebase console
firebase.initializeApp({
  apiKey: "xxx",
  authDomain: "xxx",
  databaseURL: "xxx",
  projectId: "xxx",
  storageBucket: "xxx",
  messagingSenderId: "xxx"
});

export default function Auth() {
  const [authState, setAuthState] = useState({ status: "loading" });

  useEffect(() => {
    return firebase.auth().onAuthStateChanged(async user => {
      if (user) {
        const token = await user.getIdToken();
        const idTokenResult = await user.getIdTokenResult();
        const hasuraClaim =
          idTokenResult.claims["https://hasura.io/jwt/claims"];

        if (hasuraClaim) {
          setAuthState({ status: "in", user, token });
        } else {
          // Check if refresh is required.
          const metadataRef = firebase
            .database()
            .ref("metadata/" + user.uid + "/refreshTime");

          metadataRef.on("value", async data => {
            if (!data.exists) {
              return;
            }
            // Force refresh to pick up the latest custom claims changes.
            const token = await user.getIdToken(true);
            setAuthState({ status: "in", user, token });
          });
        }
      } else {
        setAuthState({ status: "out" });
      }
    });
  }, []);

  const signInWithGoogle = async () => {
    try {
      await firebase.auth().signInWithPopup(provider);
    } catch (error) {
      console.log(error);
    }
  };

  const signOut = async () => {
    try {
      setAuthState({ status: "loading" });
      await firebase.auth().signOut();
      setAuthState({ status: "out" });
    } catch (error) {
      console.log(error);
    }
  };

  let content;
  if (authState.status === "loading") {
    content = null;
  } else {
    content = (
      <>
        <div>
          {authState.status === "in" ? (
            <div>
              <h2>Welcome, {authState.user.displayName}</h2>
              <button onClick={signOut}>Sign out</button>
            </div>
          ) : (
            <button onClick={signInWithGoogle}>Sign in with Google</button>
          )}
        </div>

        <App authState={authState} />
      </>
    );
  }

  return <div className="auth">{content}</div>;
}
The code is straight forward if you are familiar with the new Hooks API. Notice how we use the Firebase realtime database to listen to the refreshTime which we set up in the Firebase cloud function. Also, we check whether a user's id token already contains custom claims to avoid useless refreshing.
App:
import { InMemoryCache } from "apollo-cache-inmemory";
import ApolloClient from "apollo-client";
import { split } from "apollo-link";
import { HttpLink } from "apollo-link-http";
import { WebSocketLink } from "apollo-link-ws";
import { getMainDefinition } from "apollo-utilities";
import gql from "graphql-tag";
import React from "react";
import { ApolloProvider, Mutation, Subscription } from "react-apollo";

const PL_SUB = gql`
  subscription PL {
    programming_language(order_by: { vote_count: desc }) {
      name
      vote_count
    }
  }
`;

const PL_WITH_LOVE_SUB = gql`
  subscription PL_WITH_LOVE($userId: String!) {
    programming_language(order_by: { vote_count: desc }) {
      name
      vote_count
      lovedLanguagesByname_aggregate(where: { user_id: { _eq: $userId } }) {
        aggregate {
          count
        }
      }
    }
  }
`;

const VOTE_MUTATION = gql`
  mutation Vote($name: String!) {
    update_programming_language(
      _inc: { vote_count: 1 }
      where: { name: { _eq: $name } }
    ) {
      returning {
        vote_count
      }
    }
  }
`;

const LOVE_MUTATION = gql`
  mutation Love($name: String!) {
    insert_loved_language(objects: { name: $name }) {
      affected_rows
    }
  }
`;

const UNLOVE_MUTATION = gql`
  mutation Unlove($name: String!) {
    delete_loved_language(where: { name: { _eq: $name } }) {
      affected_rows
    }
  }
`;

export default function App({ authState }) {
  const isIn = authState.status === "in";

  const headers = isIn ? { Authorization: `Bearer ${authState.token}` } : {};

  const httpLink = new HttpLink({
    uri: "https://your-heroku-domain/v1alpha1/graphql",
    headers
  });

  const wsLink = new WebSocketLink({
    uri: "wss://your-heroku-domain/v1alpha1/graphql",
    options: {
      reconnect: true,
      connectionParams: {
        headers
      }
    }
  });

  const link = split(
    ({ query }) => {
      const { kind, operation } = getMainDefinition(query);
      return kind === "OperationDefinition" && operation === "subscription";
    },
    wsLink,
    httpLink
  );

  const client = new ApolloClient({
    link,
    cache: new InMemoryCache()
  });

  return (
    <ApolloProvider client={client}>
      <Subscription
        subscription={isIn ? PL_WITH_LOVE_SUB : PL_SUB}
        variables={
          isIn
            ? {
                userId: authState.user.uid
              }
            : null
        }
      >
        {({ data, loading, error }) => {
          if (loading) return "loading...";
          if (error) return error.message;

          return (
            <ul className="pl-list">
              {data.programming_language.map(pl => {
                const { name, vote_count } = pl;

                let content = null;
                if (isIn) {
                  const isLoved =
                    pl.lovedLanguagesByname_aggregate.aggregate.count === 1;
                  if (isLoved) {
                    content = (
                      <Mutation mutation={UNLOVE_MUTATION} variables={{ name }}>
                        {unlove => <button onClick={unlove}>Unlove</button>}
                      </Mutation>
                    );
                  } else {
                    content = (
                      <Mutation mutation={LOVE_MUTATION} variables={{ name }}>
                        {love => <button onClick={love}>Love</button>}
                      </Mutation>
                    );
                  }
                }

                return (
                  <li key={name}>
                    <span>{`${name} - ${vote_count}`}</span>
                    <span>
                      <Mutation mutation={VOTE_MUTATION} variables={{ name }}>
                        {vote => <button onClick={vote}>Vote</button>}
                      </Mutation>
                      {content}
                    </span>
                  </li>
                );
              })}
            </ul>
          );
        }}
      </Subscription>
    </ApolloProvider>
  );
}
Notice how Hasura and GraphQL enable us to flexibly query data we need based on different auth state.
In this tutorial, we build a real-time voting app with Hasura. We integrate a robust auth system both on the backend and frontend. You can see how Hasura makes tedious and hard jobs easy by providing a pluggable GraphQL and auth interface. Based on this model, there really is no limit on what kind of amazing apps you can build.
All the code in this tutorial are in the Github repo.