Tapeout projects sometimes run into mishaps when students new to Git force push to main without review or overwrite someone else's work. This assignment (heavily based on Github's intro course) ensures we all have a common Git foundation.
Git is a distributed Version Control System (VCS), which means it is a useful tool for easily tracking changes to your code, collaborating, and sharing. With Git you can track the changes you make to your project so you always have a record of what you’ve worked on and can easily revert back to an older version if need be. It also makes working with others easier—groups of people can work together on the same project and merge their changes into one final source!
GitHub is a way to use the same power of Git all online with an easy-to-use interface. It’s used across the software world and beyond to collaborate and maintain the history of projects.
GitHub is home to some of the most advanced technologies in the world. Whether you're visualizing data or building a new game, there's a whole community and set of tools on GitHub that can get you to the next step. This course starts with the basics of GitHub, but we'll dig into the rest later.
The GitHub flow is a lightweight workflow that allows you to experiment and collaborate on your projects easily, without the risk of losing your previous work.
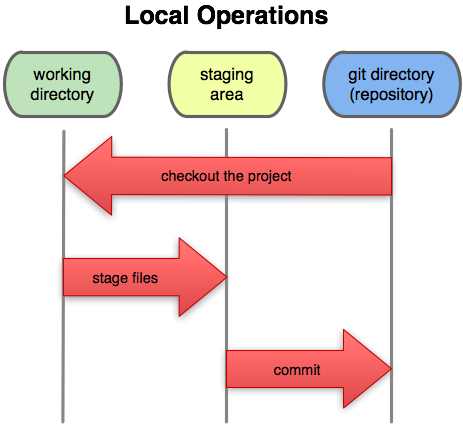
A repository is where your project work happens--think of it as your project folder. It contains all of your project’s files and revision history. You can work within a repository alone or invite others to collaborate with you on those files.
When a repository is created with GitHub, it’s stored remotely in the ☁️. You can clone a repository to create a local copy on your computer and then use Git to sync the two. This makes it easier to fix issues, add or remove files, and push larger commits. You can also use the editing tool of your choice as opposed to the GitHub UI. Cloning a repository also pulls down all the repository data that GitHub has at that point in time, including all versions of every file and folder for the project! This can be helpful if you experiment with your project and then realize you liked a previous version more. To learn more about cloning, read "Cloning a Repository".
Committing and pushing are how you can add the changes you made on your local machine to the remote repository in GitHub. That way your instructor and/or teammates can see your latest work when you’re ready to share it. You can make a commit when you have made changes to your project that you want to “checkpoint.” You can also add a helpful commit message to remind yourself or your teammates what work you did (e.g. “Added a README with information about our project”).
Once you have a commit or multiple commits that you’re ready to add to your repository, you can use the push command to add those changes to your remote repository. Committing and pushing may feel new at first, but we promise you’ll get used to it 🙂
We mentioned repositories already, they are where your project work happens, but let’s talk a bit more about the details of them! As you work more on GitHub you will have many repositories which may feel confusing at first. Fortunately, your "GitHub dashboard" helps to easily navigate to your repositories and see useful information about them. Make sure you’re logged in to see it!
Repositories also contain READMEs. You can add a README file to your repository to tell other people why your project is useful, what they can do with your project, and how they can use it. We are using this README to communicate how to learn Git and GitHub with you. 😄 To learn more about repositories read "Creating, Cloning, and Archiving Repositories and "About README's".
You can use branches on GitHub to isolate work that you do not want merged into your final project just yet. Branches allow you to develop features, fix bugs, or safely experiment with new ideas in a contained area of your repository. Typically, you might create a new branch from the default branch of your repository—main. This makes a new working copy of your repository for you to experiment with. Once your new changes have been reviewed by a teammate, or you are satisfied with them, you can merge your changes into the default branch of your repository. To learn more about branching, read "About Branches".
A fork is another way to copy a repository, but is usually used when you want to contribute to someone else’s project. Forking a repository allows you to freely experiment with changes without affecting the original project and is very popular when contributing to open source software projects! To learn more about forking, read "Fork a repo"
When working with branches, you can use a pull request to tell others about the changes you want to make and ask for their feedback. Once a pull request is opened, you can discuss and review the potential changes with collaborators and add more changes if need be. You can add specific people as reviewers of your pull request which shows you want their feedback on your changes! Once a pull request is ready-to-go, it can be merged into your main branch. To learn more about pull requests, read "About Pull Requests".
Issues are a way to track enhancements, tasks, or bugs for your work on GitHub. Issues are a great way to keep track of all the tasks you want to work on for your project and let others know what you plan to work on. You can also use issues to tell a favorite open source project about a bug you found or a feature you think would be great to add!
For larger projects, you can keep track of many issues on a project board. GitHub Projects help you organize and prioritize your work and you can read more about them in this "About Project boards document. You likely won’t need a project board for your assignments, but once you move on to even bigger projects, they’re a great way to organize your team’s work! You can also link together pull requests and issues to show that a fix is in progress and to automatically close the issue when someone merges the pull request. To learn more about issues and linking them to your pull requests, read "About Issues".
Your profile page tells people the story of your work through the repositories you're interested in, the contributions you've made, and the conversations you've had. You can also give the world a unique view into who you are with your profile README. You can use your profile to let future employers know all about you! To learn more about your user profile and adding and updating your profile README, read "Managing Your Profile README".
You might have noticed already, but you can add some fun styling to your issues, pull requests, and files. "Markdown" is an easy way to style your issues, pull requests, and files with some simple syntax. This can be helpful to organize your information and make it easier for others to read. You can also drop in gifs and images to help convey your point! To learn more about using GitHub’s flavor of markdown, read "Basic Writing and Formatting Syntax".
The GitHub community is vast. There are many types of people who use GitHub in their day to day—students like you, professional developers, hobbyists working on open source projects, and explorers who are just jumping into the world of software development on their own. There are many ways you can interact with the larger GitHub community, but here are three places where you can start.
If you find a repository interesting or you want to keep track of it, star it! When you star a repository it’s also used as a signal to surface better recommendations on github.com/explore. If you’d like to get back to your starred repositories you can do so via your user profile. To learn more about starring repositories, read "Saving Repositories with Stars".
You can follow people on GitHub to receive notifications about their activity and discover projects in their communities. When you follow a user, their public GitHub activity will show up on your dashboard so you can see all the cool things they are working on. To learn more about following users, read "Following People".
GitHub Explore is a great place to do just that … explore 😄 You can find new projects, events, and developers to interact with.
You can check out the GitHub Explore website at github.com/explore. The more you interact with GitHub the more tailored your Explore view will be.
When you accepted the invite to this assignment, Github automatically made a fork of the main ucb-eecs151tapeout-fa24-git-basics repository.
- When working on the tapeout, your Chipyard (we'll explain later) repository will also be a fork of the main respository until integration.
To complete this assignment please complete the following:
Please add your SSH key to your Github account to simplify logging in. Later you can copy this key to the instructional machine. If you've never done this before, the steps are:
(Copied from Github docs.)
You can generate a new SSH key on your local machine. After you generate the key, you can add the public key to your account on your GitHub instance to enable authentication for Git operations over SSH.
(1) Open Terminal.
(2) Paste the text below, replacing the email used in the example with your GitHub Enterprise Server email address.
ssh-keygen -t ed25519 -C "[email protected]"
Note: If you are using a legacy system that doesn't support the Ed25519 algorithm, use:
ssh-keygen -t rsa -b 4096 -C "[email protected]"
This creates a new SSH key, using the provided email as a label.
Generating public/private ALGORITHM key pair.
When you're prompted to "Enter a file in which to save the key", you can press Enter to accept the default file location. Please note that if you created SSH keys previously, ssh-keygen may ask you to rewrite another key, in which case we recommend creating a custom-named SSH key. To do so, type the default file location and replace id_ALGORITHM with your custom key name.
Enter a file in which to save the key (/Users/YOU/.ssh/id_ALGORITHM): [Press enter]
(3) At the prompt, type a secure passphrase. For more information, see "Working with SSH key passphrases."
Enter passphrase (empty for no passphrase): [Type a passphrase] Enter same passphrase again: [Type passphrase again]
(Copied from Github docs.)
(1) Copy the SSH public key to your clipboard.
If your SSH public key file has a different name than the example code, modify the filename to match your current setup. When copying your key, don't add any newlines or whitespace.
$ pbcopy < ~/.ssh/id_ed25519.pub
# Copies the contents of the id_ed25519.pub file to your clipboard
Tip: If pbcopy isn't working, you can locate the hidden .ssh folder, open the file in your favorite text editor, and copy it to your clipboard.
(2) In the upper-right corner of any page on GitHub, click your profile photo, then click Settings.
(3) In the "Access" section of the sidebar, click SSH and GPG keys.
(4) Click New SSH key or Add SSH key.
(5) In the "Title" field, add a descriptive label for the new key. For example, if you're using a personal laptop, you might call this key "Personal laptop".
(6) Select the type of key, either authentication or signing. For more information about commit signing, see "About commit signature verification."
(7) In the "Key" field, paste your public key.
(8) Click Add SSH key.
(9) If prompted, confirm access to your account on GitHub. For more information, see "Sudo mode."
The Chipyard SoC repository, and more importantly - the VLSI flow and VLSI output files - are too large and compute intensive to run efficiently on most local machines. As such, you will be provided with an instructional account on a separate machine you will SSH into for most of this class. To use your SSH key on that machine, you can use a command like:
ssh-copy-id your_username@instructional_machine
or
ssh-copy-id -i [identity_file] your_username@instructional_machine
where [identity_file] is something like ~/.ssh/id_rsa.pub.
Let us know when the time comes if you have issues with this step.
(1) On your local device, clone this repository.
git clone [SSH Git string]
You will find your unique SSH string in the <> Code tab at the top.
For example, it may look like:
git clone [email protected]:ucb-eecs151tapeout/ucb-eecs151tapeout-fa24-git-basics.git
(2) Go to the STUDENTS.md file and add your name.
(3) Audit the changes.
Run git status.
This command will show you the changes in the repository since last commit.
Make sure STUDENTS.md is listed as modified, and nothing else.
(3) Push the changes to your fork.
git add STUDENTS.md will stage the file for commit.
(Note that while there's ways to stage all changed files at once, that is generally considered bad practice, for example due to the amount of large intermediary files VLSI flows generate. By accidentally commiting those files, you are polluting the repository and making your life much harder.. and Git potentially much slower. So don't do it! You may also want to read up on .gitignore files to make sure some file extensions get ignored by Git automatically.)
Run git status again. STUDENTS.md should now change from red to green.
To create a commit (you can think of it as a checkpoint), run:
git commit -m "This short message should explain what you changed."
If it asks you to set your name and email, follow the prompt. And then to push to the remote repository:
git push
If you don't know what these commands do, check out Resources at the bottom of this README.
(4) Open a pull request to the main repository and submit a screenshot to the gradescope.
To do this, go to the repository main page on Github. You will see a note such as:
This branch is 1 commit ahead of, 1 commit behind ucb-eecs151tapeout/ucb-eecs151tapeout-fa24-git-basics:main.
Click on Contribute and Open pull request.
(Watch for announcements in case we change how we want you to submit proof.)
While this STUDENTS.md change is minor, in large projects, you are normally expected to submit a PR (pull request) to enable your collaborators to review your work before integrating it into the main branch. That is the practice we adopt in the EECS151T Tapeout.
(5) You're done with the Prelab! You can move on the main parts of Lab 1.
If you want more Github practice..
- Go to your user dashboard and create a new repository. Experiment with the features within that repository to familiarize yourself with them.
- Create your profile README. Let the world know a little bit more about you! What are you interested in learning? What are you working on? What's your favorite hobby? Learn more about creating your profile README in the document, "Managing Your Profile README".