Starting with Blade Engine Tutorial 4
tutorial created by Patricio Land
Previous tutorials:
You can download the full project created in this tutorial from here.
--
In this tutorial we’re going to learn how to make different kinds of interactions between the actor player and several objects in a scene.
First of all we’re starting a new project. We’re going to call it tutorial4, but you can use the name of your choice.
As we need to add some images to this scene, we propose you to download the following file to continue.
Inside there’s two folders. One to populate the room we’re creating, the other one contains the animation frames for the actor player.
Then create two separate Atlas, one called Room (put all the files from the room_images folder inside), and a second called Player (and put all the images from the player_animations folder inside).
If you’re unsure about how to proceed check out our first three tutorials and come back-

For this chapter, we’re creating a first scene by the name of '01', with the room background on it, as shown:


Now it’s time to add some items inside the room. The most obvious is going to be our actor character, our player. For this actor we’re using the animations from the Player Atlas you created before.
Set a scale factor of '1' for it, a zindex of '2', and a walking speed of '600'. Also don’t forget to established a walk zone, set the P icon next to the Player and select the stand.left as the 'init' animation for him.
Save and Test. Our character should be able to move around the room inside the designed walking zone.

Next add an sprite actor by the name of 'Ball' whit a zindex of '3', add the text ‘A tennis ball’ into the description field and use the animation ball from the Room Atlas.
To make things more interesting, create another sprite actor, call it Spider (zindex of '1', description ‘A spider’, speed '2') and use the 'spider_ani' animation from the Room Atlas for it (be sure to se it as repeat animation kind).
Make sure to place the little creature over the drawers, where the mice is having some rest.
The scene should now look as much as this:

Test the scene. When you place the mouse over the ball it should read ‘A tennis ball’ and ‘A Spider’.
Sometimes you need to make interactions with objects that are already drawn in the background, as the window in this room. In this case we use the Background actor type.

After creating the Background actor you´ll notice a blue rectangle in the scene. Drag this rectangle to over the window and shape it moving the little boxes around. You can add more vertex double clicking on it if needed (Ctrl+double click to delete).


Don´t forget to add a description to this element. Remember that you can always edit the actor with the little pencil icon in the menu.
Test the scene. If you move the mouse pointer over the window the associated description should be visible, in the same way it appears for the rest of the actors.

Now move the pointer closer to the Spider actor and hit the Left Mouse Button. A new message pops up showing the phrase ´For what?´. In the same way, if you click the Right Mouse Button and the text ´I´m not interested´ will be shown in a small text frame.

The first action -clicking the LMB- corresponds to the verb Pickup and the second -clicking RMB- to the Lookat verb. As you may know, in a classic Point & Click adventure we make our way interacting with objects, examining them, using them, placing or combining them into our inventory and many, many other actions designed in order to solve the puzzles.
Keep in mind that Pick and Look are the most common actions, but you can develop as many commands as you need. In fact, those two verbs are so essentials that are already set by default with associated standard messages.
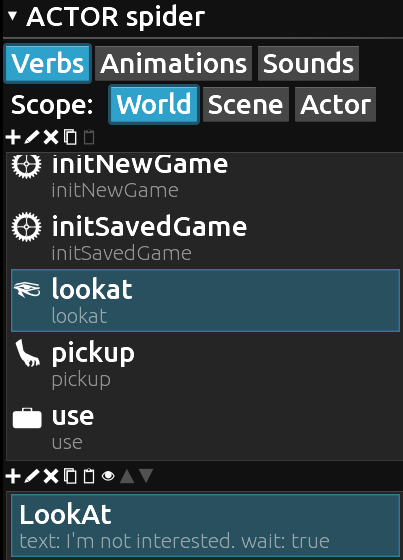
With the 'Spider' actor selected, focus in the right menu of the editor. Hit the World button and a list of verbs will be shown.
Scroll down in order to see the complete list. Here´s where the default Lookat, Pickup and Use verbs exists.
With the Lookat verb selected check the second menu at the bottom of the list. Edit it and you´ll be able to modify the default message we talked about. Same thing for Pickup.
Use is a little bit more complex and we´ll back in a future tutorial devoted to the Inventory.
Remember that this is a general setup for every object in the room (actually there´s no actor attached to those verbs here, you can check this while editing the content of each command). But having the same reaction for all the elements of the scene is really kinda dull. Right!
In order to add more variety and fun to our game we must assign to every actor a list of actions or verbs.
To do that select an actor, let´s start with the Ball.
After selection the 'Ball' in the Scene Menu to the left, be sure to click on the Actor button on the Right Menu. The menu is empty by the moment, so we´re going to populate it. Hit the plus icon and a new window will pop. This is the Create Object window, and from it we can set the verb we need from a short list:
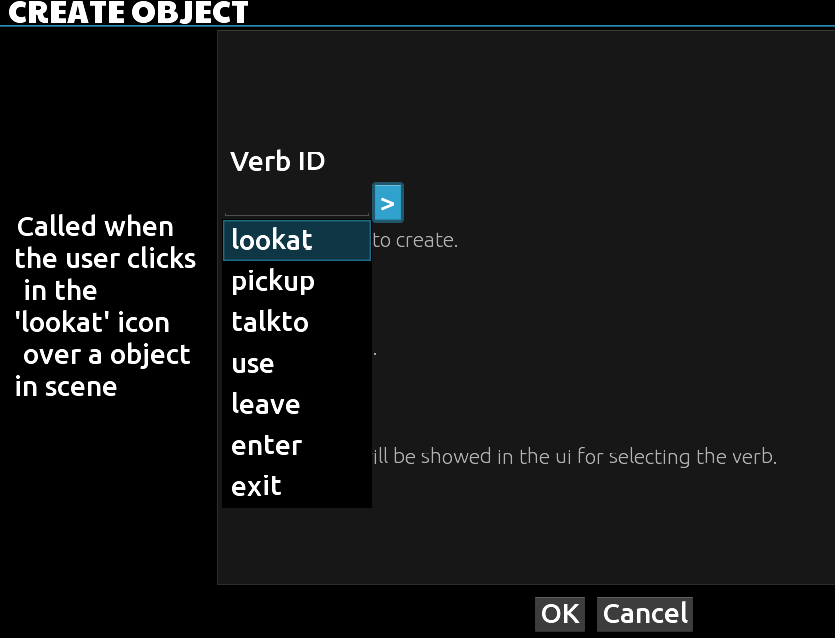
From the list select the lookat verb ID and leave the two other fields unchanged. Short after that, the Lookat element will show in a new list of commands. Notice that there´s an associated icon (the eye) to it.
Now we need to add actions to this verb in order to personalize it. Hit the little pencil button (from the second half of the menu) and in the new window choose the action Say.
This will allow us to make the current actor player say something about the object, so also set the Actor field to $PLAYER (remember that with this engine we can have several actor players in the same scene, each one will be identified with it´s own name but a fast way to identify the current player actor is to use the $PLAYER option).
Add a phrase in the Text field. Something like ´A tennis ball, my dog loves to play with it!´
This text will be said by the player when looking at the ball.
Leave the others fields in the default mode and hit OK.
Test the scene, move the pointer over the tennis ball and click the RMB to perform the Lookat verb, as in the picture.

Now we can proceed to complete the Pickup verb in the same fashion as we did with Lookat.
Select the 'ball' actor in the left menu, add a Pickup verb and edit it to put the text ´Just what i was looking for!´ on it. Notice the little hand icon next to the verb.

Test the scene, now we have two actions for the ball. The RMB that activates the Lookat and the LMB that is associated to the Pickup verb.
Keep in mind that at this moment the Pickup verb is just showing a phrase played by the main actor but it´s not actually picking up the ball because we´re just adding a Say action to it.
Before adding more complex stuff let´s see another approach to this method.
Having to do this kind of blind navigation with the mouse buttons it´s not for everyone. Even worst, it will be inconvenient for touch devices as tablets or smart phones.
Good news are that we have a full set of options to choose from. Go to the right side of the editor and select the Game Props button and check the Ui_mode element. Right now is set to TWO_BUTTONS, change it to the PIE option.


Run again the scene. Right or Left click over the ball and see what happens! Now each action is shown as an icon (the eye for the Lookat and the hand for the Pickup). Nice, isn´t it. And the better part is that you can even change the image for those icons to suit your needs. What a delight of engine!

The try to click on each icon and check how they work.
For the most part, the Lookat verb is almost complete, but we must add more love to the Pickup action.
First of all the player must go near the object he wants to put into his pocket. So let´s make the player move towards the ball.
Go to the right menu of the Editor, and with the Pickup verb (for the ball) selected, hit the plus button in the second half of the menu to create a new element.
In the new window choose the verb Goto, select the current player to perform the action, and the 'Ball' actor as destination.
Notice that you can also specify a set of (X, Y) positions in the screen if you need more accuracy. This position is relative to the target actor if selected. If the target actor is empty, the position are absolute world coordinates.
After that, add a new action with the plus button. This time choose Animation from the list. And set the other parameters as in the following image.

As you can see the pick-up animation we had ready in the atlas for our character actor will be fired up when it reaches the ball.
Let´s check if this works.
Run one more time the scene. Click on the ball and then click on the Pickup icon. The player will say his line, then walk to the ball, and finally move down to reach the green sphere.
The only thing is…the ball stays put on the floor!
In fact, everything is all right. We must tell the engine to pick the object and do something with it. One possibility is to put the ball into the character´s inventory.
During running time you´ll notice a little whit bag at the left bottom corner of the screen This is the icon that for the inventory. Click it (or hit the middle mouse button) and it will reveal it contents. A large rectangle will pop at the bottom of the scene. As black and empty as my real pockets!

Click again on the little bag to close it.
Next step is to move the ball into the inventory and keep it safe!
As you may imagine is just a matter of use the correct set of verbs into our task list.
Add a Pickup Action to the list, choosing the right name of the scene and the actor to be affected. In this case, the ball.
By the time moment we have not an special animation for this element inside the inventory so we leave the last field blank.

But we´re not done yet. It´s always a good idea to confirm the action with a text in case the human player misses the subtle shake of the white bag indicating that something went inside the inventory.
Add a final verb with a Say action and use some funny phrase like ´Got it! Ouch, it´s all covered with dog slime!´.
After that the complete set of verbs will look like this

Play the whole scene. Take the ball. Check if this time it goes inside the inventory.

There´s still plenty of room to improve. You can modify the order of the verbs in the list to have a better performance.
What about make him talk after he approaches the ball? Try to figure out what happens if you change the Wait field of the first Say verb to false. Do some experimentation, are you brave enough to put the ball again in the floor?
Don´t worry if you not, we´re taking a deeper look to the inventory system next time.
Until then, have some blade-fun!